You can create a campaign to send actual push messages. Click on the Register Campaign Button on the list and enter the corresponding page. The elements required for campaign dispatch should be registered in order from the top, and since there is a lot of information required, we provide convenience features such as loading pre-entered texts.
You can return to the top of the page by clicking the right [top] button in all areas. If you try to save without filling out the required fields, the page will automatically scroll down to that empty field.
Campaign Title

Enter a campaign title. You can enter up to 50 characters in Korean.
If you have a pre-registered title template, you can import the text by clicking the Load Title Template Button on the right.
To save the title text you just entered as a title template, press Save as Title Template Button.
App(Game)
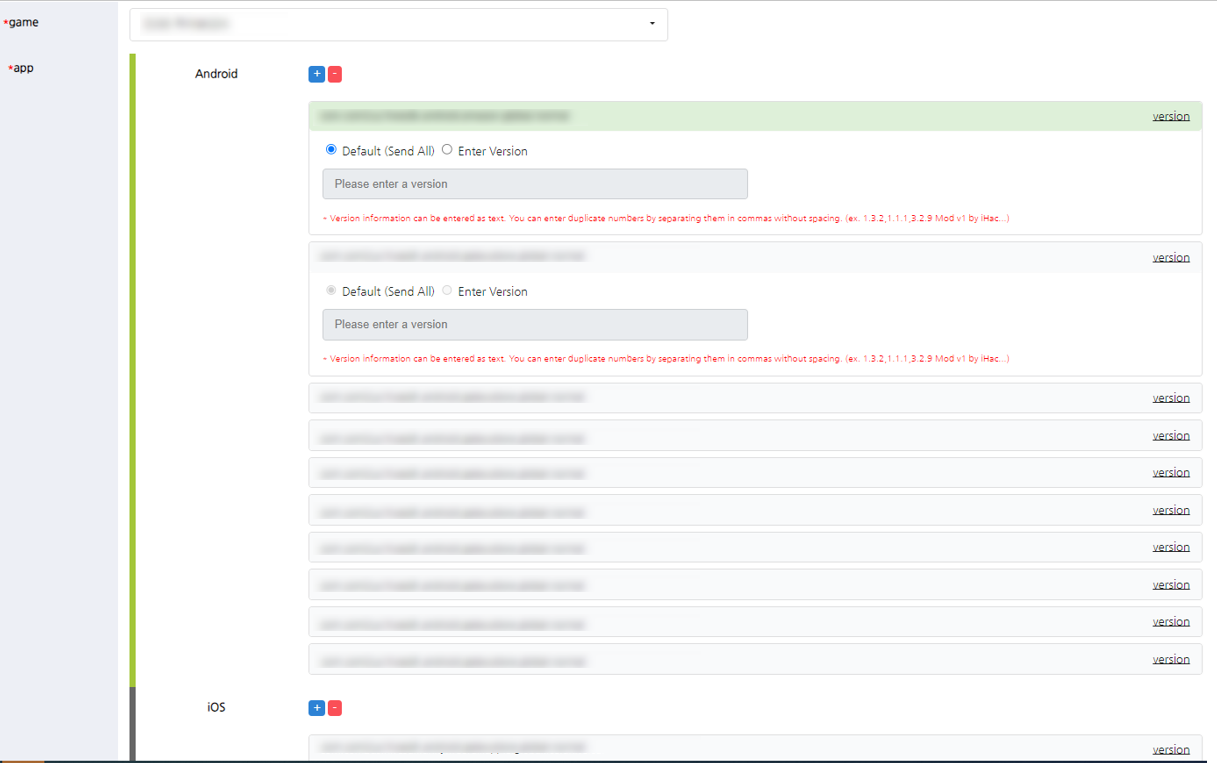
Select the app (game) that you will send the campaign to. One campaign can send a message to only one app (game). Search and select an app (game) title to view a list of all apps registered with that game title. You can choose both Android and iOS apps at the same time, or you can choose one or more apps.
If you want to send a campaign only to a specific version of the selected app, please click the version button on the right of the app information. The default is to send campaigns to all versions of the app, so you don’t have to make any adjustments if you don’t want to specify the version.
When you click the version button, the area for selecting a version expands down, and you can enter the desired version. You have to enter the text of the desired version directly, so please check the version information you want to send in advance.
Delivery Target

Select the delivery type.
If you select Bundle, campaigns will be sent for all tokens for that app.
If you select Targeting, you can send targeting push by selecting pre-registered targeting data. You need to register the targeting data separately in the Push > Register Targeting Data menu. If you have pre-extracted targeting data, you can register the data in the Register Targeting Data menu and enter campaign details. If you search for targeting data based on registration date, the data registered in the Register Targeting Data menu will be displayed. Find and select the targeting data you want to use.
If you register by going to Analytics v2> Segment> Register Targeting Campaign menu, the delivery type is fixed as targeting and the targeting data generated in the segment is automatically registered. In this case, the targeting information cannot be modified.
Delivery Location
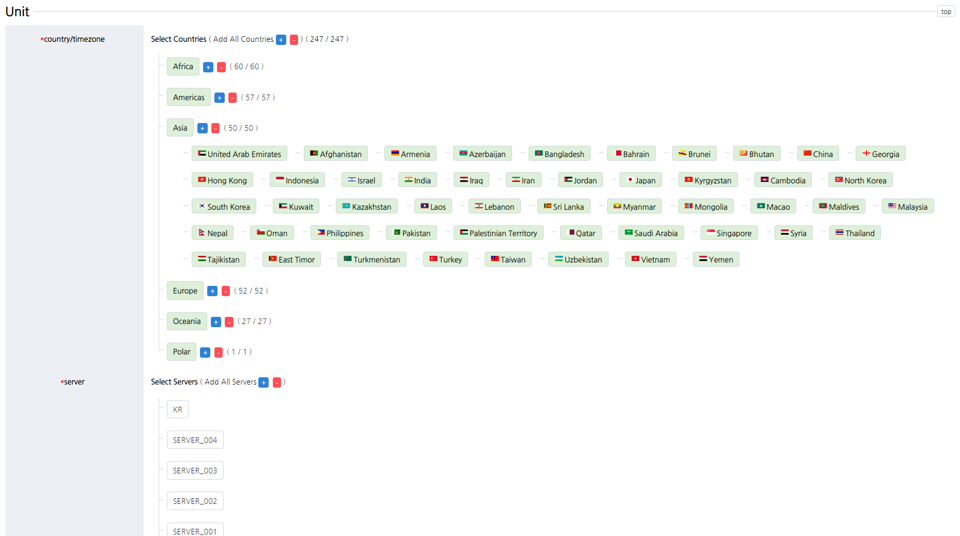
Select the delivery location. Click [‘+’] or [‘-‘] to select all or dismiss all of the lower categories.
You can send campaigns by server/country/time zone at the same time.
When sending by country/time zone, click on the continent name you wish to send to unfold the list of individual countries below.
Server information automatically displays a list of servers in that app (game). If you select a specific server and specify a country/time zone, the message may not be sent if there is no user info that matches the country/time zone within the selected server. In other words, if you select “Korea” server and you specify the country as ” Americas>United States”, there may be no target. In contrast, if you wish to send push message specific to “Asia/South Korea” users within the “U.S.” server, you may send a message by specifying above without a separate targeting. Please specify a location value appropriate for the purpose of delivery and target.
Delivery Reservation
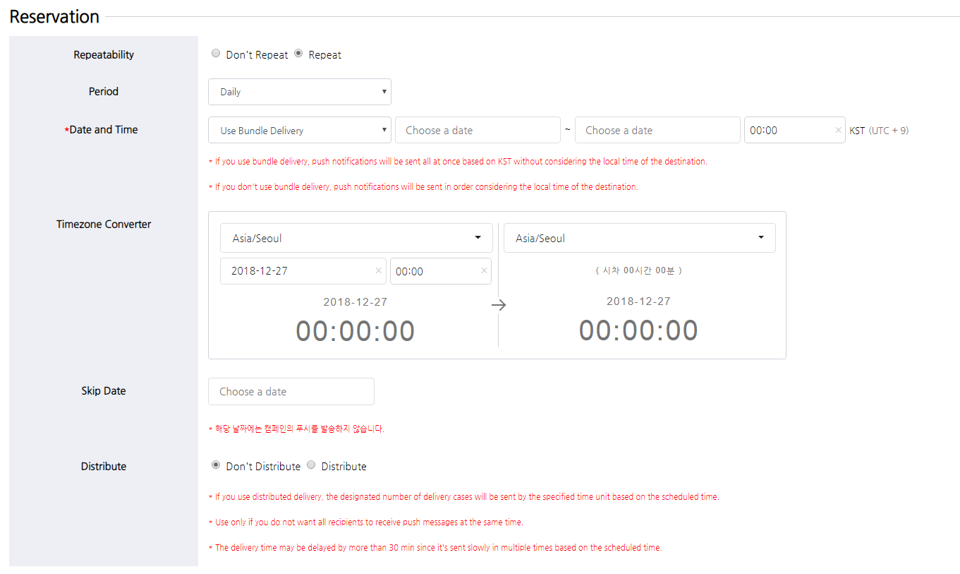
Specify when you want to send the campaign.
Please select whether or not to repeat first. If you select Repeat, you can set the repeat interval as “daily” or “weekly” and also select a date interval to repeat. If you select “weekly” and select all 7 days, campaigns will be sent every day as if you’ve selected “daily”. If you want to repeat the campaign but don’t want to send a campaign on a specific date, you can select the desired date on the “Skip Date” field and add it.
Select the date, whether to use bundle delivery or not, and time. Time is based on Korea Standard Time (UTC +9). When using bundle delivery, campaigns are sent at once based on the time entered (KST) without considering the local time of the destination. You can use the “%hh:mm%” conversion code when you enter messages in this case only.
If bundle delivery is not used, the delivery takes into account the local time zone according to the time zone of the destination. That is, you enter 3pm, campaigns will be sent in order at 3pm based on the local time. %hh:mm% conversion code cannot be used.
If you want distributed delivery, you can send the specified number of delivery by time. If you set to send 10,000 cases per minute, 10,000 cases will be sent first at the designated time and 10,000 cases per minute to the remaining targets. If there are too many targets and the unit is small, it may take a long time for the last person to receive the campaign. There is no limit to the number of cases to be sent or unit of time. Please use the function only if you do not want all recipients to receive push messages at the same time.
Message
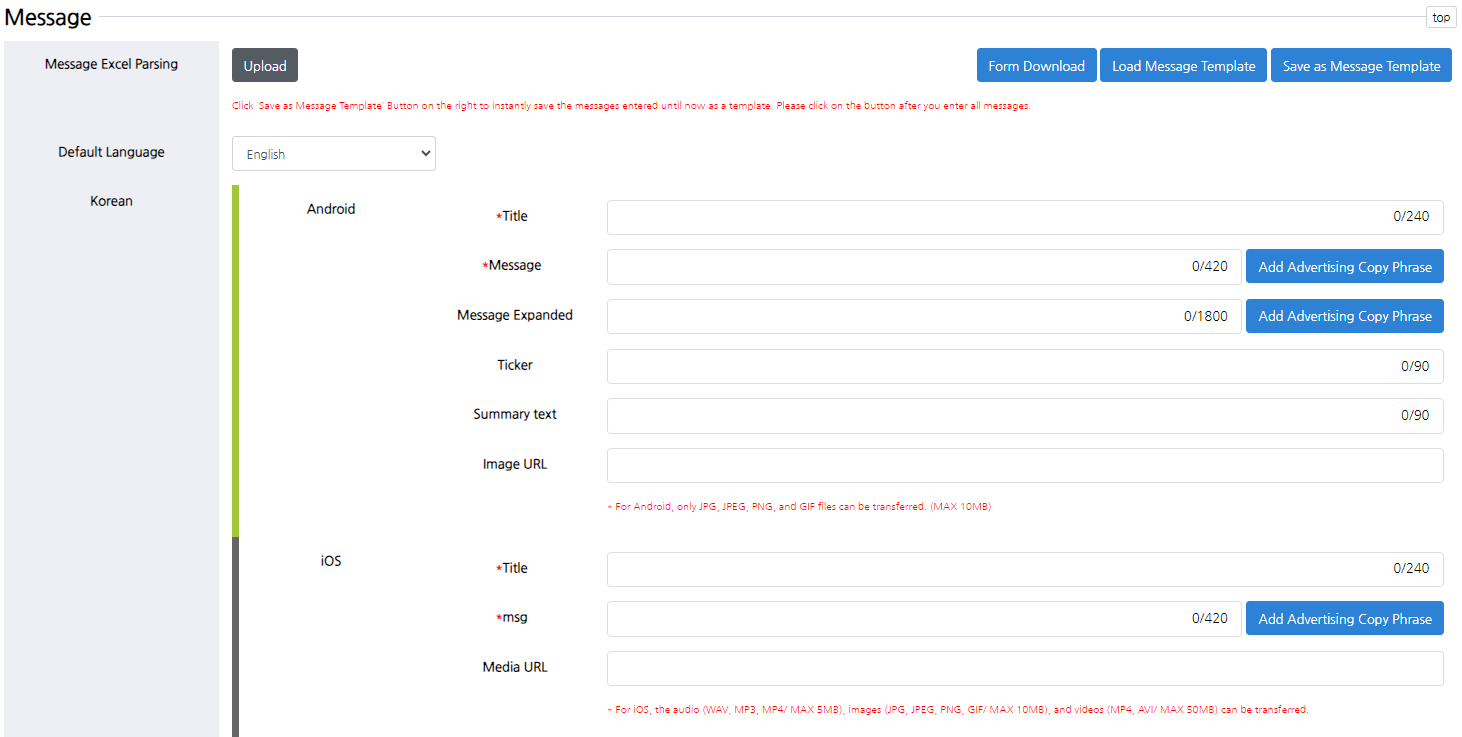
Enter the contents of the campaign to be sent. The detailed functions of each input form are as follows. (As the features of iOS are the same as Android while iOS has simpler format, the guide has been written based on Android.)
| Title | 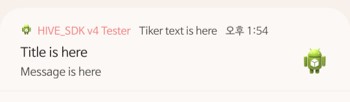
A title text of the received push notification. Required field. (“Title is here” area) |
| Message |
Body texts of the received push notification. (“Message is here” area) If the text exceeds 70 characters (KR), it will be displayed as “…” mark. Therefore, if you need to enter messages longer than the MAX character limit, you must use the Expanded Message section. |
| Message Expanded | 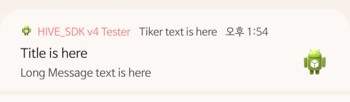
If you’ve entered an expanded message, you can swipe down the received push notification to view the expanded message texts. (“Long Message text is here” area) |
| Ticker |
Ticker is a separate text that can be displayed next to the app icon in the carrier bar and app name in the push notification window when a push notification is received. (“Ticker text is here” area) However, the location of the ticker may differ by the Android OS and service provider, so it may not be displayed the same as the example image above. |
| Summary text | 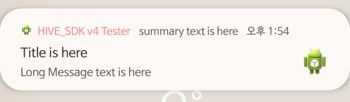
You can enter summary texts. (“summary text is here” area) However, as it uses the same field as the ticker in Hive push services, only the texts you enter in Summary Text will be shown when you enter texts for both fields. |
| Image URL | If you enter an external image URL, you can send the image along with the push notification. As direct image upload is not supported in the delivery stage, please upload the image to a separate space in advance and use it as an external URL format only. |
Like the title, if you have a pre-registered message template, you can load the text at once by clicking the Load Message Template Button on the right. You can also save the message texts that you just entered directly as a template.
Alternatively, you can upload a pre-registered file to register the message. Please click the Form Download Button to download the form and enter the message in advance.

The first time you download a template, the contents will be empty and the template will only contain headers. Please fill out the required field as shown in the upper sample. The rightmost “isDefault” column indicates which language should be designated as the default value, and you only need to enter Y in one of the languages.
Messages are supported in a total of 16 languages. The five major languages, such as Korean, Chinese, Chinese, English and Japanese, are unfolded by default, and the other 11 languages can be unfolded by clicking the “Show Other Languages” button.
| Korean(ko) | Chinese simplified(zh-hans) | Chinese Traditional(zh-hant) | English(en) | Japanese(ja) | – |
| Arabic(ar) | French(fr) | German(de) | Spanish(es) | Portuguese(pt) | Thai(th) |
| Italian(it) | Russian(ru) | Indonesian(id) | Vietnamese(vi) | Turkish(tr) |
When you enter multiple languages, if a language besides the default languages is included, push will be sent to that language as long as it matches the language value saved in the recipient token in the server. If you have not entered a language that matches the language value stored in the recipient token, messages entered in the Default field will be sent. Therefore, the default value is required. In other words, if you want to send push in English globally regardless of the region, simply enter the English text in the Default field and leave the rest of the language blank. Please be aware that text entered in the English field can only be received by a user whose language value of the token is set as English.
For example, if you want to send push in English to all users except Korean users, you can add English to the default field and add Korean text to the Korean field.
If you select both Android and iOS apps, you can enter the message to send at once. The form required to send push messages to Android and iOS apps is different, so please check the format of push messages you would like to send. For both Android and iOS, you must fill out the Title and Short MSG (message) fields.
For media, you can only send one of the JPG/ JPEG/ PNG/ GIF files (images only, 10MB MAX) for Android. For iOS, you can send not only images but also audio and video files for devices with iOS 10 or higher. Please refer to below for transferring media on iOS.
Preview
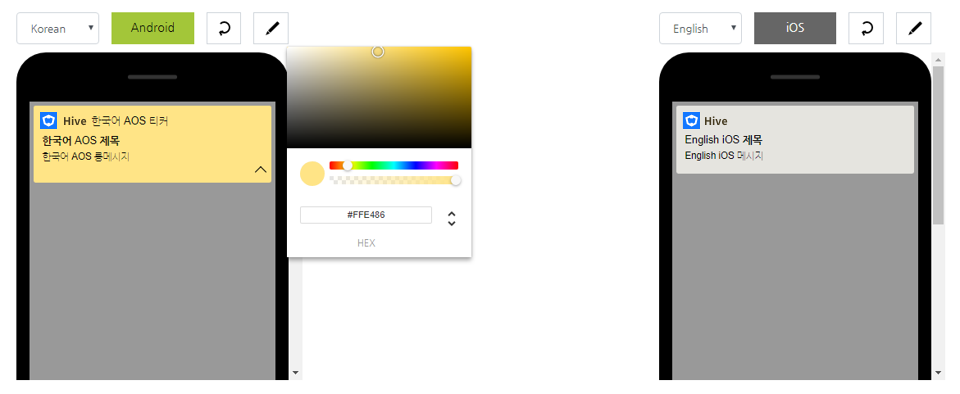
When you have finished entering the message, you can check how the message will be displayed on the actual device in the preview area. The image on the left is a preview of Android and the one on the right is a preview of iOS. You can change the background color of the push notification UI by clicking the color picker button on the top of your device. If you have applied font colors, you can use this feature to check in advance whether you can see the text well on a particular background color.
You can also preview a media, if attached. You can double check if an invalid media has been inserted.
Option

Select delivery-related options. All are optional. Apply it only if you there are necessary functions.
Designating Notification Sound
Sets the notification sound to be heard when users receive a push notification. Please enter the resource name included in the game client.
Designating Push Icon
You can change the icon to be displayed on the screen when users receive a push notification.

When disabled, the App icon will be displayed as the image on the left by default. However, you can designate an icon like the image on the right by using the feature.
To enable the feature, please enter the resource name included in the game client or enter the image web url.
Vibration
You can set whether to make the device vibrate or not when users receive a push notification.
Overwrite
Select whether or not to use the overwrite function when users receive push notifications. Specifying one of the code values from 1 to 99 automatically enables the overwrite function.
The overwrite function is a function that overwrites any previous push with new push based on a push code regardless of whether a user has checked the push content or not. If the user hasn’t checked the messages sent earlier, you’ll be sending a new push, overwriting previous push messages, without adding new notifications to the user’s device. The primary purpose of this function is to prevent spamming users with push notifications and increase the amount of push messages actually read by users. However, it can also be used in cases where you don’t want users to read earlier push messages, especially daily push messages whose compensation expires in one day.
Here’s how to use the overwrite function: If you sent a push using code number “1” for “Game A” for a campaign on the previous day, you should send the push with the same condition (using code number “1” for “Game A”) for the campaign to be sent on the following day. In this way, the overwrite function will be enabled and the new push will overwrite the push that was sent on the previous day. (However, the overwrite function only works if the user has not read the push. The push that the user has already read has nothing to do with the overwrite function.)
Enter comments such as the purpose of using the overwrite function and comments, if necessary, as you can use comments to search for push messages on which the overwrite function has been used. Entering a comment is not mandatory.
User Engagement
You can set whether to use the User Engagement or not.
User Engagement is a feature supported in Hive SDK v1.10 and above to support deeplinks in push.
You can insert a link in a message sent via text (SMS) or push notification so that users can access and get to a specific location in the game. You can also insert a coupon value in the deeplink and send so that the users can claim rewards directly from the inbox in the game when they tap on it.
To use the in-game deeplink, simply enter the name of the game/APPID/issued download URL/target location to create a link and insert the generated URL into the push.
Scheme option values are as follows.

Unused is a value selected when you don’t use the feature. Select UE if you want to enable the User Engagement feature.

The above is displayed if UE you select in the previous combo box. If you select “GAME”, you’ll be able to enter the content based on a format designated in the game. This is a setting to let you be directed to the game’s internal functions and you need a predefined path value. Please contact the corresponding game team for path values. If you select “Hive”, you’ll be able to enter the content based on the format predefined in Hive. When selected, the second combo box will be enabled, allowing you to select a preset value.
The detailed list of available Path List by scheme option is as follows.
For Addresses within Hive
| AppID://hive/authlogin | Moves to the Hive login page. If one is logged in as a guest, he or she will be moved to the official login page. If one is logged in via official Hive account, he or she will be logged in automatically without exposing the page. |
| AppID://hive/socalinquery | Moves to the 1:1 Inquiry Page. |
| AppID://hive/socialmyinquiry | Only users who have logged in as a Hive member will be directed to My Inquiries. |
| AppID://hive/promotionshow?type={number} | Moves to the custom view page that has the viewed that corresponds to the value entered as the type value. |
| AppID://hive/offerwallsh | Moves to the Offerwall Page. (Android Only) |
| AppID://hive/promotioncoupon?couponid={couponid} | Consumes coupons entered with Couponid. Results will be delivered to C2SModuleApi_EngagementConsumeCoupon as a callback. |
| AppID://hive/socialmessage?uid={uid}&text={message} | Enter the user uid info in the uid field and details in the message field to check the details in the Hive message. |
| AppID://hive/socialinvitation?uid={uid} | Enter the user uid info in the uid field and the invite message will be sent to the corresponding user. |
For Addresses within Games
| AppID://game/{path}?{query} | A schema used to move to the game’s internal functions. Enter the path value defined in the game. (Contact the game team for path value)
“C2SModuleApi_EngagementProcessScheme” callback will occur. If this callback occurs, you must check the delivered event date and perform a corresponding action. |
Time Sensitive
Only available for iOS 15 or later. Users can receive notifications if they have additionally set the app to “Allow Time Sensitive”.Bulk push notifications with ad are not supported. However, please use it only for “time sensitive notifications”.
Ex) Account security notifications that require immediate confirmation, products that must be received within a specific time period, etc.
Refer to iOS 15 or later OS settings flow
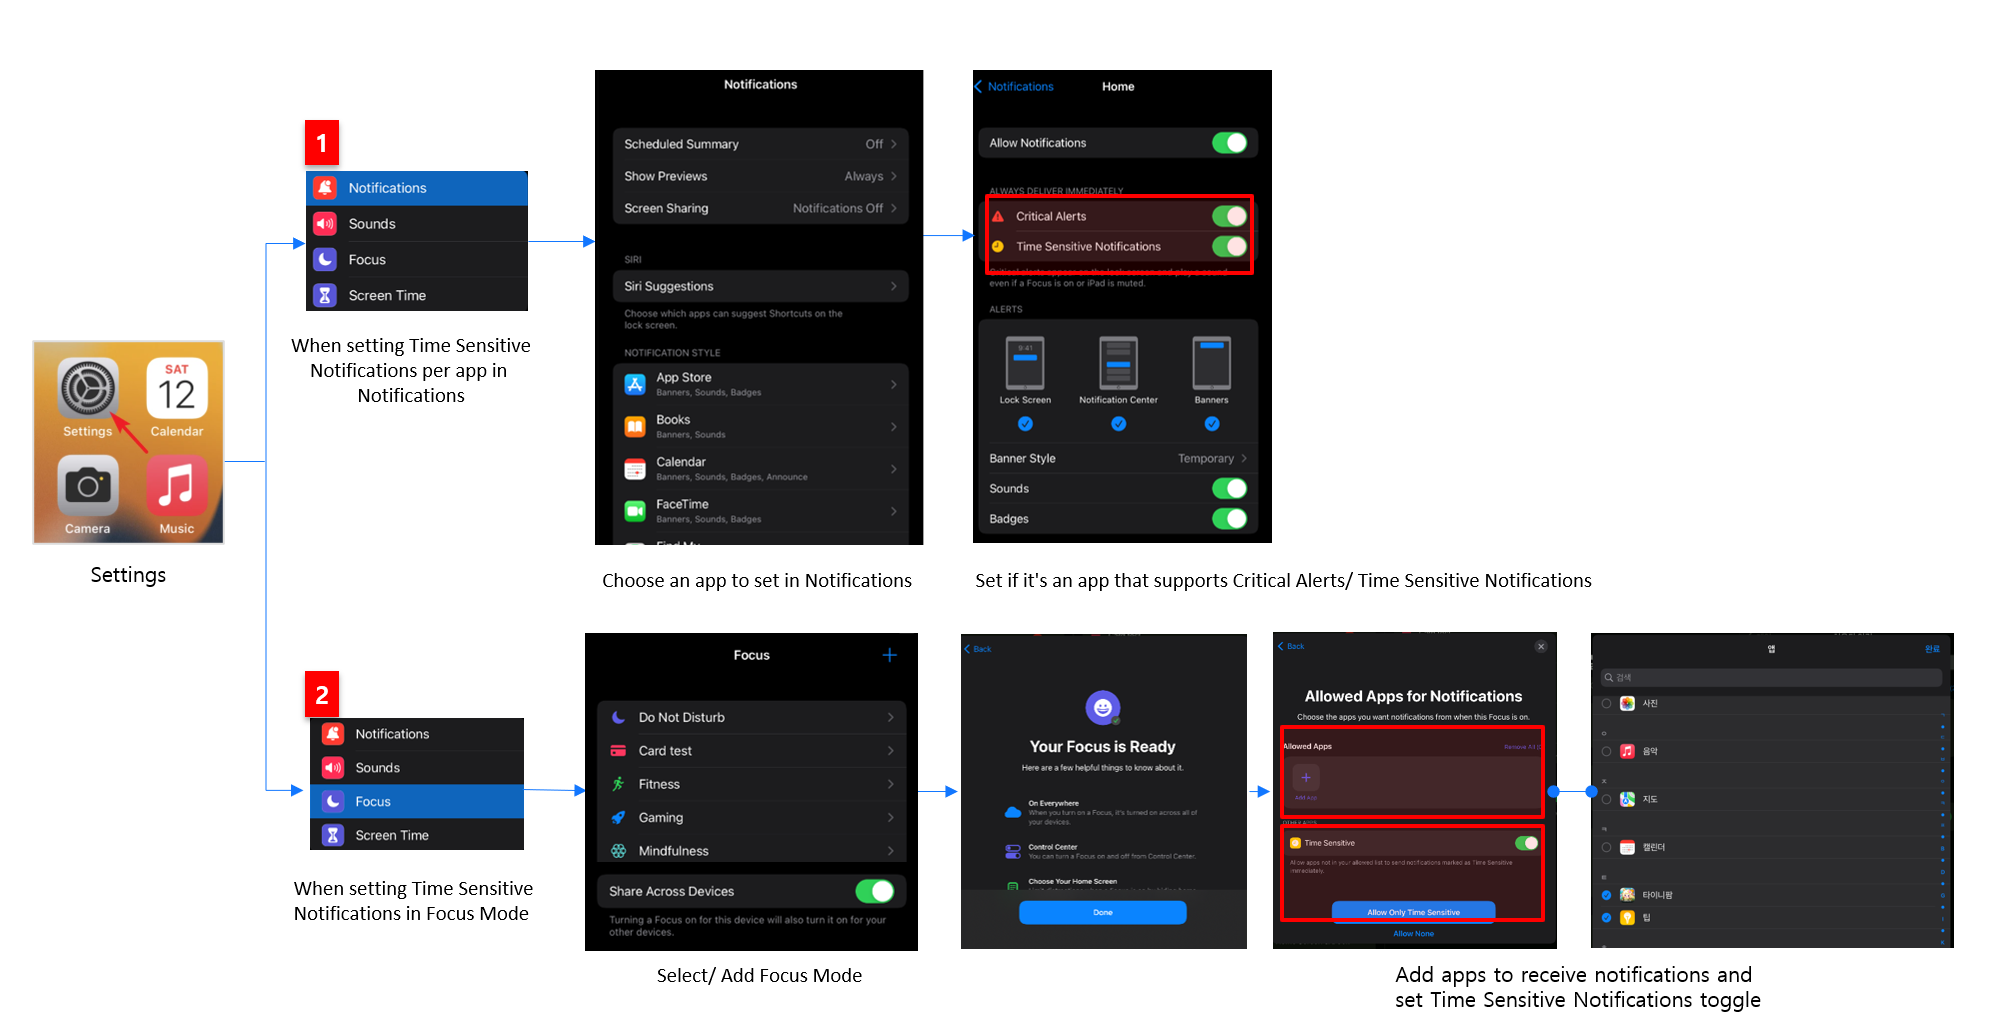
Unused is a value selected when you don’t use the feature. This is the default.

Select Use when you want to use the Time Sensitive Notifications function. The option values for Time Sensitive Notifications are as follows.

Note
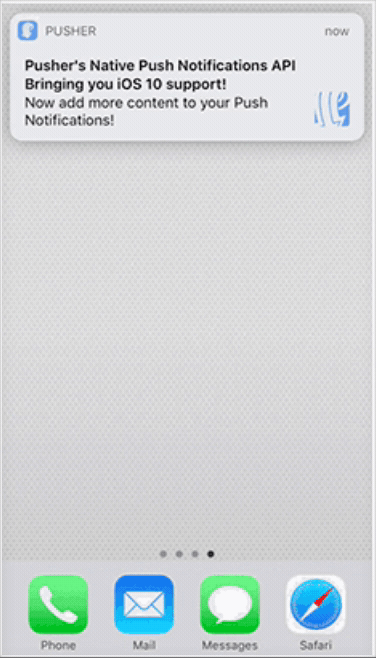
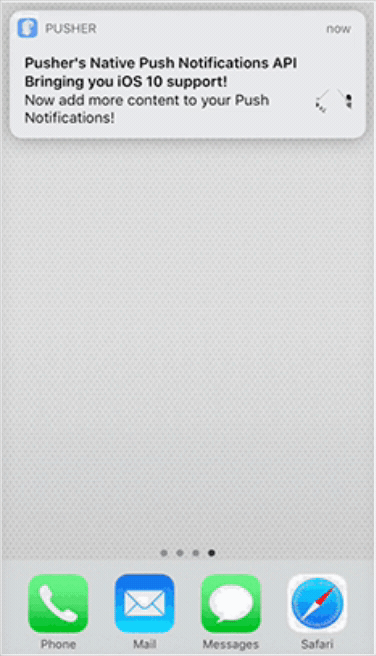
What is iOS Notification Service Extension?
This is a feature which utilizes new UserNotiTcations.framework feature added in iOS 10. It allows you to add and transfer media (image, audio, video) to the push notification area.
 |
 |
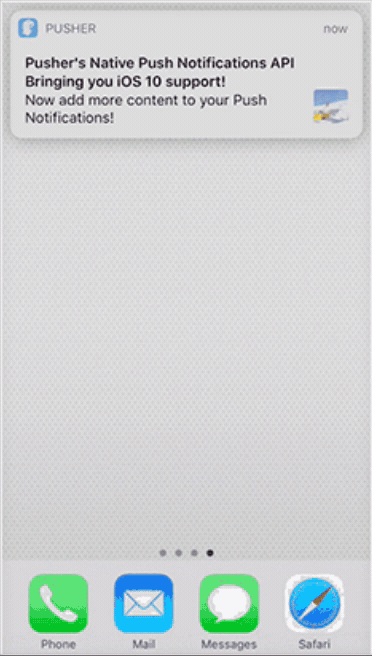 |
The feature is available on devices installed with Xcode 8.0 or higher, or devices with iOS 10 or higher. On devices with versions lower than these, users will receive the same push as before even if you use this feature.
The allowed media types and capacities are as follows:
| Category | Type | MAX Limit |
| Audio | WAV, MP3, MP4(Audio) | 5MB |
| Image | JPG, JPEG, PNG, GIF | 10MB |
| Video | MP4, AVI | 50MB |
What’s iOS Provisional Authorization?
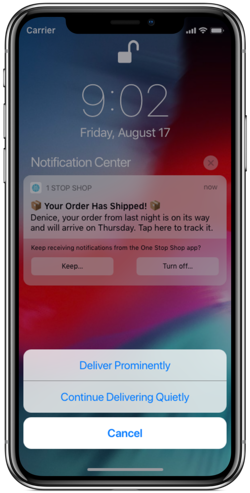
It’s a new push notification receiving feature for iOS 12 and up.
On OS versions applied with this feature, push notifications will not be displayed immediately when received. Rather, a user must swipe down from the upper iOS notification center to view the push notification. All notifications received in this way will ask the user if he or she wants to continue receiving notifications in the same way by default.
The user can specify how he or she wants to receive notifications from the app by tapping the “Keep” button. If the user finds the notification of the app useful, he or she can tap “Deliver Prominently” to have the app send notifications as normal. Otherwise, he or she can tap “Continue Delivering Quietly” to continue to receive notifications quietly.
Users can tap “‘Turn Off…” to move to a screen where they can turn off the corresponding app’s notifications.