Hive Adiz iOS
Hive Adiz iOS is an advertising module for iOS provided by Hive to make it easier to use the advertising exposure features offered by AdMob. The types of advertisements provided by Hive Adiz iOS are as follows:
- Interstitial ads
- Banner ads
- Native ads
- Rewarded ads
- Rewarded Interstitial ads
- App Opening ads
To install and use Hive Adiz iOS, please refer to the guide below in order.
Pre-requisites
Configure Hive Adiz iOS development environment.
Installation
Add the GADApplicationIdentifier key to the Xcode project’s Info.plist file, and add the AdMobId value (the format in ca-app-pub-XXXXX~YYYYY) as the value for this key.
|
1 2 3 4 |
<key>GADApplicationIdentifier</key> <string>ca-app-pub-XXXXX~YYYYY</string> |
Additionally, on iOS 14 and above, refer to the Update your info.plist guide to add the SKAdNetwork list to your Info.plist file.
After that, add the followings to the CocoaPods configuration (Podfile) of your project.
|
1 2 3 4 5 6 7 8 9 10 11 12 13 14 15 16 17 18 19 20 21 22 23 24 25 26 27 28 29 30 31 |
source 'https://github.com/CocoaPods/Specs.git' source 'https://github.com/Com2uSPlatformCorp/HiveAdiz-iOS.git' platform :ios, '12.0' target 'UnityFramework' do pod 'HiveAdizUnityPlugin', '2.0.1' end target 'Unity-iPhone' do end use_frameworks! # fix for dyld issue in pods when using Project post_install do |installer| installer.pods_project.targets.each do |target| target.build_configurations.each do |config| # xcode 15 Toolchain Issue xcconfig_path = config.base_configuration_reference.real_path xcconfig = File.read(xcconfig_path) xcconfig_mod = xcconfig.gsub(/DT_TOOLCHAIN_DIR/, "TOOLCHAIN_DIR") File.open(xcconfig_path, "w") { |file| file << xcconfig_mod } # end config.build_settings["BUILD_LIBRARY_FOR_DISTRIBUTION"] = "YES" if config.build_settings['IPHONEOS_DEPLOYMENT_TARGET'].to_f < 12.0 config.build_settings['IPHONEOS_DEPLOYMENT_TARGET'] = '12.0' end end end end |
Run $pod install to apply CocoaPod settings.
Setup Test Ads
Hive Adiz allows you to display test ads in two ways.
- Enable test mode: Only display test ads issued by AdMob.
- Register test devices and display ads: Display real ads for testing purposes. Register the devices to display test ads to ensure no invalid traffic occurs during testing.
Enable Test Mode
During the development phase, enable test mode so that clicks on test ads do not incur charges to advertisers. When test mode is enabled, only AdMob test ads are displayed. In test mode, you do not need to enter the AdMob ad key in the Hive console to display test ads. Disable test mode for commercial distribution.
|
1 2 3 4 5 6 7 8 9 |
import HiveAdiz // Activate the test mode. Comment out the line below for commercial distribution. Adiz.setTestMode(true) // Enable logging for Hive Adiz module. Logging should only be used in test mode. Comment out the line below for commercial distribution. Adiz.setLogEnable(true) |
|
1 2 3 4 5 6 7 8 9 |
#import <HiveAdiz/HiveAdiz-Swift.h> // Activate the test mode. Comment out the line below for commercial distribution. [Adiz setTestMode: true]; // Enable logging for Hive Adiz module. Logging should only be used in test mode. Comment out the line below for commercial distribution. [Adiz setLogEnable: true]; |
Setting up test devices for ad display
You should register a test device to display test ads in the following situations:
- When testing if the AdMob ad key registered in the Hive console works properly
- When you want to ensure the GDPR consent popup is working correctly after you wrote a GDPR message
- When you need to run the Ad Inspector to analyze and debug ad requests
Testing with real ads without registering a test device may be considered invalid traffic, leading to your AdMob account being blocked and no longer being able to display ads. When you register a test device, “Test Mode” or “Test Ad” (for native ads) will be displayed during ad display. Test devices should be disabled for production deployment.
Banner, Interstitial, or Rewarded Ad

Native Ad
To register a test device, first identify the test device ID. The test device ID (e.g., B74F6468-1516-467C-99AD-CC5973C5DB52) can be found using the following two methods:
- Check the Logcat logs after calling
Adiz.Initialize():
To enable debug mode for this device, set: UMPDebugSettings.testDeviceIdentifiers = @[B74F6468-1516-467C-99AD-CC5973C5DB52] - Check the Logcat logs after calling
Adiz.Initialize()and then callinginitialize()→load()regardless of the ad type:
GADMobileAds.sharedInstance().requestConfiguration.testDeviceIdentifiers = [ "B74F6468-1516-467C-99AD-CC5973C5DB52" ]
After identifying the test device ID, add the line Adiz.SetTestDevice(DEVICE_ID) before executing Adiz.initialize in the existing Hive Adiz initialization code. Replace DEVICE_ID with the copied test device ID.
|
1 2 3 4 5 |
func setTestDevice(testId: String) { Adiz.setTestDevice(testId) } |
|
1 2 3 4 5 |
- (void)setTestDevice: (NSString *)testId { [Adiz setTestDevice: testId]; } |
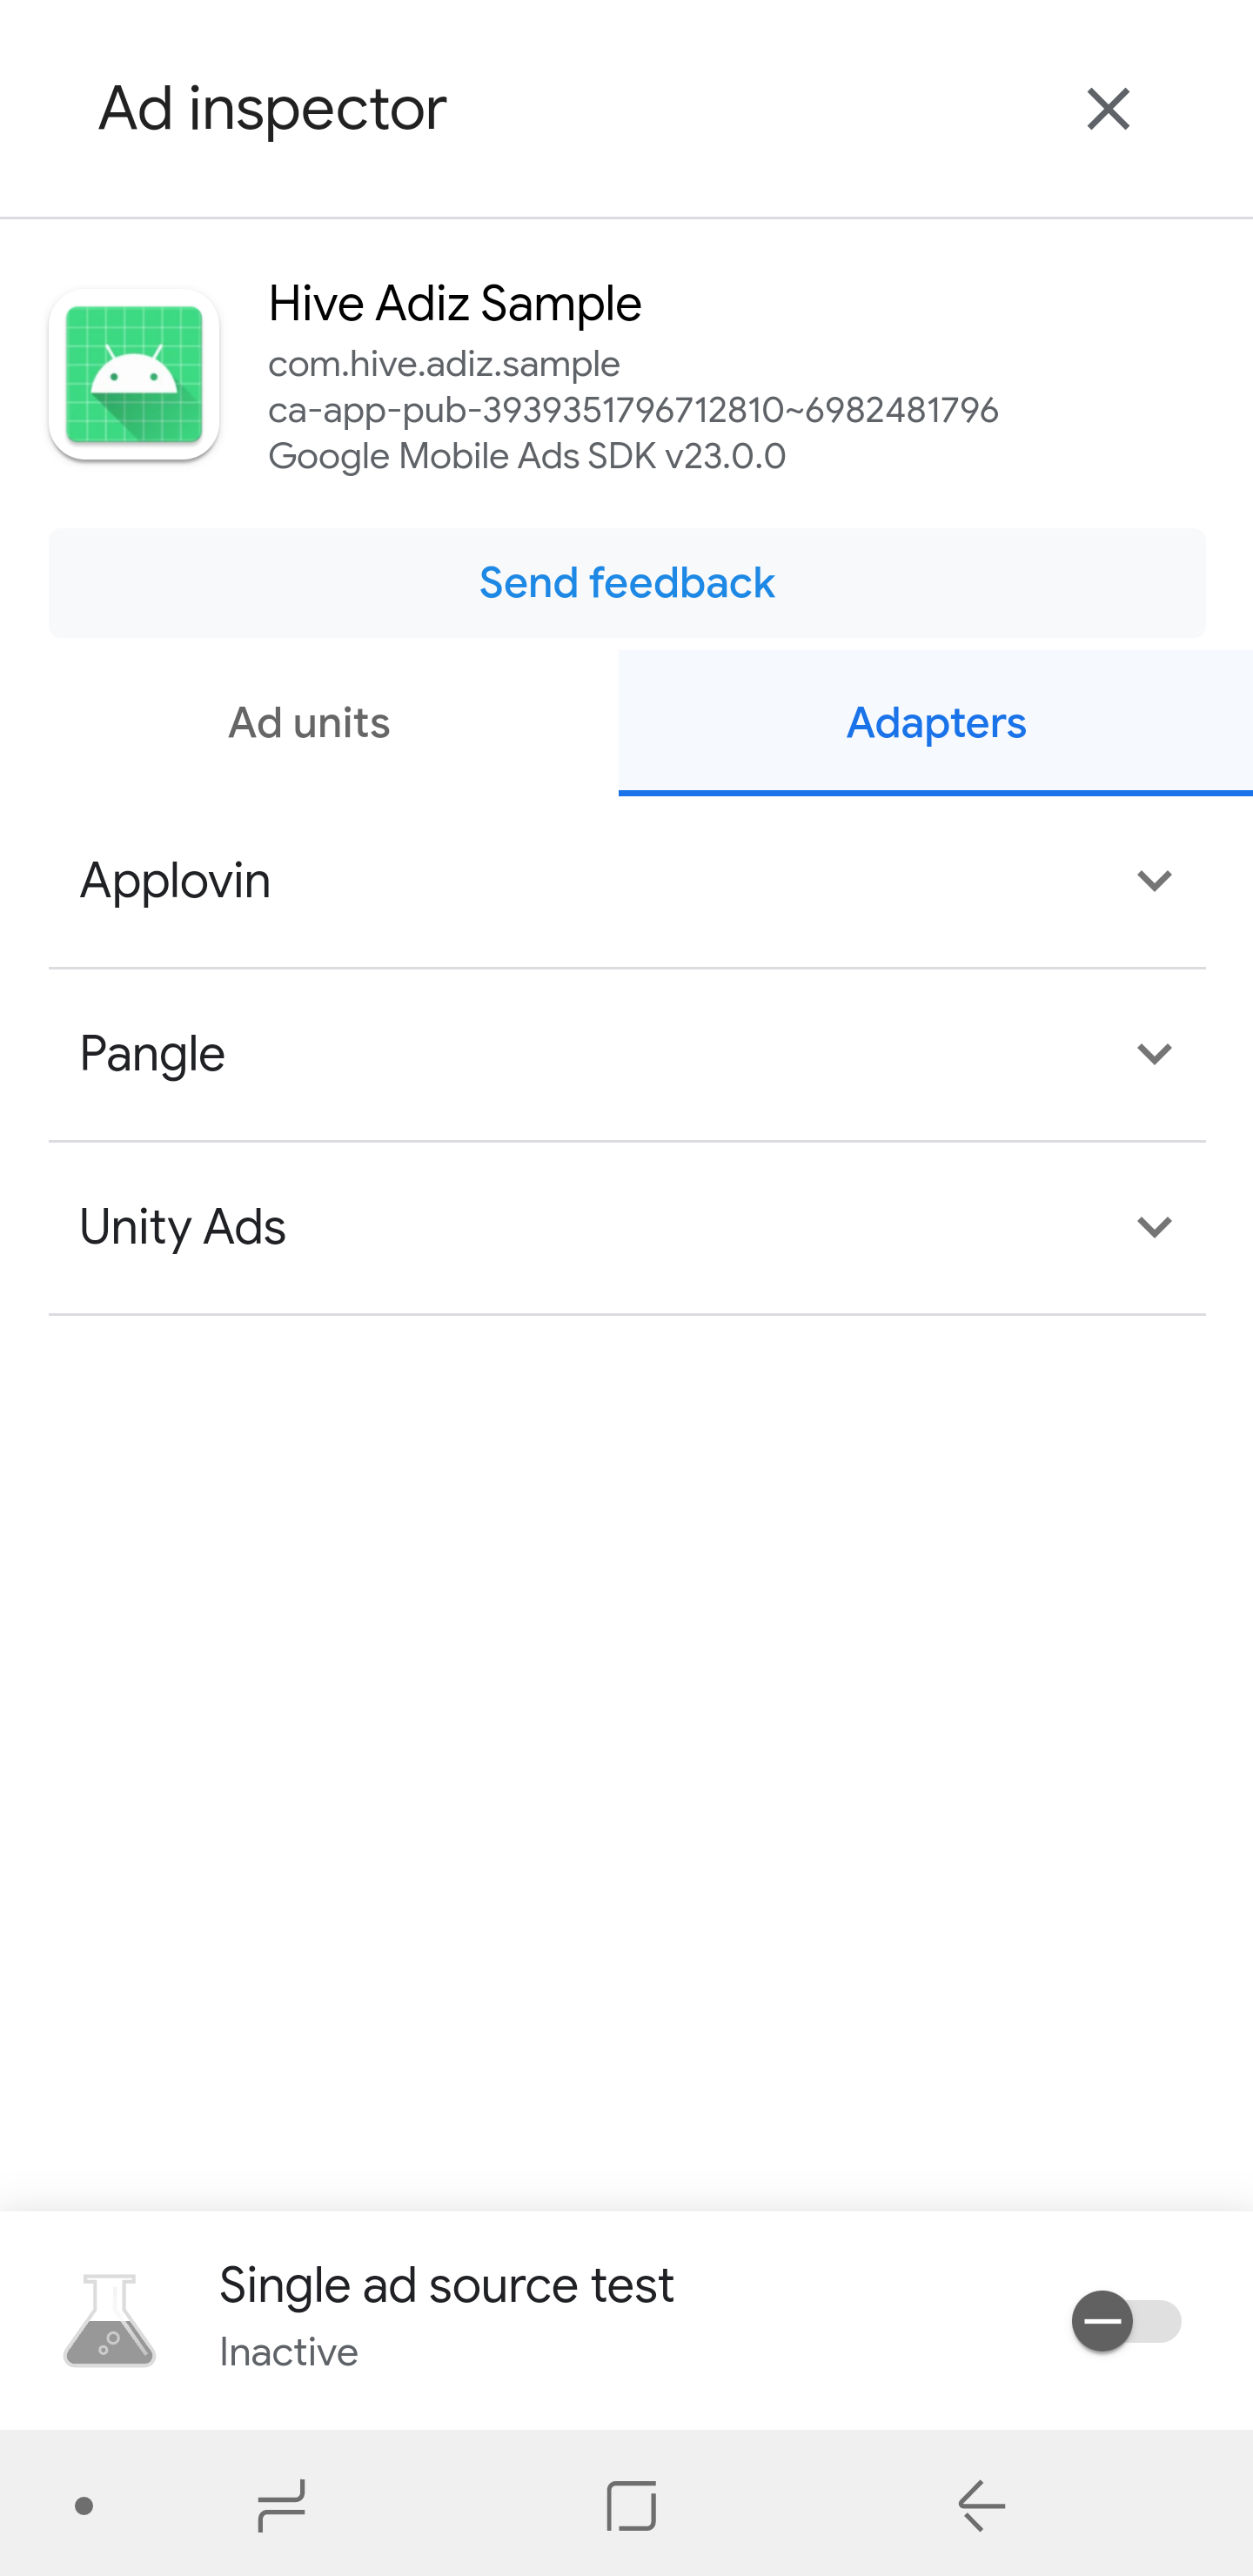
Using the Ad Inspector
The Ad Inspector is an in-app overlay tool that allows real-time analysis of the process of requesting and displaying actual ads on a test device. It informs you of the time it took to load the ad and, if the display failed, provides the reason for the failure. Additionally, you can specify a particular ad network to check if the ads are displayed correctly, and if there are any issues, you can debug at the code level. All these processes are carried out with the Ad Inspector UI. It is included in Google Mobile Ads SDK iOS version 7.68.0 and above, and can be used by calling AdizDeveloperTool.OpenAdInspector.
To use the Ad Inspector, the following two conditions must be met:
|
1 2 3 4 5 |
func openAdInspector(viewController: UIViewController) { AdizDeveloperTool.openAdInspector(viewController) } |
|
1 2 3 4 5 |
- (void)openAdInspector: (UIViewController *)viewController { [AdizDeveloperTool openAdInspector: viewController]; } |
Setting Hive Adiz AppID
Set the Hive Adiz AppID you registered in the Hive console AppCenter. If this is not configured, it will use the Bundle ID.
|
1 2 3 |
Adiz.setAppId(appId) |
|
1 2 3 |
[Adiz setAppId: appId]; |
Setting Hive Console Server
Set the Hive console server you want to use. The default is real. Even if you use the commercial server, test ads are displayed if test mode is enabled.
- Hive test console server:
AdizZoneType.test - Hive sandbox console server:
AdizZoneType.sandbox - Hive commercial console server:
AdizZoneType.real
|
1 2 3 |
Adiz.setZone(AdizZoneType.real) |
|
1 2 3 |
[Adiz setZone: AdizZoneTypeReal]; |
Exposing User-Specific Ads
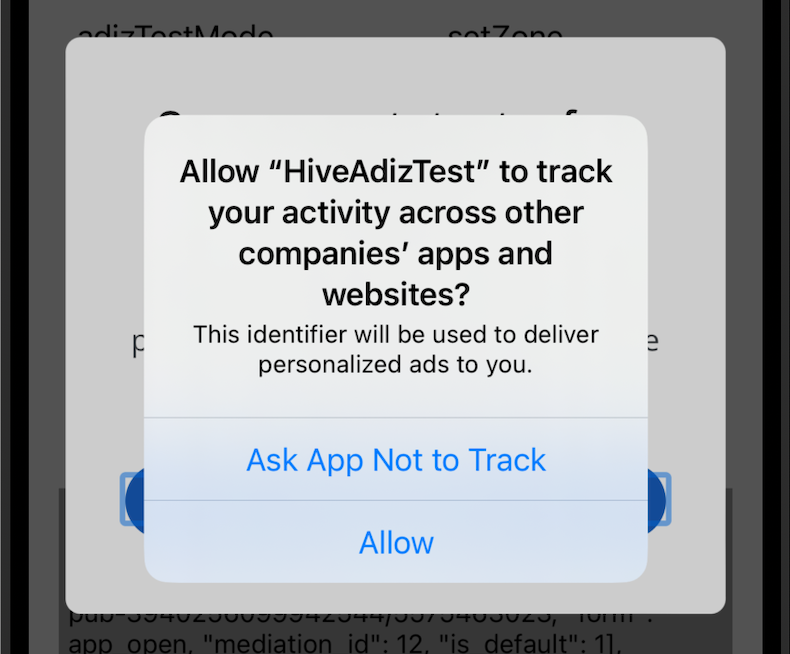
With the introduction of ATT (App Tracking Transparency) in iOS 14.5+, privacy protection has been strengthened. As a result, user-specific ads can only be exposed if the user consents to activity tracking in the ATT consent popup. To maximize ad revenue by exposing user-specific ads, it is necessary to create an IDFA (Identifier for Advertisers) message.
Create and publish your IDFA message following the guide on the AdMob dashboard.
- Guide to Applying IDFA
- Guide to Creating IDFA Message
- Explanation of IDFA Messages and ATT Notifications
After creating and publishing the IDFA message, set the user tracking permissions. Follow the steps below to add the key to Info.plist.
- Select your project in the project navigator of the Xcode project window.
- In the TARGETS list, select your app.
- Click the Info tab.
- Click the Custom iOS Target Properties section in the Info tab.
- Right-click in the Custom iOS Target Properties list.
- Click the Add Row menu.
- Enter NSUserTrackingUsageDescription in the Key field and add the value specified in the Localization file > Base.Iproj folder > InfoPlist.strings.
Next, write the message requesting permission approval from the app users as specified in the Localization file (General Settings > Requesting Permission Settings). If you do not enter the permission request popup message, the app may be rejected during the review process due to missing additional explanation guides on user access permissions.
Once this is completed, the ATT consent popup will be automatically displayed when you initialize Hive Adiz. If the user clicks “Allow” on the ATT consent popup, the IDFA is activated, enabling personalized ads for the user.
GDPR Consent Popup Display (Europe and UK)
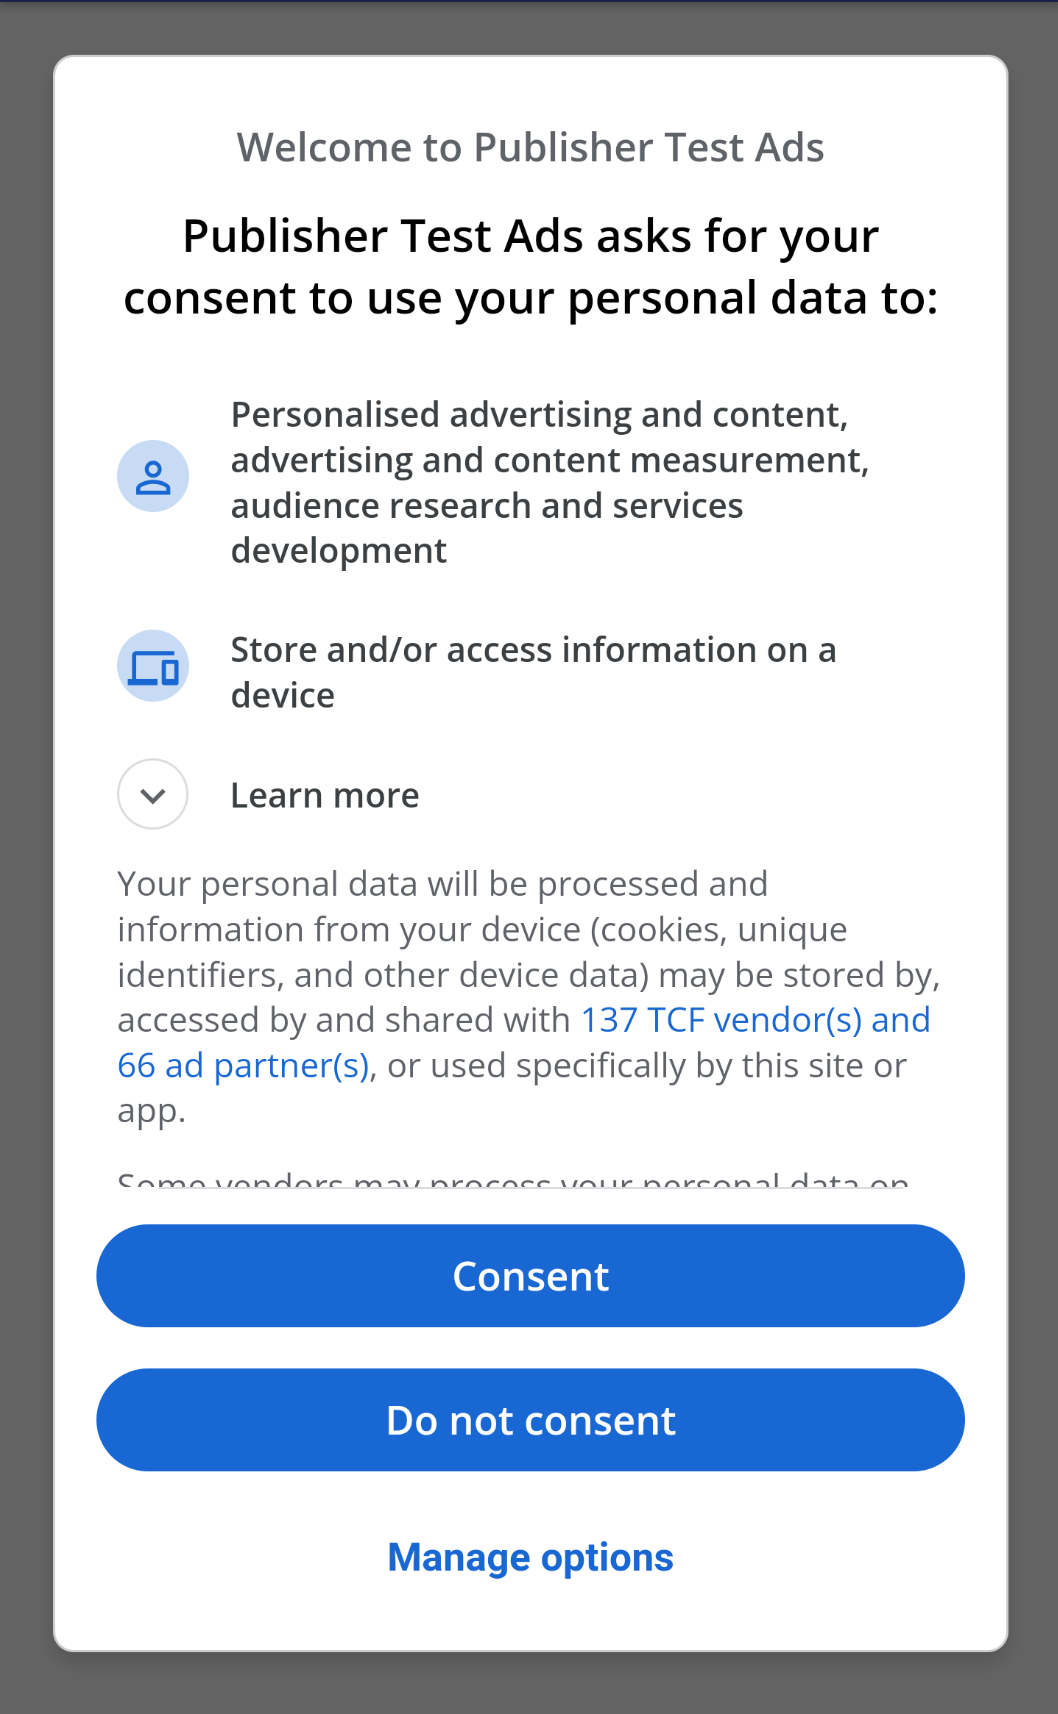
If your game targets Europe and the UK (EEA & UK), it is required to display a GDPR (General Data Protection Regulation) consent popup. The GDPR consent popup will only be shown if the user’s device IP address is from Europe or the UK (EEA & UK). Hive Adiz supports Google‘s UMP (User Messaging Platform) for displaying the GDPR consent popup.
After creating the GDPR message in the AdMob console, the GDPR popup will be displayed to users accessing from Europe and the UK when you initialize Hive Adiz.
Creating GDPR Message
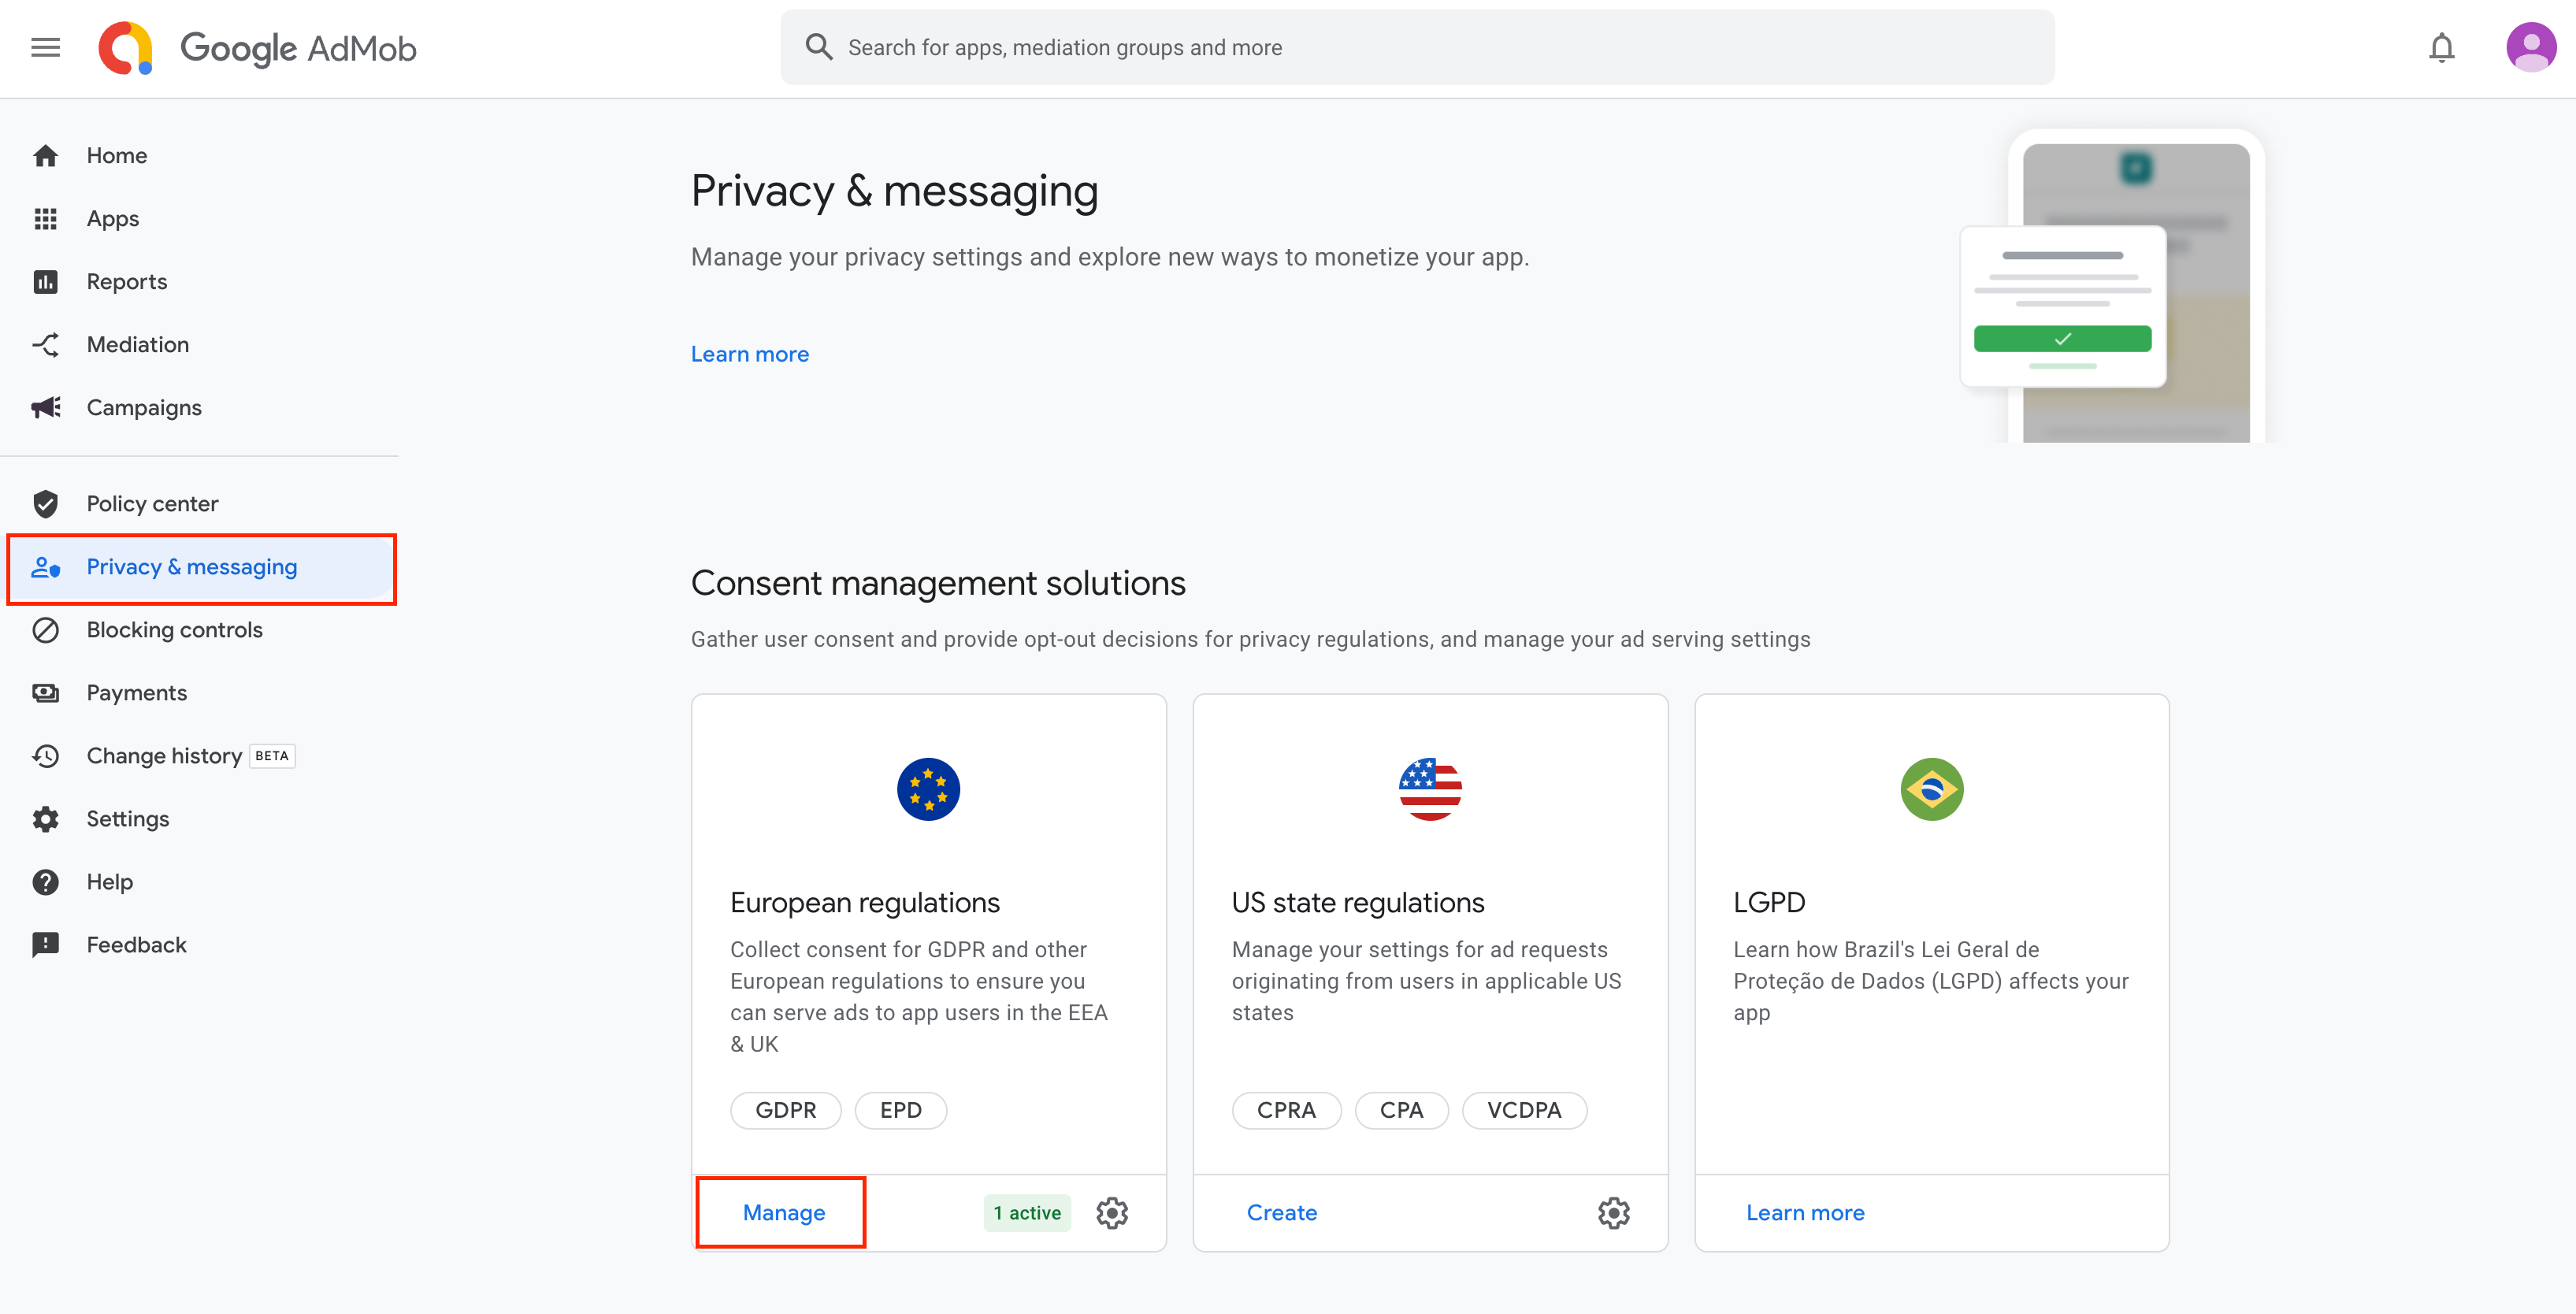
Access the Google AdMob console to create the GDPR message. Before creating the GDPR message, refer to the GDPR message creation guide.
After creating the GDPR message, the GDPR consent popup will automatically be displayed during the initialization of Hive Adiz.
Implementing Options for GDPR Consent/Withdrawal
The GDPR consent popup should allow users to modify their consent at any time. For instance, users who initially did not consent to GDPR but wish to receive personalized ads may want to consent, or vice versa. To accommodate such scenarios, developers must implement functionality for users to either consent again or withdraw their previous consent. To implement GDPR consent/withdrawal functionality, follow these steps:
- Implement a button UI in your app to reload the GDPR consent popup window.
- When implementing the initialization of Hive Adiz, call
isPrivacyOptionsRequired()to display the button UI above for users accessing from Europe and the UK, and not display it otherwise. If users from Europe and the UK press the button, callshowPrivacyOptionsFormto reload the GDPR consent popup, allowing users to modify their consent for GDPR details at any time through a “Manage Options” button or similar within the app. TheshowPrivacyOptionsFormmethod provided below is for illustration purposes only and can be implemented in any form desired by the developer.
|
1 2 3 4 5 6 7 8 9 10 11 12 13 14 15 16 17 18 19 20 21 22 23 24 25 26 |
import HiveAdiz func initialize(_ appId: String) { // ... // isPrivacyOptionsRequired is default false targetViewController.showPrivacyFormButton.isEnabled = AdizConsentManager.isPrivacyOptionsRequired() // HiveAdiz initialize Adiz.initialize(targetViewController) { error, json in // ... // showPrivacyOptionsForm button enable check targetViewController.showPrivacyFormButton.isEnabled = AdizConsentManager.isPrivacyOptionsRequired() // ... } } func showPrivacyOptionsForm(_ targetViewController: UIViewController) { // Show GDPR Form if AdizConsentManager.isPrivacyOptionsRequired() { AdizConsentManager.showPrivacyOptionsForm(targetViewController) { error in // No need to do any error handling. } } } |
Setting Tag For Under the Age of Consent
Using the Tag For Under the Age of Consent (TFUA), you can configure ad requests to treat users residing in the European Economic Area (EEA), the United Kingdom, and Switzerland as subjects to limited data processing. For apps that serve children, you can set that the user is under the age of consent using AdizConsentManager.SetUserPrivacySettings. While there are some differences between European countries, GDPR defines the age requiring parental consent as under 16. The age of consent setting must be configured before executing Adiz.initialize.
|
1 2 3 4 5 6 7 8 9 10 11 12 13 14 15 |
func initialize(_ appId: String) { bool isTagForUnderAgeOfConsent = false // change this to true if the user is a child let privacySet = PrivacySettings.Builder() .setTagForUnderAgeOfConsent(isTagForUnderAgeOfConsent) AdizConsentManager.setUserPrivacySettings(privacySet.build()) // HiveAdiz initialize Adiz.initialize(targetViewController) { error, json in // ... } } |
|
1 2 3 4 5 6 7 8 9 10 11 12 13 14 15 |
- (void)initialize: (NSString *)appId { bool isTagForUnderAgeOfConsent = false; // change this to true if the user is a child PrivacySettingsBuilder* privacySet = [[PrivacySettingsBuilder alloc] init]; privacySet = [builder setTagForUnderAgeOfConsent: isTagForUnderAgeOfConsent]; [AdizConsentManager setUserPrivacySettings: [privacySet build]]; // HiveAdiz initialize [Adiz initialize: targetViewController handler:^(AdizError * error, NSDictionary<NSString *,id> * json) { // ... }]; } |
Setting up GDPR Test Devices
The GDPR consent popup is displayed only if the device’s IP address is from Europe or the UK. During development, you can force the GDPR consent popup to display regardless of the device IP address for testing purposes by setting up GDPR test devices. Follow the steps below to set up GDPR test devices. The following content is the same as Displaying ads on a test device.
- Initialize Hive Adiz. The purpose of this initialization is to check the test device ID, so you don’t need to create a GDPR consent message in advance.
- Find the device ID in the Logcat log output. Here’s an example message:
To enable debug mode for this device, set: UMPDebugSettings.testDeviceIdentifiers = @[B74F6468-1516-467C-99AD-CC5973C5DB52] Get the device ID (example:
B74F6468-1516-467C-99AD-CC5973C5DB52). - Copy the device ID.
- Add
Adiz.setTestDevice(DEVICE_ID)before executingAdiz.initializein the existing Hive Adiz initialization code. - Create a GDPR consent message and reinitialize Hive Adiz to ensure the GDPR consent popup appears correctly.
|
1 2 3 4 5 6 7 8 9 10 11 12 |
func initialize(_ appId: String) { // ... // Set TestDevice before Adiz.initialize. example @"B74F6468-1516-467C-99AD-CC5973C5DB52" Adiz.setTestDevice("B74F6468-1516-467C-99AD-CC5973C5DB52") // HiveAdiz initialize Adiz.initialize(targetViewController) { error, json in // ... } } |
|
1 2 3 4 5 6 7 8 9 10 11 12 |
- (void)initialize: (NSString *)appId { // ... // Set TestDevice before Adiz.initialize. example @"B74F6468-1516-467C-99AD-CC5973C5DB52" [Adiz setTestDevice: @"B74F6468-1516-467C-99AD-CC5973C5DB52"]; // HiveAdiz initialize [Adiz initialize: targetViewController handler:^(AdizError * error, NSDictionary<NSString *,id> * json) { // ... }]; } |
COPPA Child-Directed Treatment Tag Setting
In accordance with the Children’s Online Privacy Protection Act (COPPA), app developers can specify whether Google should treat content as child-directed during ad requests by setting the tagForChildDirectedTreatment (TFCD) tag. If you wish to treat the content as child-directed, you must call AdizConsentManager.SetUserPrivacySettings before executing Adiz.initialize. When using Hive Adiz with the Hive SDK, the child-directed treatment tag is applied automatically, so no additional settings are required.
|
1 2 3 4 5 6 7 8 9 10 11 12 13 14 15 |
func initialize(_ appId: String) { bool isTagForChildDirectedTreatment = false // Change to true for children let privacySet = PrivacySettings.Builder() .setTagForChildDirectedTreatment(isTagForUnderAgeOfConsent) AdizConsentManager.setUserPrivacySettings(privacySet.build()) // HiveAdiz initialize Adiz.initialize(targetViewController) { error, json in // ... } } |
|
1 2 3 4 5 6 7 8 9 10 11 12 13 14 15 |
- (void)initialize: (NSString *)appId { bool isTagForChildDirectedTreatment = false; // Change to true for children PrivacySettingsBuilder* privacySet = [[PrivacySettingsBuilder alloc] init]; privacySet = [builder setTagForChildDirectedTreatment: isTagForChildDirectedTreatment]; [AdizConsentManager setUserPrivacySettings: [privacySet build]]; // HiveAdiz initialize [Adiz initialize: targetViewController handler:^(AdizError * error, NSDictionary<NSString *,id> * json) { // ... }]; } |
Add Ad Mediation
Hive Adiz allows you to display ads using AdMob mediation. Follow the steps below to add AdMob mediation.
Add AdMob Mediation
Proceed with the ad source integration work in the AdMob console. Follow the table below.
| AppLovin | Pangle | Unity Ads | Meta | |
|---|---|---|---|---|
| Step 1 | Configure AppLovin | Configure Pangle | Configure Unity Ads | Set up Meta configuration |
| Step 2 | Add AppLovin Ad Source to AdMob | Add Pangle Ad Source to AdMob | Add Unity Ads Ad Source to AdMob | Add Meta ad source to AdMob |
| Step 3 | Add Adiz Adapter | |||
Add Adiz Adapter
Add dependencies to your CocoaPods Podfile.
|
1 2 3 4 5 6 7 8 9 10 11 12 13 14 15 16 17 18 19 20 21 22 23 |
# ... $HIVE_ADIZ_VERSION = '2.0.1' def adiz pod 'HiveAdiz', $HIVE_ADIZ_VERSION end def adizAdapter pod 'HiveAdizAdapterAppLovin', $HIVE_ADIZ_VERSION pod 'HiveAdizAdapterPangle', $HIVE_ADIZ_VERSION pod 'HiveAdizAdapterUnityAds', $HIVE_ADIZ_VERSION pod 'HiveAdizAdapterMeta', $HIVE_ADIZ_VERSION end target 'MyGame-mobile' do adiz adizAdapter end # ... |
To ensure the Adiz adapter configuration is applied correctly, run the app and check the configuration list on the Ad Inspector screen.
Initializing Hive Adiz
The initialization of Hive Adiz is the essential step before exposing any type of advertisement. When you initialize Hive Adiz, you can receive the necessary ad keys to display ads. If test mode is enabled, you will receive a test key. If you are using the Hive SDK, proceed with Adiz initialization after calling AuthV4.setup.
|
1 2 3 4 5 6 7 8 9 10 11 12 13 14 15 16 17 18 19 20 21 22 23 24 25 26 27 28 29 30 31 32 33 34 35 36 37 38 39 40 41 42 |
import HiveAdiz // Initializing Hive Adiz Adiz.initialize(targetViewController) { error, json in if error.isSuccess, let responseList = json?["keys"] as? [[String:Any]] { var interstitialKeyList = [String]() var bannerKeyList = [String]() var nativeKeyList = [String]() var rewardedKeyList = [String]() var rewardedInterstitialKeyList = [String]() var appOpenKeyList = [String]() for response in responseList { if let isDefault = response["is_default"] as? Bool, isDefault == false { let hiveAdKey = response["key"] as? String ?? "" let hiveForm = response["form"] as? String ?? "" switch hiveForm { case "interstitial": interstitialKeyList.append(hiveAdKey) case "banner": bannerKeyList.append(hiveAdKey) case "native": nativeKeyList.append(hiveAdKey) case "rewarded": rewardedKeyList.append(hiveAdKey) case "rewarded_interstitial": rewardedInterstitialKeyList.append(hiveAdKey) case "app_open": appOpenKeyList.append(hiveAdKey) default: break } } } print("interstitialKeyList \(interstitialKeyList)"); print("bannerKeyList \(bannerKeyList)"); print("nativeKeyList \(nativeKeyList)"); print("rewardedKeyList \(rewardedKeyList)"); print("rewardedInterstitialKeyList \(rewardedInterstitialKeyList)"); print("appOpenKeyList \(appOpenKeyList)"); } } |
|
1 2 3 4 5 6 7 8 9 10 11 12 13 14 15 16 17 18 19 20 21 22 23 24 25 26 27 28 29 30 31 32 33 34 35 36 37 38 39 40 41 42 43 44 45 |
#import <HiveAdiz/HiveAdiz-Swift.h> // Initializing Hive Adiz [Adiz initialize: targetViewController handler:^(AdizError * error, NSDictionary<NSString *,id> * json) { if([error isSuccess] && json[@"keys"] != nil) { NSArray* responseList = json[@"keys"]; NSMutableArray<NSString*> *interstitialKeyList = [[NSMutableArray alloc] init]; NSMutableArray<NSString*> *bannerKeyList = [[NSMutableArray alloc] init]; NSMutableArray<NSString*> *nativeKeyList = [[NSMutableArray alloc] init]; NSMutableArray<NSString*> *rewardedKeyList = [[NSMutableArray alloc] init]; NSMutableArray<NSString*> *rewardedInterstitialKeyList = [[NSMutableArray alloc] init]; NSMutableArray<NSString*> *appOpenKeyList = [[NSMutableArray alloc] init]; for (NSDictionary* response in responseList) { // This is an example of setting up the list of ad keys (is_default = false) when you wants to put the ad key directly. if (response[@"is_default"] != nil && [response[@"is_default"] boolValue] == false) { NSString* hiveAdKey = response[@"key"]; NSString* hiveForm = response[@"form"]; if ([hiveForm isEqualToString: @"interstitial"]) { [interstitialKeyList addObject: hiveAdKey]; } else if ([hiveForm isEqualToString: @"banner"]) { [bannerKeyList addObject: hiveAdKey]; } else if ([hiveForm isEqualToString: @"native"]) { [nativeKeyList addObject: hiveAdKey]; } else if ([hiveForm isEqualToString: @"rewarded"]) { [rewardedKeyList addObject: hiveAdKey]; } else if ([hiveForm isEqualToString: @"rewarded_interstitial"]) { [rewardedInterstitialKeyList addObject: hiveAdKey]; } else if ([hiveForm isEqualToString: @"app_open"]) { [appOpenKeyList addObject: hiveAdKey]; } } } NSLog(@"interstitialKeyList %@", interstitialKeyList); NSLog(@"bannerKeyList %@", bannerKeyList); NSLog(@"nativeKeyList %@", nativeKeyList); NSLog(@"rewardedKeyList %@", rewardedKeyList); NSLog(@"rewardedInterstitialKeyList %@", rewardedInterstitialKeyList); NSLog(@"appOpenKeyList %@", appOpenKeyList); } }]; |
When initializing, the JSON file received as a callback includes a list of ad keys. The format of the ad key list is as follows:
|
1 2 3 4 5 6 7 8 9 10 11 12 13 14 15 16 17 18 19 20 21 22 23 24 25 26 27 28 29 30 31 32 33 34 35 36 37 38 39 40 41 42 |
{ "keys":[ { "mediation_id":5, "key":"ca-app-pub-3940256099942544/5354046379", "form":"rewarded_interstitial", "is_default":true }, { "mediation_id":4, "key":"ca-app-pub-3940256099942544/5224354917", "form":"rewarded", "is_default":true }, { "mediation_id":3, "key":"ca-app-pub-3940256099942544/2247696110", "form":"native", "is_default":true }, { "mediation_id":1, "key":"ca-app-pub-3940256099942544/1033173712", "form":"interstitial", "is_default":true }, { "mediation_id":2, "key":"ca-app-pub-3940256099942544/6300978111", "form":"banner", "is_default":true }, { "mediation_id":6, "key":"ca-app-pub-3940256099942544/9257395921", "form":"app_open", "is_default":true } ] } |
If you initialize in test mode, you will receive a list of test ad keys even if you have not registered an AdMob ad key in the Hive console. If you initialize in commercial mode, you will receive a list of AdMob ad keys registered in the Hive console.
Each ad format has one ad as the default ad (an ad with "is_default":true). The first ad registered becomes the default ad for that ad format. You do not need to enter the ad key (hiveAdKey) when creating the ad instance (initialize()) for the default ad. To change the default ad, you must delete the existing default ad in the Hive console and re-register the ad.
Setting Up Ad Callback Listeners
You can receive callbacks based on the state changes of an ad by implementing the AdizListener when creating each ad instance.
| Name | Description | Required |
|---|---|---|
| onLoad() | Ad load successful | O |
| onFail(error: AdizError) | Failure (you can understand the reason for failure through error.getCode() and error.getMessage()) |
O |
| onShow() | Ad display successful | O |
| onClick() | Ad clicked | O |
| onPaidEvent(_ revenueData: AdRevenueData) | This is a point at which a paid event is received after the ad is displayed. At this point, the ad revenue information is delivered. | O |
| onClose() | Ad closed
|
X |
| onRewarded(_ rewardItem: RewardItem) | The point at which the user receives a reward after an ad display for rewarded (rewarded, rewarded interstitial) ads |
X |
|
1 2 3 4 5 6 7 8 9 10 11 12 13 14 15 16 17 18 19 20 21 22 23 24 25 26 27 28 29 30 31 32 33 34 35 36 37 38 39 40 41 |
import HiveAdiz class TestAdizListener: AdizListener { func onLoad() { // Called when the ad is loaded. // If the ad load is successful, you need to call the ad instance's .show() at the desired point to display the ad. print("[\(delegateTypeName)] onLoad") } func onFail(_ error: AdizError) { // Called if the ad load failed or the ad display failed for some other reason. print("[\(delegateTypeName)] onFail: ") print("(\(error.getCode())) \(error.getMessage() ?? "")") } func onShow() { // Called when the ad is displayed. print("[\(delegateTypeName)] onShow") } func onClick() { // Called when the ad is clicked. print("[\(delegateTypeName)] onClick") } func onPaidEvent(_ revenueData: AdRevenueData) { // Called when the revenue for the ad is generated. print("[\(delegateTypeName)] onPaidEvent: \(revenueData.getCurrency()) \(revenueData.getRevenue().description)") var revenue = revenueData.getRevenue() // revenue when ad is exposed var currency = revenueData.getCurrency() // currency code for revenue when ad is exposed } func onClose() { // Called when the ad is closed. // Banner, Native ads do not have an onClose callback. print("[\(delegateTypeName)] onClose") } func onRewarded(_ rewardItem: RewardItem) { // Called when a reward occurs for watching the ad in rewarded, rewarded interstitial ads. print("[\(delegateTypeName)] onRewarded") print("amount: \(rewardItem.getItemAmount()) type: \(rewardItem.getItemType())") var itemType = rewardItem.getItemType() // Reward item type var itemAmount = rewardItem.getItemAmount() // Reward item quantity }} |
|
1 2 3 4 5 6 7 8 9 10 11 12 13 14 15 16 17 18 19 20 21 22 23 24 25 26 27 28 29 30 31 32 33 34 35 36 37 38 39 40 41 42 43 44 45 46 47 48 49 50 51 52 53 54 |
#import <HiveAdiz/HiveAdiz-Swift.h> @interface TestAdizListener : NSObject<AdizListener> @end @implementation TestAdizListener - (void) onLoad { // Called when the ad is loaded. // If the ad load is successful, you need to call the ad instance's .show() at the desired point to display the ad. NSLog(@"[TestAdizListener] onLoad"); } - (void) onFail:(AdizError *)error { // Called if the ad load failed or the ad display failed for some other reason. NSLog(@"[TestAdizListener] onFail: "); NSLog(@"errorCode: %ld, errorMessage: %@", (long)[error getCode], [error getMessage]); } - (void) onShow { // Called when the ad is displayed. NSLog(@"[TestAdizListener] onShow"); } - (void) onClick { // Called when the ad is clicked. NSLog(@"[TestAdizListener] onClick"); } - (void) onPaidEvent:(AdRevenueData *)revenueData { // Called when the revenue for the ad is generated. NSLog(@"[TestAdizListener] onPaidEvent: %@ %f", [revenueData getCurrency], [revenueData getRevenue]); double revenue = [revenueData getRevenue]; // revenue when ad is exposed NSString* currency = [revenueData getCurrency]; // currency code for revenue when ad is exposed } - (void) onClose { // Called when the ad is closed. // Banner, Native ads do not have an onClose callback. NSLog(@"[TestAdizListener] onClose"); } - (void) onRewarded:(RewardItem *)rewardItem { // Called when a reward occurs for watching the ad in rewarded, rewarded interstitial ads. NSLog(@"[TestAdizListener] onRewarded"); NSLog(@"amount: %ld type: %@", (long)[rewardItem getItemAmount], [rewardItem getItemType]); NSString* itemType = [rewardItem getItemType]; // Reward item type NSInteger itemAmount = [rewardItem getItemAmount]; // Reward item type quantity } @end |
Error Codes
The error codes and error messages for Adiz.Initialize and AdizListener when onFail() is received are as follows:
Common Codes
| Number | Case | Explanation |
|---|---|---|
| 0 | Success | Success |
Adiz Error Codes
| Number | Case | Explanation |
|---|---|---|
| -1 | InvalidParam | Invalid parameter |
| -2 | NotSupported | Not supported |
| -3 | InProgress | Process in progress |
| -4 | Network | Network error |
| -5 | NeedInitialize | Initialization needed |
| -6 | ResponseFail | Response failed |
| -7 | Timeout | Network timeout |
| -99 | Unknown | Unknown error |
Ad Platform Error Codes
| Number | Case | Explanation |
|---|---|---|
| -101 | NeedLoad | Ad not loaded |
| -102 | NeedReload | Need to reload due to ad display time expiration |
| -103 | NotEnoughInventory | Mediation response was successful, but no filled ads due to insufficient inventory |
| -104 | MissingAppId | AppID error for mediation request |
| -105 | InternalNetworkError | Mediation network-related error |
| -106 | InvalidUnitId | Invalid Unit Id |
| -107 | MediationNoFill | Mediation adapter failed to handle ad request |
| -108 | AlreadyLoaded | Already loaded |
| -109 | CannotRequestAds | Cannot request ads |
| -201 | GdprConsentError | GDPR consent error |
| -202 | IsNotPrivacyOptionsRequired | No need to display or unable to display the GDPR consent popup |
Ad Exposure and Termination
To expose and terminate ads, follow these steps:
- Create ad instances from the ad class for each type of ad you want to expose. If the ad you want to expose is not a default ad, you need to enter the ad key obtained from initialization. If you do not enter the ad key (
hiveAdKey), a default ad instance is created. - Load (
load()) the ad you want to expose. - Expose (
show()) the loaded ad. To re-expose the ad, you must callload()again followed byshow(). - To terminate the ad, call
destroy().
Interstitial Ads
Interstitial ads are full-screen ads that cover the interface of game.
|
1 2 3 4 5 6 7 8 9 10 11 12 13 14 15 16 17 18 19 20 21 22 23 24 25 26 27 28 29 30 31 32 33 34 35 36 37 38 39 40 41 42 43 44 45 46 47 48 49 50 51 52 53 54 55 |
import UIKit import HiveAdiz class InitViewController: UIViewController { // Create an interstitial ad instance. var interstitialAd: AdizInterstitial? func requestInitAd(hiveAdKey: String?) { if let adKey = hiveAdKey, adKey.count > 0 { // Initialize AdizInterstitial Instance (ViewController, hiveAdKey, AdizListener) self.interstitialAd = AdizInterstitial.initialize(self, hiveAdKey: adKey, adizListener: self) } else { // Initialize Default AdizInterstitial Instance (ViewController, AdizListener) self.interstitialAd = AdizInterstitial.initialize(self, adizListener: self) } } func requestLoadAd() { // Load AdizInterstitial self.interstitialAd?.load() } func requestShowAd() { // Show AdizInterstitial self.interstitialAd?.show() } func requestDestroyAd() { // Destroy AdizInterstitial self.interstitialAd?.destroy() self.interstitialAd = nil } } extension InitViewController: AdizListener { func onLoad() { // requestShowAd() } func onFail(_ error: AdizError) { } func onShow() { } func onClick() { } func onPaidEvent(_ revenueData: AdRevenueData) { } func onClose() { // requestDestroyAd() } } |
|
1 2 3 4 5 6 7 8 9 10 11 12 13 14 15 16 17 18 19 20 21 22 23 24 25 26 27 28 29 30 31 32 33 34 35 36 37 38 39 40 41 42 43 44 45 46 47 48 49 50 51 52 53 54 55 56 57 58 59 60 61 62 63 64 65 66 67 68 |
#import <UIKit/UIKit.h> #import <HiveAdiz/HiveAdiz-Swift.h> @interface InitViewController : UIViewController<AdizListener> @property (nonatomic, strong) AdizInterstitial* interstitialAd; @end @implementation InitViewController - (void) requestInitAd: (NSString*)hiveAdKey { if (hiveAdKey != nil && ![hiveAdKey isEqualToString:@""]) { // Initialize AdizInterstitial Instance (ViewController, hiveAdKey, AdizListener) // Create an interstitial ad instance. self.interstitialAd = [AdizInterstitial initialize:self hiveAdKey:hiveAdKey adizListener:self]; } else { // Initialize Default AdizInterstitial Instance (ViewController, AdizListener) self.interstitialAd = [AdizInterstitial initialize:self adizListener:self]; } } - (void) requestLoadAd { // Load AdizInterstitial if (self.interstitialAd != nil) { [self.interstitialAd load]; } } - (void) requestShowAd { // Show AdizInterstitial if (self.interstitialAd != nil) { [self.interstitialAd show]; } } - (void) requestDestroyAd { // Destroy AdizInterstitial if (self.interstitialAd != nil) { [self.interstitialAd destroy]; self.interstitialAd = nil; } } #pragma mark - AdizListener - (void) onLoad { // [self requestShowAd]; } - (void) onFail:(AdizError *)error { } - (void) onShow { } - (void) onClick { } - (void) onPaidEvent:(AdRevenueData *)revenueData { } - (void) onClose { // [self requestDestroyAd]; } @end |
Banner Ads (Banner)
Banner ads expose a banner of a specific size. Banner ads do not receive the onClose() callback. Therefore, you must call destroy() from another location to terminate the ad.
BannerSize follows standard banner sizes.
| Size Point (Width x Height) | Description | Supported Devices | BannerSize Constant |
|---|---|---|---|
| 320×50 | Banner | Mobile phones and tablets | BannerSize.normal |
| 320×100 | Large Banner | Mobile phones and tablets | BannerSize.medium |
| 300×250 | IAB Medium Rectangle | Mobile phones and tablets | BannerSize.large |
| 468×60 | IAB Full-Size Banner | Tablets | BannerSize.full |
PositionType is either top or bottom. The default is bottom.
| Alignment | Description | PositionType Constant |
|---|---|---|
| Top Alignment | Specifies alignment at the top of the screen, based on the SafeArea | PositionType.top |
| Bottom Alignment (Default) | Specifies alignment at the bottom of the screen, based on the SafeArea | PositionType.bottom |
|
1 2 3 4 5 6 7 8 9 10 11 12 13 14 15 16 17 18 19 20 21 22 23 24 25 26 27 28 29 30 31 32 33 34 35 36 37 38 39 40 41 |
import UIKit import HiveAdiz class BannerViewController: UIViewController { // Create AdizBanner Instance // Create an banner ad instance. var bannerAd: AdizBanner? func requestInitAd(hiveAdKey: String?) { // Set banner size var bannerSize: BannerSize = .normal if let adKey = hiveAdKey, adKey.count > 0 { // Initialize AdizBanner Instance (ViewController, hiveAdKey, BannerSize, AdizListener) self.bannerAd = AdizBanner.initialize(self, hiveAdKey: adKey, size: bannerSize, adizListener: self) } else { // Initialize Default AdizBanner Instance (ViewController, BannerSize, AdizListener) self.bannerAd = AdizBanner.initialize(self, size: bannerSize, adizListener: self) } } func requestLoadAd() { // Load AdizBanner self.bannerAd?.load() } func requestShowAd() { // Set position type var position: PositionType = .top // Show AdizBanner self.bannerAd?.show(position) } func requestDestroyAd() { // Destroy AdizBanner self.bannerAd?.destroy() self.bannerAd = nil }} extension BannerViewController: AdizListener { func onLoad() { // requestShowAd() } func onFail(_ error: AdizError) { } func onShow() { } func onClick() { } func onPaidEvent(_ revenueData: AdRevenueData) { }} |
|
1 2 3 4 5 6 7 8 9 10 11 12 13 14 15 16 17 18 19 20 21 22 23 24 25 26 27 28 29 30 31 32 33 34 35 36 37 38 39 40 41 42 43 44 45 46 |
#import <UIKit/UIKit.h> #import <HiveAdiz/HiveAdiz-Swift.h> @interface BannerViewController : UIViewController<AdizListener> @property (nonatomic, strong) AdizBanner* bannerAd; @end @implementation BannerViewController - (void) requestInitAd: (NSString*)hiveAdKey { // Set banner size BannerSize bannerSize = BannerSizeNormal; if (hiveAdKey != nil && ![hiveAdKey isEqualToString:@""]) { // Initialize AdizBanner Instance (ViewController, hiveAdKey, BannerSize, AdizListener) self.bannerAd = [AdizBanner initialize:self hiveAdKey:hiveAdKey size: bannerSize adizListener:self]; } else { // Initialize Default AdizBanner Instance (ViewController, BannerSize, AdizListener) self.bannerAd = [AdizBanner initialize:self size:bannerSize adizListener:self]; }} - (void) requestLoadAd { // Load AdizBanner if (self.bannerAd != nil) { [self.bannerAd load]; }} - (void) requestShowAd { // Set position type PositionType position = PositionTypeTop; // Show AdizBanner if (self.bannerAd != nil) { [self.bannerAd show: position]; }} - (void) requestDestroyAd { // Destroy AdizBanner if (self.bannerAd != nil) { [self.bannerAd destroy]; self.bannerAd = nil; }} #pragma mark - AdizListener - (void) onLoad { // [self requestShowAd]; } - (void) onFail:(AdizError *)error { } - (void) onShow { } - (void) onClick { } - (void) onPaidEvent:(AdRevenueData *)revenueData { } @end |
Native Ads
Native ads display a specific size of the native template. Native ads are optimized for portrait screens, so it is recommended to use them in portrait games (vertical screen games). Native ads do not receive the onClose() callback. Therefore, you must call destroy() from another location to terminate the ad.
Currently, the templates support small or medium sizes.
| Size Point (Width x Height) | Template | Alignment | BannerSize Constant |
|---|---|---|---|
| 355×91 (Aspect Ratio Adjusted) | small size | Top / Bottom | BannerSize.normal |
| 355×370 (Aspect Ratio Adjusted) | medium size | Center (fixed) | BannerSize.medium, BannerSize.large, BannerSize.full |
For the small template, PositionType is either top or bottom, with the default being bottom.
| Alignment | Description | PositionType Constant |
|---|---|---|
| Top Alignment | Specifies alignment at the top of the screen | PositionType.top |
| Bottom Alignment (Default) | Specifies alignment at the bottom of the screen | PositionType.bottom |
The medium template does not allow for alignment selection and uses center alignment by default.
|
1 2 3 4 5 6 7 8 9 10 11 12 13 14 15 16 17 18 19 20 21 22 23 24 25 26 27 28 29 30 31 32 33 34 35 36 37 38 39 40 41 42 43 44 45 46 47 48 49 50 51 52 53 54 55 56 57 58 |
import UIKit import HiveAdiz class NativeViewController: UIViewController { // Create AdizNative Instance var nativeAd: AdizNative? func requestInitAd(hiveAdKey: String?) { // Set banner size var bannerSize: BannerSize = .normal if let adKey = hiveAdKey, adKey.count > 0 { // Initialize AdizNative Instance (ViewController, hiveAdKey, BannerSize, AdizListener) self.nativeAd = AdizNative.initialize(self, hiveAdKey: adKey, size: bannerSize, adizListener: self) } else { // Initialize Default AdizNative Instance (ViewController, BannerSize, AdizListener) self.nativeAd = AdizNative.initialize(self, size: bannerSize, adizListener: self) } } func requestLoadAd() { // Load AdizNative self.nativeAd?.load() } func requestShowAd() { // Set position type var position: PositionType = .top // Show AdizNative self.nativeAd?.show(position) } func requestDestroyAd() { // Destroy AdizNative self.nativeAd?.destroy() self.nativeAd = nil } } extension NativeViewController: AdizListener { func onLoad() { // requestShowAd() } func onFail(_ error: AdizError) { } func onShow() { } func onClick() { } func onPaidEvent(_ revenueData: AdRevenueData) { } } |
|
1 2 3 4 5 6 7 8 9 10 11 12 13 14 15 16 17 18 19 20 21 22 23 24 25 26 27 28 29 30 31 32 33 34 35 36 37 38 39 40 41 42 43 44 45 46 47 48 49 50 51 52 53 54 55 56 57 58 59 60 61 62 63 64 65 66 67 68 69 |
#import <UIKit/UIKit.h> #import <HiveAdiz/HiveAdiz-Swift.h> @interface NativeViewController : UIViewController<AdizListener> @property (nonatomic, strong) AdizNative* nativeAd; @end @implementation NativeViewController - (void) requestInitAd: (NSString*)hiveAdKey { // Set banner size BannerSize bannerSize = BannerSizeNormal; if (hiveAdKey != nil && ![hiveAdKey isEqualToString:@""]) { // Initialize AdizNative Instance (ViewController, hiveAdKey, BannerSize, AdizListener) self.nativeAd = [AdizNative initialize:self hiveAdKey:hiveAdKey size: bannerSize adizListener:self]; } else { // Initialize Default AdizNative Instance (ViewController, BannerSize, AdizListener) self.nativeAd = [AdizNative initialize:self size:bannerSize adizListener:self]; } } - (void) requestLoadAd { // Load AdizNative if (self.nativeAd != nil) { [self.nativeAd load]; } } - (void) requestShowAd { // Set position type PositionType position = PositionTypeTop; // Show AdizNative if (self.nativeAd != nil) { [self.nativeAd show: position]; } } - (void) requestDestroyAd { // Destroy AdizNative if (self.nativeAd != nil) { [self.nativeAd destroy]; self.nativeAd = nil; } } #pragma mark - AdizListener - (void) onLoad { // [self requestShowAd]; } - (void) onFail:(AdizError *)error { } - (void) onShow { } - (void) onClick { } - (void) onPaidEvent:(AdRevenueData *)revenueData { } @end |
Rewarded Ads (Rewarded)
These are rewarded ads where users receive rewards for watching the ad for a certain amount of time. Once the reward is issued, you will receive the information about the reward item through the onRewarded() callback.
|
1 2 3 4 5 6 7 8 9 10 11 12 13 14 15 16 17 18 19 20 21 22 23 24 25 26 27 28 29 30 31 32 33 34 35 36 37 38 39 40 41 42 43 44 45 46 47 48 49 50 51 52 53 54 55 56 57 |
import UIKit import HiveAdiz class RewardViewController: UIViewController { // Create AdizRewarded Instance var rewardAd: AdizRewarded? func requestInitAd(hiveAdKey: String?) { if let adKey = hiveAdKey, adKey.count > 0 { // Initialize AdizRewarded Instance (ViewController, hiveAdKey, AdizListener) self.rewardAd = AdizRewarded.initialize(self, hiveAdKey: adKey, adizListener: self) } else { // Initialize Default AdizRewarded Instance (ViewController, AdizListener) self.rewardAd = AdizRewarded.initialize(self, adizListener: self) } } func requestLoadAd() { // Load AdizRewarded self.rewardAd?.load() } func requestShowAd() { // Show AdizRewarded self.rewardAd?.show() } func requestDestroyAd() { // Destroy AdizRewarded self.rewardAd?.destroy() self.rewardAd = nil } } extension RewardViewController: AdizListener { func onLoad() { // requestShowAd() } func onFail(_ error: AdizError) { } func onShow() { } func onClick() { } func onPaidEvent(_ revenueData: AdRevenueData) { } func onClose() { // requestDestroyAd() } func onRewarded(_ rewardItem: RewardItem) { } } |
|
1 2 3 4 5 6 7 8 9 10 11 12 13 14 15 16 17 18 19 20 21 22 23 24 25 26 27 28 29 30 31 32 33 34 35 36 37 38 39 40 41 42 43 44 45 46 47 48 49 50 51 52 53 54 55 56 57 58 59 60 61 62 63 64 65 66 |
#import <UIKit/UIKit.h> #import <HiveAdiz/HiveAdiz-Swift.h> @interface RewardedViewController : UIViewController<AdizListener> @property (nonatomic, strong) AdizRewarded* rewardedAd; @end @implementation RewardedViewController - (void) requestInitAd: (NSString*)hiveAdKey { if (hiveAdKey != nil && ![hiveAdKey isEqualToString:@""]) { // Initialize AdizRewarded Instance (ViewController, hiveAdKey, AdizListener) self.rewardedAd = [AdizRewarded initialize:self hiveAdKey:hiveAdKey adizListener:self]; } else { // Initialize Default AdizRewarded Instance (ViewController, AdizListener) self.rewardedAd = [AdizRewarded initialize:self adizListener:self]; } } - (void) requestLoadAd { // Load AdizRewarded if (self.rewardedAd != nil) { [self.rewardedAd load]; } } - (void) requestShowAd { // Show AdizRewarded if (self.rewardedAd != nil) { [self.rewardedAd show]; } } - (void) requestDestroyAd { // Destroy AdizRewarded if (self.rewardedAd != nil) { [self.rewardedAd destroy]; self.rewardedAd = nil; } } #pragma mark - AdizListener - (void) onLoad { // [self requestShowAd]; } - (void) onFail:(AdizError *)error { } - (void) onShow { } - (void) onClick { } - (void) onPaidEvent:(AdRevenueData *)revenueData { } - (void) onClose { // [self requestDestroyAd]; } - (void) onRewarded:(RewardItem *)rewardItem { } @end |
Rewarded Interstitial Ads (Rewarded Interstitial)
Rewarded interstitial ads allow users to receive rewards after watching ads for a certain period. Once the reward is issued, you will receive the information about the reward item through the onRewarded() callback.
|
1 2 3 4 5 6 7 8 9 10 11 12 13 14 15 16 17 18 19 20 21 22 23 24 25 26 27 28 29 30 31 32 33 34 35 36 37 38 39 40 41 42 43 44 45 46 47 |
import UIKit import HiveAdiz class RewardInterstitialViewController: UIViewController { // Create AdizRewardedInterstitial Instance var rewardInterstitialAd: AdizRewardedInterstitial? func requestInitAd(hiveAdKey: String?) { if let adKey = hiveAdKey, adKey.count > 0 { // Initialize AdizRewardedInterstitial Instance (ViewController, hiveAdKey, AdizListener) self.rewardInterstitialAd = AdizRewardedInterstitial.initialize(self, hiveAdKey: adKey, adizListener: self) } else { // Initialize Default AdizRewardedInterstitial Instance (ViewController, AdizListener) self.rewardInterstitialAd = AdizRewardedInterstitial.initialize(self, adizListener: self) } } func requestLoadAd() { // Load AdizRewardedInterstitial self.rewardInterstitialAd?.load() } func requestShowAd() { // Show AdizRewardedInterstitial self.rewardInterstitialAd?.show() } func requestDestroyAd() { // Destroy AdizRewardedInterstitial self.rewardInterstitialAd?.destroy() self.rewardInterstitialAd = nil } } extension RewardInterstitialViewController: AdizListener { func onLoad() { // requestShowAd() } func onFail(_ error: AdizError) { } func onShow() { } func onClick() { } func onPaidEvent(_ revenueData: AdRevenueData) { } func onClose() { // requestDestroyAd() } func onRewarded(_ rewardItem: RewardItem) { } } |
|
1 2 3 4 5 6 7 8 9 10 11 12 13 14 15 16 17 18 19 20 21 22 23 24 25 26 27 28 29 30 31 32 33 34 35 36 37 38 39 40 41 42 43 44 45 46 47 48 49 50 |
#import <UIKit/UIKit.h> #import <HiveAdiz/HiveAdiz-Swift.h> @interface RewardedInterstitialViewController : UIViewController<AdizListener> @property (nonatomic, strong) AdizRewardedInterstitial* rewardedInterstitialAd; @end @implementation RewardedInterstitialViewController - (void) requestInitAd: (NSString*)hiveAdKey { if (hiveAdKey != nil && ![hiveAdKey isEqualToString:@""]) { // Initialize AdizRewardedInterstitial Instance (ViewController, hiveAdKey, AdizListener) self.rewardedInterstitialAd = [AdizRewardedInterstitial initialize:self hiveAdKey:hiveAdKey adizListener:self]; } else { // Initialize Default AdizRewardedInterstitial Instance (ViewController, AdizListener) self.rewardedInterstitialAd = [AdizRewardedInterstitial initialize:self adizListener:self]; }} - (void) requestLoadAd { // Load AdizRewardedInterstitial if (self.rewardedInterstitialAd != nil) { [self.rewardedInterstitialAd load]; }} - (void) requestShowAd { // Show AdizRewardedInterstitial if (self.rewardedInterstitialAd != nil) { [self.rewardedInterstitialAd show]; }} - (void) requestDestroyAd { // Destroy AdizRewardedInterstitial if (self.rewardedInterstitialAd != nil) { [self.rewardedInterstitialAd destroy]; self.rewardedInterstitialAd = nil; }} #pragma mark - AdizListener - (void) onLoad { // [self requestShowAd]; } - (void) onFail:(AdizError *)error { } - (void) onShow { } - (void) onClick { } - (void) onPaidEvent:(AdRevenueData *)revenueData { } - (void) onClose { // [self requestDestroyAd]; } - (void) onRewarded:(RewardItem *)rewardItem { } @end |
App Opening Ads (AppOpen)
App opening ads display pre-loaded (load()) ads when the app status changes from background to foreground. If show() is called 3 hours after the ad is loaded, the ad will be automatically reloaded before being displayed. Once an ad is displayed at least once, it will not automatically be loaded afterwards.
|
1 2 3 4 5 6 7 8 9 10 11 12 13 14 15 16 17 18 19 20 21 22 23 24 25 26 27 28 29 30 31 32 33 34 35 36 37 38 39 40 41 42 43 |
import UIKit import HiveAdiz class AppOpenViewController: UIViewController { // Create AdizAppOpen Instance var appOpenAd: AdizAppOpen? func requestInitAd(hiveAdKey: String?) { if let adKey = hiveAdKey, adKey.count > 0 { // Initialize AdizAppOpen Instance (ViewController, hiveAdKey, AdizListener) self.appOpenAd = AdizAppOpen.initialize(self, hiveAdKey: adKey, adizListener: self) } else { // Initialize Default AdizAppOpen Instance (ViewController, AdizListener) self.appOpenAd = AdizAppOpen.initialize(self, adizListener: self) } } func requestLoadAd() { // Load AdizAppOpen self.appOpenAd?.load() } func requestShowAd() { print("[appOpenAd] appOpenAd don't request Show") } func requestDestroyAd() { // Destroy AdizAppOpen self.appOpenAd?.destroy() self.appOpenAd = nil } } extension AppOpenViewController: AdizListener { func onLoad() { } func onFail(_ error: AdizError) { } func onShow() { } func onClick() { } func onPaidEvent(_ revenueData: AdRevenueData) { } func onClose() { // requestDestroyAd() } } |
|
1 2 3 4 5 6 7 8 9 10 11 12 13 14 15 16 17 18 19 20 21 22 23 24 25 26 27 28 29 30 31 32 33 34 35 36 37 38 39 40 41 42 43 44 45 |
#import <UIKit/UIKit.h> #import <HiveAdiz/HiveAdiz-Swift.h> @interface AppOpenViewController : UIViewController<AdizListener> @property (nonatomic, strong) AdizAppOpen* appOpenAd; @end @implementation AppOpenViewController - (void) requestInitAd: (NSString*)hiveAdKey { if (hiveAdKey != nil && ![hiveAdKey isEqualToString:@""]) { // Initialize AdizAppOpen Instance (ViewController, hiveAdKey, AdizListener) self.appOpenAd = [AdizAppOpen initialize:self hiveAdKey:hiveAdKey adizListener:self]; } else { // Initialize Default AdizAppOpen Instance (ViewController, AdizListener) self.appOpenAd = [AdizAppOpen initialize:self adizListener:self]; }} - (void) requestLoadAd { // Load AdizAppOpen if (self.appOpenAd != nil) { [self.appOpenAd load]; }} - (void) requestShowAd { NSLog(@"[appOpenAd] appOpenAd don't request Show"); } - (void) requestDestroyAd { // Destroy AdizAppOpen if (self.appOpenAd != nil) { [self.appOpenAd destroy]; self.appOpenAd = nil; }} #pragma mark - AdizListener - (void) onLoad { } - (void) onFail:(AdizError *)error { } - (void) onShow { } - (void) onClick { } - (void) onPaidEvent:(AdRevenueData *)revenueData { } - (void) onClose { // [self requestDestroyAd]; } @end |