Upload patch version to Hive server
If you have previously distributed a PC version app using Crossplay Launcher in either the Sandbox or Live environment, you need to upload the patch version to the Hive console Sandbox or Production server for updating this app.
There are two main ways to upload the patch version:
- Uploading only the patch file
- Uploading the patch file along with the entire app files
Uploading only the patch file means users update the app only with the patch file. This method can be used when the patch file size is not large. However, this method can cause an issue when there are many intermediate versions between the initial version and the latest version (e.g., 1.0.0.0, 1.0.0.1, 1.0.0.2, …, 1.1.0.0). As the Crossplay Launcher updates the version sequentially through intermediate versions (e.g., 1.0.0.0 → 1.0.0.1 → 1.0.0.2 → … → 1.1.0.0), continuously updating the app with only patch files can take a long time for the users who installs the app for the first time or reinstalls the app.
Uploading the patch file along with the entire app files means users reinstall the app to update it. This method can be used when the entire app size is not excessively large and when there are many intermediate versions. In this case, the time it takes for users to update the app may be shorter than updating the app with only patch files.
In the end, whether to choose one of the methods depends on considerations such as the total size of the app files, the number of intermediate versions, and the size of the app patch files. The app developers should select one after checking the time required for app installation and updates.
Creating patch files
For both methods, you need to create patch files first. Use the patch maker to analyze the differences between the app’s current version and the new version and generate patch files. Then, upload the patch files to the Hive server using an uploader. The total size of the files of new version app must be less than 30GB based on disk allocation size, and the size of each file of new version app must be less than 4GB.
Both the patch maker and the uploader come in two types: GUI and CUI. Choose one of the two methods depending on your development environment. Below, we’ll guide you through how to use GUI or CUI patch maker in a situation where you’re updating a game app version.
Scenario
- AppID:
com.gcp2.stepbystep.windows.google.global.normal - Hive console server to upload to:
LIVE - Previous app version:
1.0.0.0 - Location of the previous version app:
D:\myGame_v1_0_0_0 - Latest app version:
1.0.0.1 - Location of the latest version app:
D:\myGame_v1_0_0_1 - Location to generate patch files:
D:\PATCH_myGame_v1_0_0_0_myGame_v1_0_0_1
Option 1: Create patch file using GUI
The GUI patch maker creates patch files through a GUI interface.
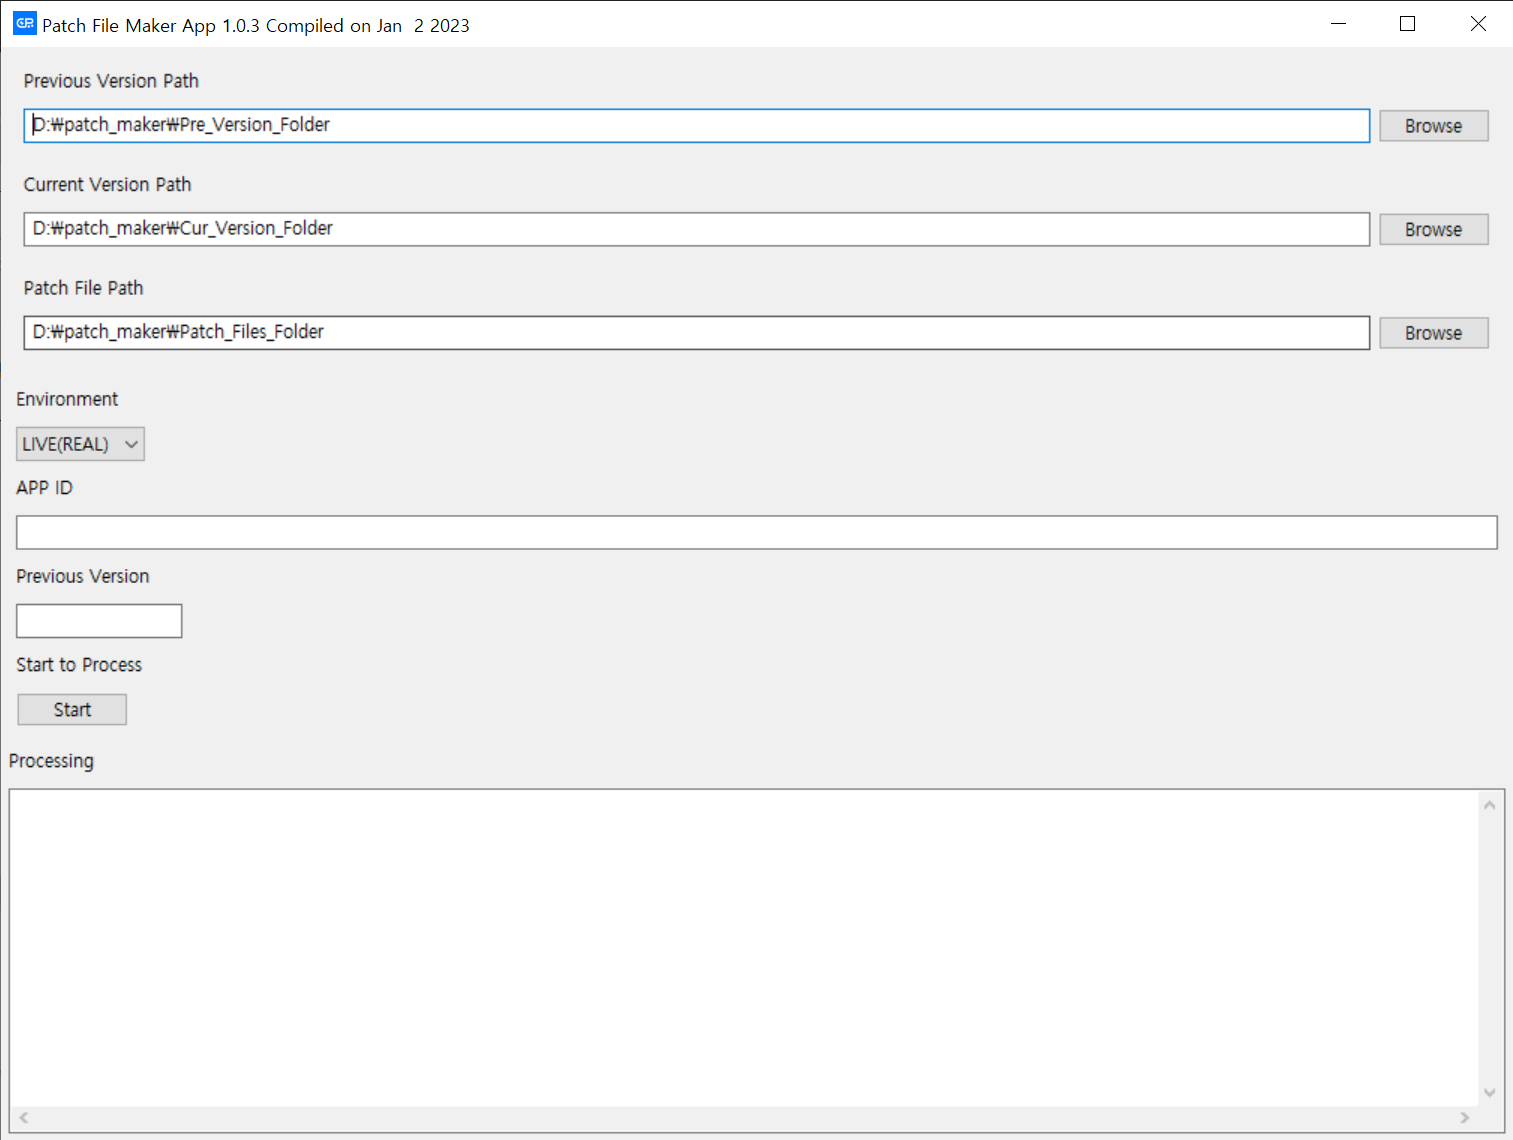
- Download the Crossplay Launcher tool from here and extract it, then run GUI/patch_maker/CrossplayLauncherPatchFileMaker.exe.
- In the patch maker interface, enter the following and press Start:
- Previous Version Path:
D:\myGame_v1_0_0_0 - Current Version Path:
D:\myGame_v1_0_0_1 - Patch File Path:
D:\PATCH_myGame_v1_0_0_0_myGame_v1_0_0_1 - Environment: Use
SANDBOXfor sandbox environment,LIVE(REAL)for live environment - APP ID:
com.gcp2.stepbystep.windows.google.global.normal - Previous Version:
1.0.0.0
- Previous Version Path:
Option 2: Generating patch files using CUI
- Download the Crossplay Launcher tool and extract it from here.
- Create Pre_Version_Folder and Cur_Version_Folder folders in the same directory where CUI/patch_maker/cpflPtc.exe is located, and copy the files from D:\myGame_v1_0_0_0 and D:\myGame_v1_0_0_1 into these folders, respectively.
-
Run CUI/patch_maker/cpflPtc.exe in the Windows terminal or PowerShell with the following command-line arguments:
- ‐‐prePath:
D:\myGame_v1_0_0_0, default isPre_Version_Foler - ‐‐nextPath:
D:\myGame_v1_0_0_1, default isCur_Version_Foler - ‐‐patchPath:
D:\PATCH_myGame_v1_0_0_0_myGame_v1_0_0_1, default isPatch_Files_Folder - -envi: Sandbox environment is
SANDBOX, Live environment isLIVE(must be the same as the environment where version1.0.0.0app files were uploaded) - ‐‐appid:
com.gcp2.stepbystep.windows.google.global.normal - ‐‐version: Enter the previous version,
1.0.0.0 - -runbatch:
y(whether to skip the question prompt during the patching process)
12345678910cpflPtc.exe \‐‐prePath="D:\myGame_v1_0_0_0" \‐‐nextPath="D:\myGame_v1_0_0_1" \‐‐patchPath="D:\PATCH_myGame_v1_0_0_0_myGame_v1_0_0_1" \-envi="LIVE" \-appid="com.gcp2.stepbystep.windows.google.global.normal" \-version="1.0.0.0" \-runbatch="y" - ‐‐prePath:
Verify the generated patch files
Check the patch files generated by the GUI or CUI patch maker in the Patch_Files_Folder. If the file data differs even though the file paths are the same between the previous and new versions, a patch file is generated. If a file is added in the new version that was not present in the previous version, a file will be created at the corresponding file path in Patch_Files_Folder.
Option 1: Uploading patch files only
Upload the generated patch files to either the Hive console Sandbox server or the Hive console Live server. There are two types of uploaders available: GUI and CUI. Depending on your development environment, choose one of these methods to upload the patch files.
Option 1: Uploading patch files using GUI
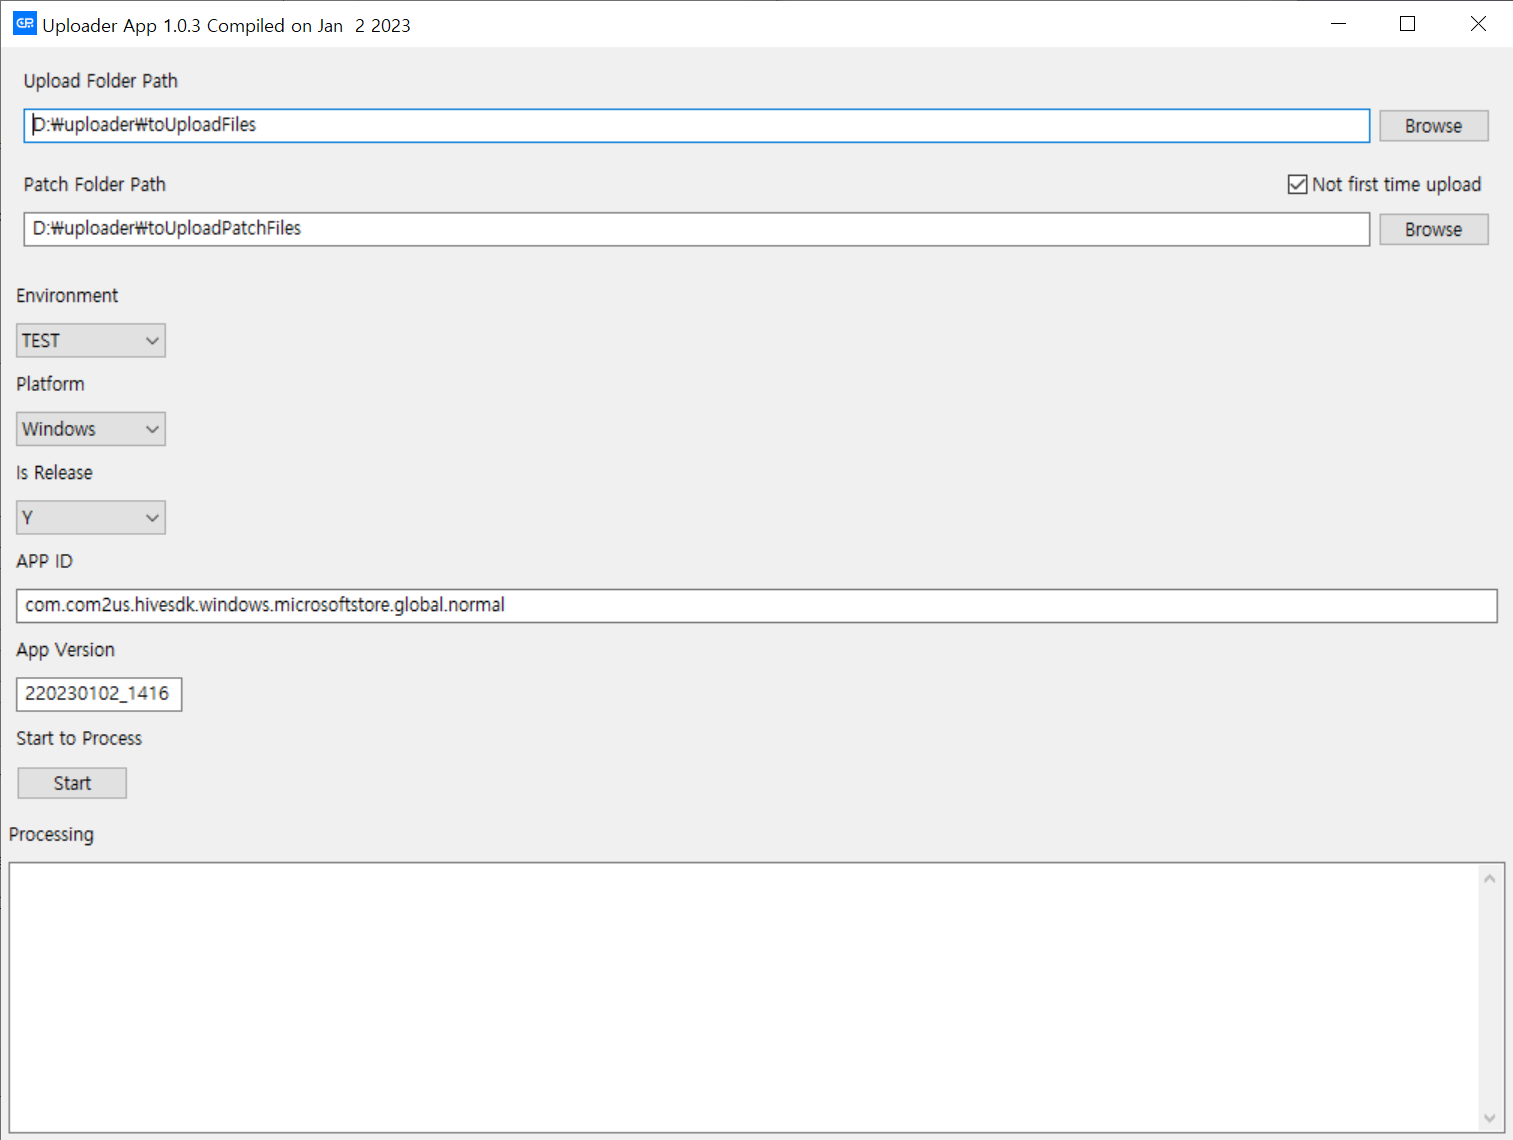
The GUI uploader uploads through a graphical interface.
- From the Hive Sandbox console or Hive Live console, navigate to Crossplay Launcher > App Management > Upload IP and select the game and AppID. Register the IP address of the PC where the app files will be uploaded as the representative IP (Rep IP).
- Download the Crossplay Launcher tool and extract it from here.
- Execute GUI/uploader/CrossplayLauncherFileUploader.exe.
- On the uploader screen, input the following and click Start:
- Upload Folder Path:
D:\myGame_v1_0_0_1 - Patch Folder Path:
D:\PATCH_myGame_v1_0_0_0_myGame_v1_0_0_1(path where the patch files generated by the patch maker are located) - Not first time upload:
Checked - Enviorment: Sandbox environment is
SANDBOX, Live environment isLIVE(REAL)(must match the environment where version1.0.0.0app files were uploaded) - Platform:
Windows - Is Release:
N - APP ID:
com.gcp2.stepbystep.windows.google.global.normal - App Version:
1.0.0.1
- Upload Folder Path:
- If the upload is successful, the Processing window will display status code
201.
Option 2: Uploading patch files using CUI
- From the Hive Sandbox console or Hive Live console, navigate to Crossplay Launcher > App Management > Upload IP and select the game and AppID. Register the IP address of the PC where the app files will be uploaded as the representative IP (Rep IP).
- Download the Crossplay Launcher tool and extract it from here.
-
Execute CUI/uploader/cpflupl.exe in Windows terminal or PowerShell with the following command-line arguments:
- -envi: Sandbox environment is
SANDBOX, Live environment isLIVE(must match the environment where version1.0.0.0app files were uploaded) - ‐‐platform:
w - ‐‐release:
n - -notfirstupload: Applicable (only when uploading patch files, not uploading a new app)
- ‐‐appid:
com.gcp2.stepbystep.windows.google.global.normal - ‐‐version:
1.0.0.1 - ‐‐filepath:
D:\myGame_v1_0_0_1 - ‐‐filepatchpath:
D:\PATCH_myGame_v1_0_0_0_myGame_v1_0_0_1, default istoUploadPatchFiles - -runbatch: Applicable
12345678910cpflupl.exe \‐‐appid="com.gcp2.stepbystep.windows.google.global.normal" \‐‐platform="w" \‐‐version="1.0.0.1" \-envi="LIVE" \‐‐filepath="D:\myGame_v1_0_0_1" \‐‐filepatchpath="D:\PATCH_myGame_v1_0_0_0_myGame_v1_0_0_1" \-runbatch ‐‐notfirstupload ‐‐release="n" - -envi: Sandbox environment is
- If the upload is successful, you will see status code
201in the terminal or shell.
Option 2: Uploading patch files and the entire app files together
Upload the created patch files and full app files to either the Hive console Sandbox Server or the Hive console Live Server. There are two types of uploaders: GUI and CUI. Choose one of these methods depending on your development environment to upload the patch files and the entire app files.
Option 1: Uploading patch files and full app files using GUI
The GUI uploader uploads through GUI screen.
- Select the game and AppID at Hive Sandbox console or Hive Live console under Crossplay Launcher > App Management > Upload IP, and register the IP address of the PC where the app files will be uploaded as the representative IP (Rep IP).
- Download and extract the Crossplay Launcher tool from here.
- Run GUI/uploader/CrossplayLauncherFileUploader.exe.
- On the uploader screen, input the following details and click Start:
- Upload Folder Path:
D:\myGame_v1_0_0_1 - Patch Folder Path:
D:\PATCH_myGame_v1_0_0_0_myGame_v1_0_0_1(the directory where the patch files generated by the patch maker are located) - Not first time upload:
Checked - Environment:
SANDBOXfor Sandbox environment,LIVE(REAL)for Live environment (should match the environment where version1.0.0.0app files were uploaded) - Platform:
Windows - Is Release:
Y - APP ID:
com.gcp2.stepbystep.windows.google.global.normal - App Version:
1.0.0.1
- Upload Folder Path:
- If the upload is successful, the Processing window will display status code
201.
Option 2: Uploading patch files and full app files using CUI
- Select the game and AppID at Hive Sandbox console or Hive Live console under Crossplay Launcher > App Management > Upload IP, and register the IP address of the PC where the app files will be uploaded as the representative IP (Rep IP).
- Download and extract the Crossplay Launcher tool from here.
-
Execute CUI/uploader/cpflupl.exe with the following command-line arguments in Windows terminal or PowerShell:
- -envi: Sandbox environment is
SANDBOX, Live environment isLIVE(must match the environment where version1.0.0.0app files were uploaded) - ‐‐platform:
w - ‐‐release:
y - -notfirstupload: Applicable (only when uploading patch files, not uploading a new app)
- ‐‐appid:
com.gcp2.stepbystep.windows.google.global.normal - ‐‐version:
1.0.0.1 - ‐‐filepath:
D:\myGame_v1_0_0_1 - ‐‐filepatchpath:
D:\PATCH_myGame_v1_0_0_0_myGame_v1_0_0_1, default istoUploadPatchFiles - -runbatch: Applicable
12345678910cpflupl.exe \‐‐appid="com.gcp2.stepbystep.windows.google.global.normal" \‐‐platform="w" \‐‐version="1.0.0.1" \-envi="LIVE" \‐‐filepath="D:\myGame_v1_0_0_1" \‐‐filepatchpath="D:\PATCH_myGame_v1_0_0_0_myGame_v1_0_0_1" \-runbatch ‐‐notfirstupload ‐‐release="n" - -envi: Sandbox environment is
- If the upload is successful, you will see status code
201in the terminal or shell.
Check upload result
After the upload is completed, go to Hive console > Crossplay Launcher > App Management > Download Setting to verify that the app has been successfully uploaded.