This page informs you how to develop Unity-base game; porting Hive SDK, or building Android, iOS, or Windows apps.
Prerequisites
Supported Unity Versions
- Unity 2018.4.24+
- Unity 2019.3.7+
- Unity 2020.1.0+
- Unity 2021.1.0+
- Unity 2018.4 LTS and earlier had terminated the Long Term Support, so Unity is unavailable to handle the future bugs or issues.
- Unity 2019.4 LTS will be updated biweekly until mid-2021, then monthly until it deprecates in May 2022.
- Unity 2020 is being currently developed and will support to update at least for 2 years after then.
Windows
To use the Hive SDK Unity Windows, you need to use the Unity 2021.3.22f or higher versions. If you use the previous versions to the Hive SDK v4.15.6, delete the Assets/Hive_SDK_v4/Plugins/Windows/additional folder and import the package you need.
Android
To use the Hive SDK Unity Android, you need the following Gradle version. The default Gradle version by Unity version can be found on here. If the default Gradle version set by Unity is lower than the Gradle version required from Hive SDK, go to Preferences > External Tools > Android > gradle to set Gradle version. For more details of downloading Gradle, see Gradle build tool.
iOS
Make sure to use Xcode 13 in Hive SDK v4.15.4 and higher.
Porting
To develop Unity-base apps, port Hive SDK as plugin type to Unity development environment. As following description, add Hive SDK to the development environment and execute necessary setup and coding.
- Adding Plugins to Development Environment
- General Settings
- Adding External Libraries
- Hive Settings
- Adding Codes to Initialize Plugin
Adding Plugins to Development Environment
Open your game project by Unity development environment, select Plugin Package in Assets >; Import Package >; Custom Package menu, and then select the Hive SDK for Unity downloaded from Hive Developers to add.
If Hive SDK is added successfully, the project screen of Unity development environment displays the SDK files.
General Settings
App settings for Android and iOS is different. Check the following description.
Android
- Click File >; Build Settings…. Build Settings screen will show up. Then, select Android from the Platform list.
- Click Switch Platform button. Platform switching process runs.
- After switching the platform, click Player Settings… button in Build Settings screen.
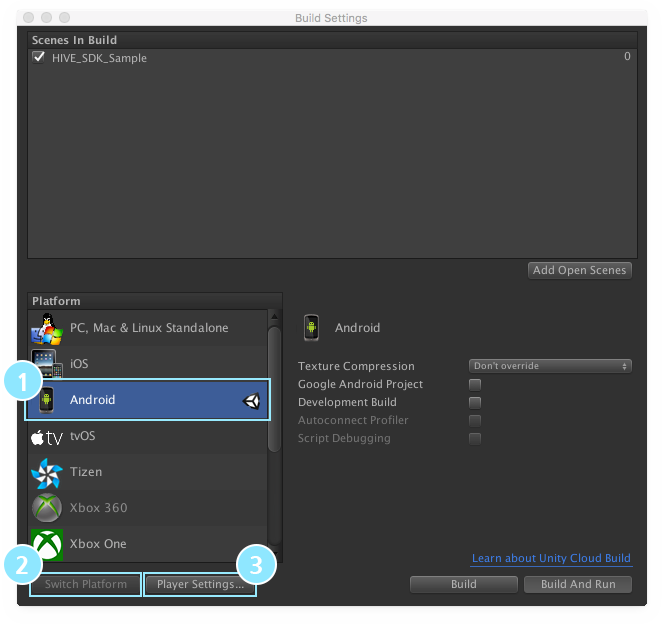
- In the Other Settings section of Inspector screen:
- Input AppID of the game in the blank of Bundle Identifier field. If you do not know the game AppID, read Prerequisites.
- Set the Minimum API Level as 19 and higher level.

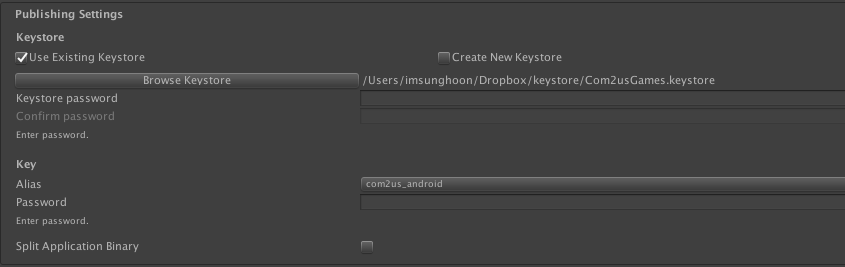
- Set the Signing Key in the Publish Settings section of the Inspector screen.
- To use the R8 compiler for optimizing an app, set the R8 config file by following the R8(prev. ProGuard) Config File Settings guide.
iOS
- Click File >; Build Settings…. Build Settings screen will show up. Then, select iOS from the Platform list.
- Click Switch Platform button. Platform switching process runs.
- After switching the platform, click Player Settings… button in Build Settings screen. Inspector screen will show up.
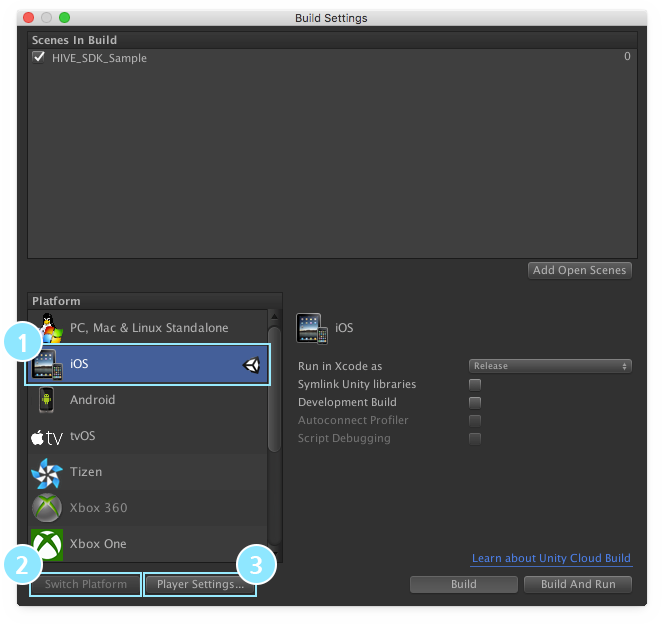
- in the Inspector screen:
- Input AppID of the game in the blank of Bundle Identifier field. If you do not know the game AppID, read Prerequisites.
- Set the target minimum iOS version as the same with iOS version in the range of support by Hive SDK. The oldest version of iOS which Hive supports is 8.0, so set the value as 8.0 and later.
Windows
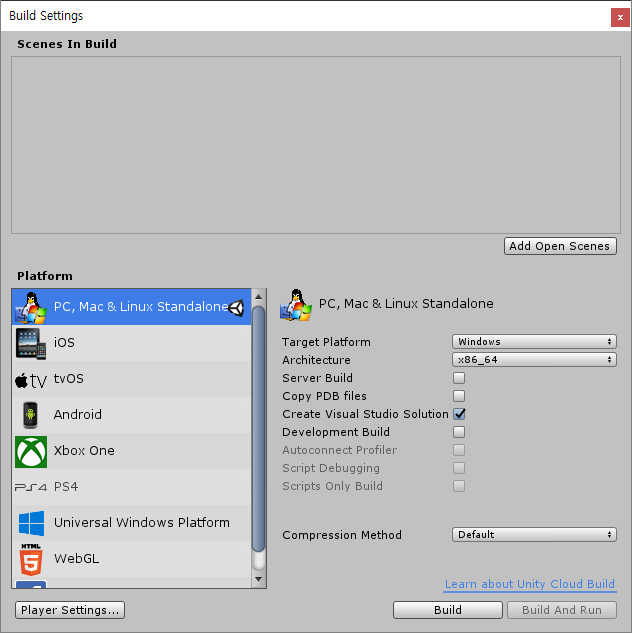
Before building your Windows project, Go to the File > Build Settings… on the editor and follow the settings below:
- Configure the build for Windows.
- Target Platform: Windows
- Architecture: x86_64
- Create Visual Studio Solution (Option): The build method differs depending on checking this option or not.
- Configure the player for Windows. Build Settings… Click on the Player Settings… button at the left bottom of a window or go to the Player section on the inspector window to set up Player Settings as below.
- Scripting Backend: IL2CPP
- API Compatibility Level: .NET Standard 2.1
- Auto Graphics APIs for Windows: Direct3D11 or OpenGLCore

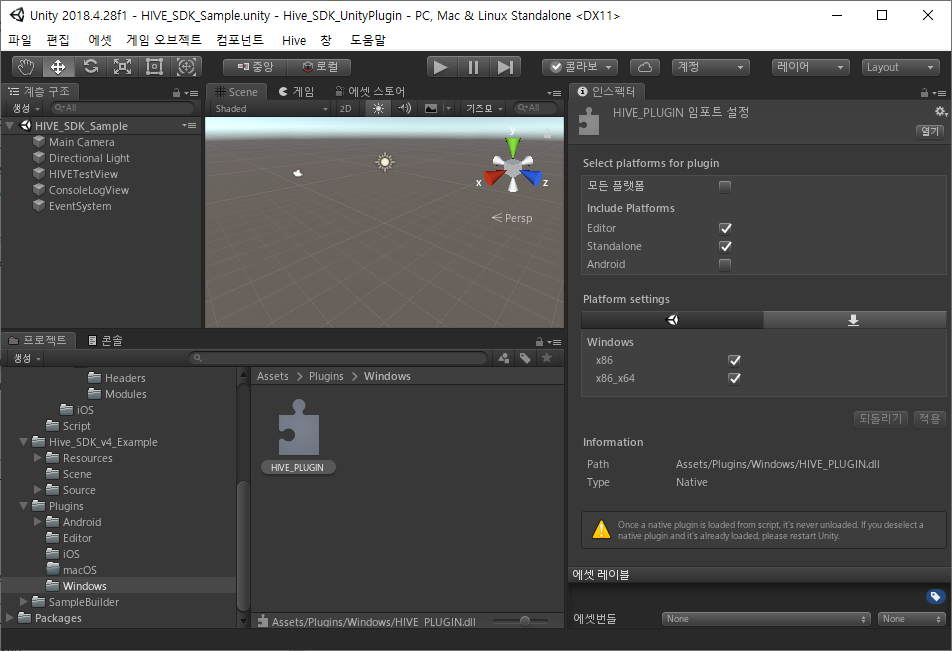
- Configure HIVE_PLUGIN.dll file. In an Inspector window, set up the HIVE_PLUGIN.dll file in Assets\Hive_SDK_v4\Plugins\Windows as below.
Windows: Purchase settings for Steam target build
If your game targets Steam, the payment is supported via IAPv4 module. The payment process is just as the existing IAPv4.
- See the Steamworks documents and prepare the steam_appid.txt resource file.
- After the completion of the build, download sdk/redistributable_bin/win64/steam_api64.dll from Steamworks, copy and paste it in the directory that the game launch file exists.
- Copy and paste the prepared steam_appid.txt file in the directory that the game launch file exists. Beware that steam_appid.txt file should not be packaged in the commercial distribution of your game.
Adding External Libraries
Hive SDK contains External-Dependency-Manager for Unity (EDM4U, formerly Google Play Service Resolver) when distributing the UnityPackage of Hive SDK, and plays a role to automatically install and distribute the libraries required to build through EDM4U settings. If EDM4U is unavailable to run, set the build environment first. Use EDM4U-providing GUI or Bash, which is called the Unix shell, the Command Line Interface (CLI).
Android
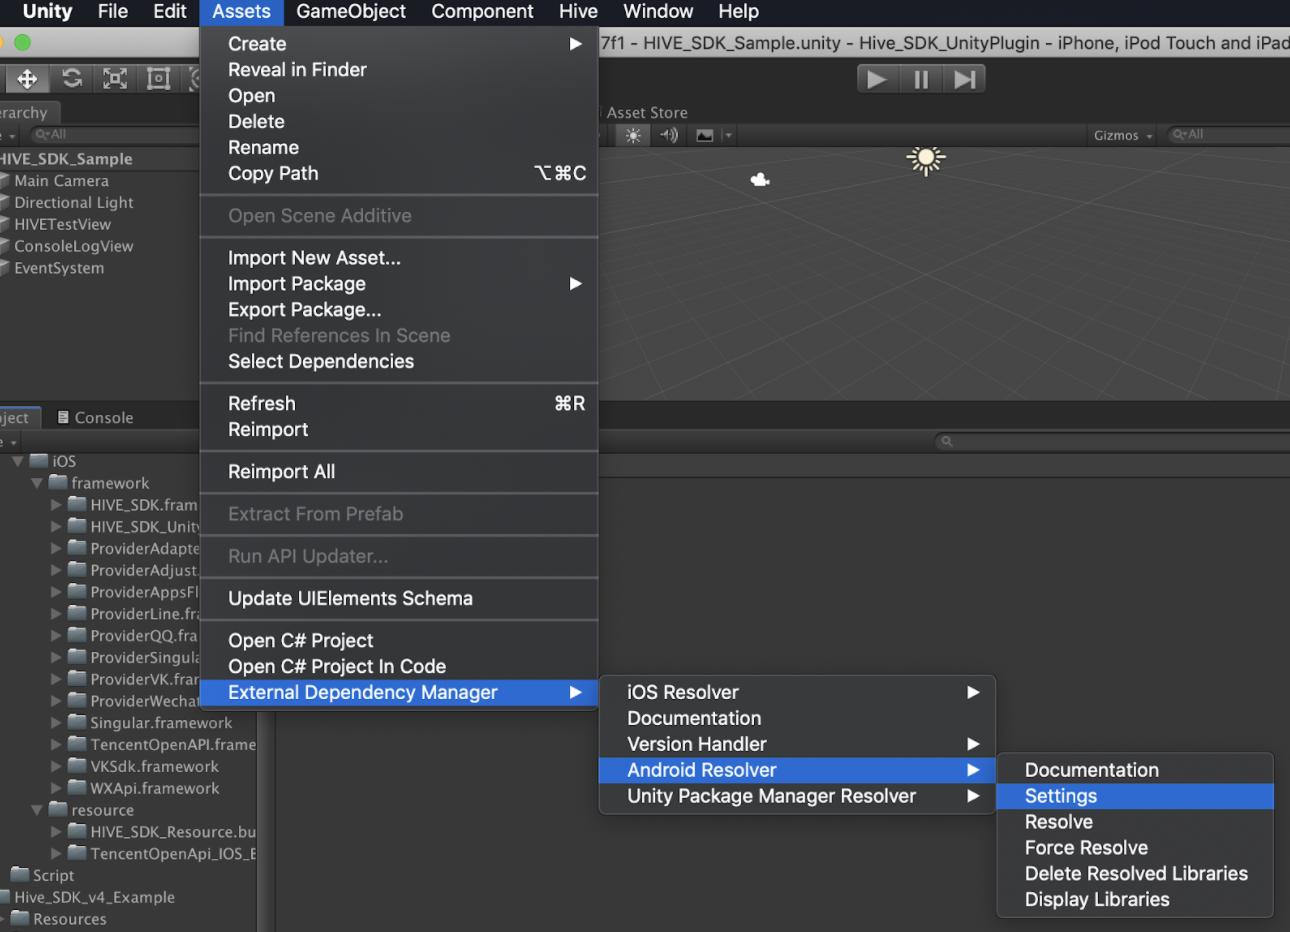
- Click Asset > External Dependency Manager > Android Resolver > Settings on Unity.
- Mark a check as a default settings in the red box on Android Resolver Settings window.

- Check Copy and patch settingsTempalte.gradle from 2022.2 only in ther Unity 2022.2 or higher versions.
- Hive SDK supports the Use Jetifier function, so we recommend unchecking it. If you’re using the latest version of Unity and checking Use Jetifier, you need to create Custom Gradle Properties Template separately according to the Unity Manual.
Setting Dependency of External Libraries
To use the VK library, minSdkVersion 21 or higher and targetSdkVersion 32 or higher are required.
Additionally, please add VK settings according to this.
- Click Hive >; ExternalDependency menu on Unity.
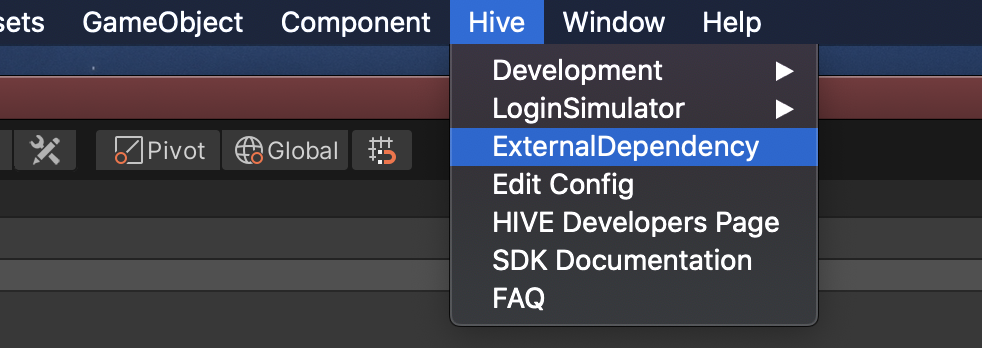
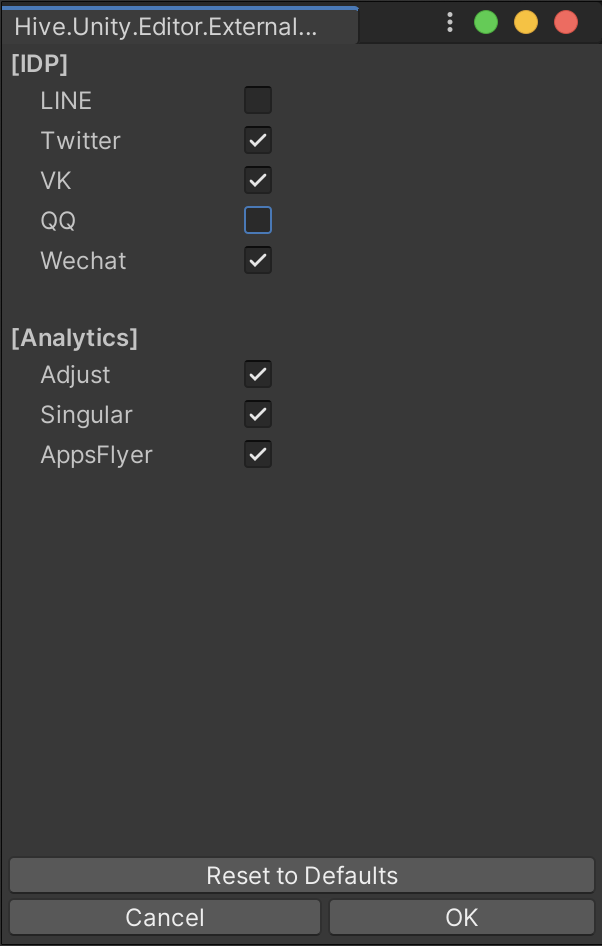
- Configure the dependency on the settings window.
To integrate the Line library, Hive SDK v4 23.0.0 or higher is required, and for Android, a minimum SDK version of 24 or higher is necessary.
When applying Hive SDK v4 23.0.0 or higher, the following configuration window will be displayed:
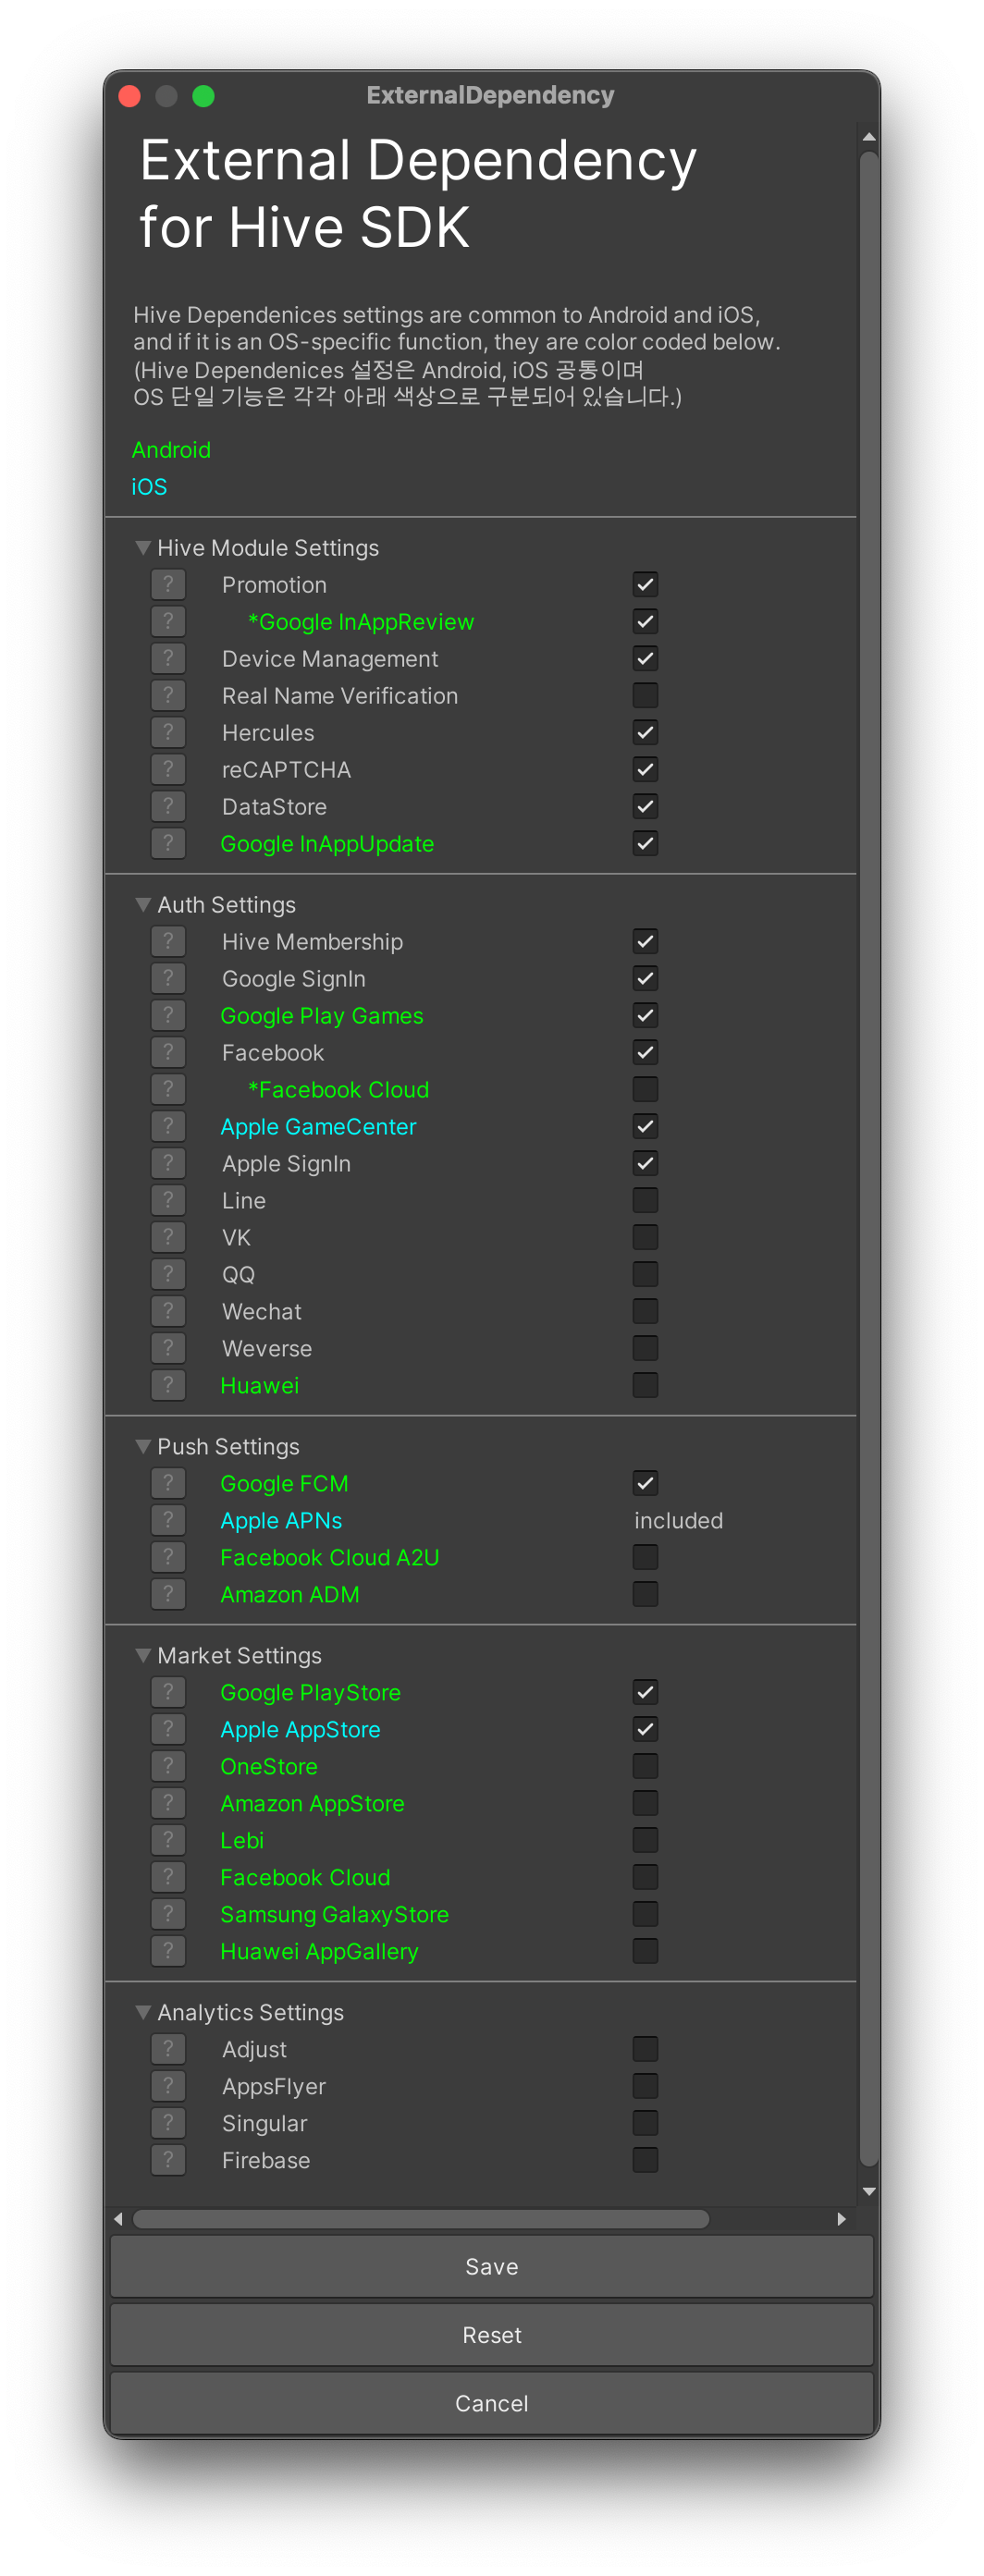
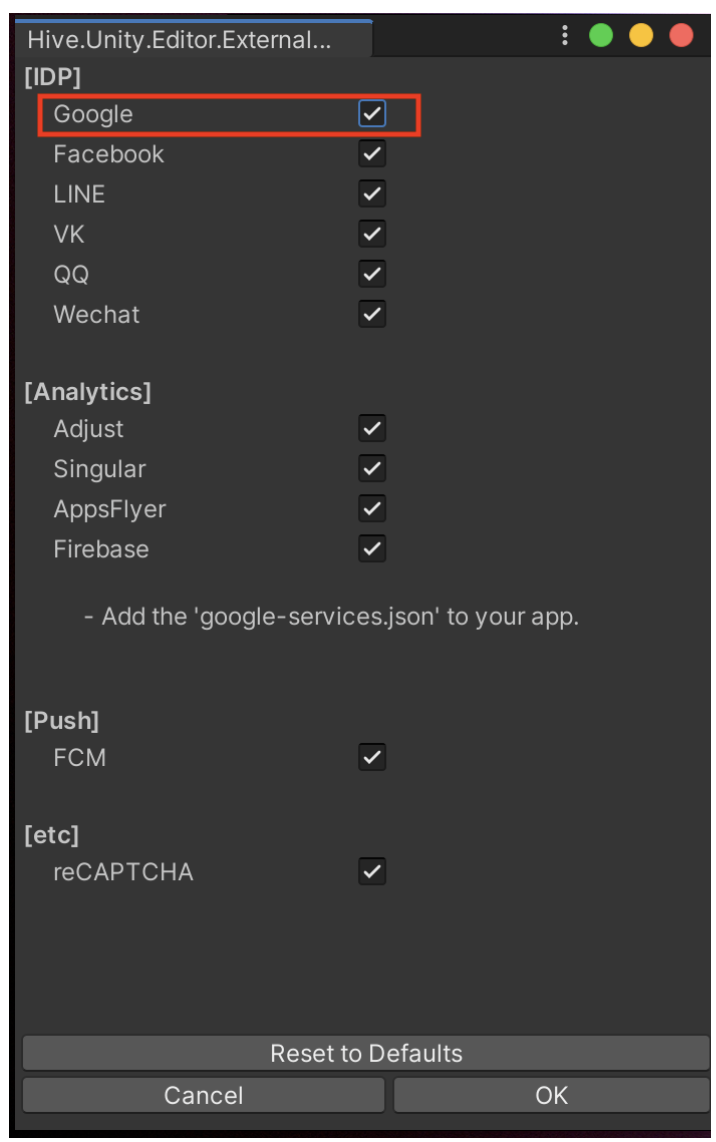
- When using Google or GooglePlayGames IdP, enable the Google checkbox.
- Below Hive SDK v4 23.0.0: Enable the Google checkbox.
- Hive SDK v4 23.0.0 or higher: For Google IdP, enable the Google SignIn checkbox, and for GooglePlayGames IdP, enable the Google Play Games checkbox.
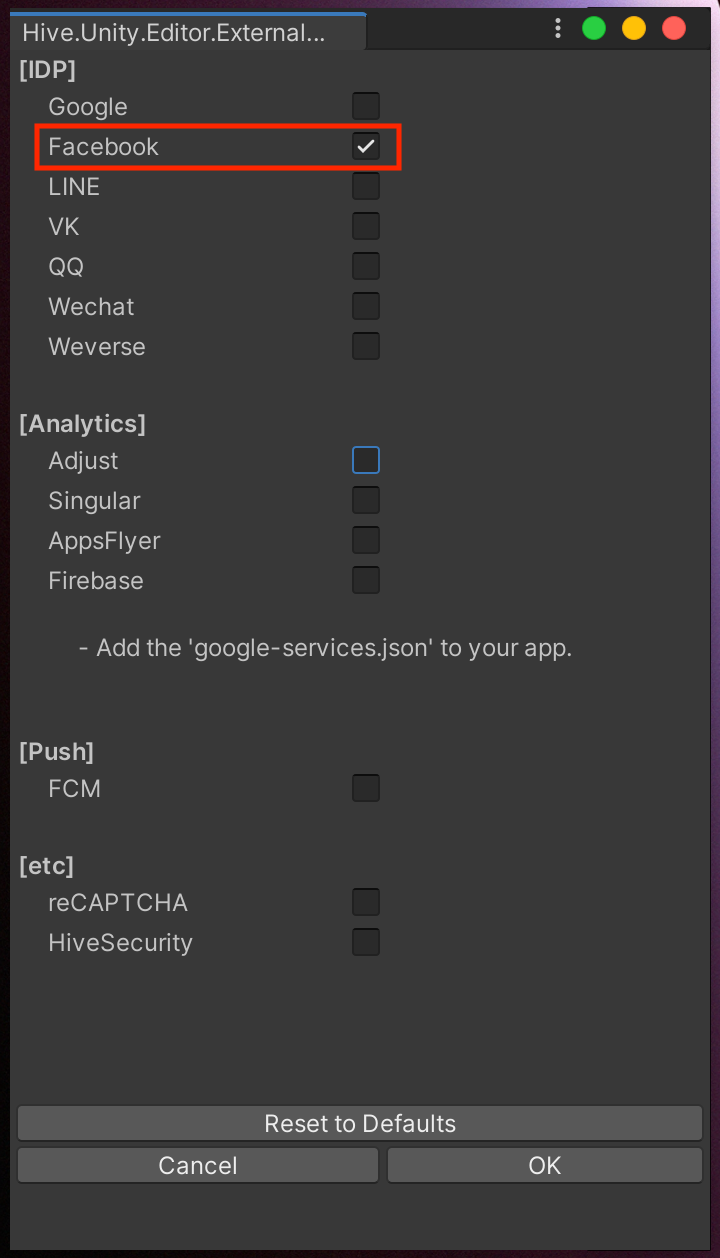
- When using Facebook IdP, enable the Facebook checkbox.
- To create a Facebook Cloud Game build, refer to Configuring Android Unity Project for Facebook Cloud Game Build.
- Google InAppReview on Android requires Promotion settings.
From Hive SDK v4 24.2.0 or above, Facebook Cloud Game build is not supported.
iOS
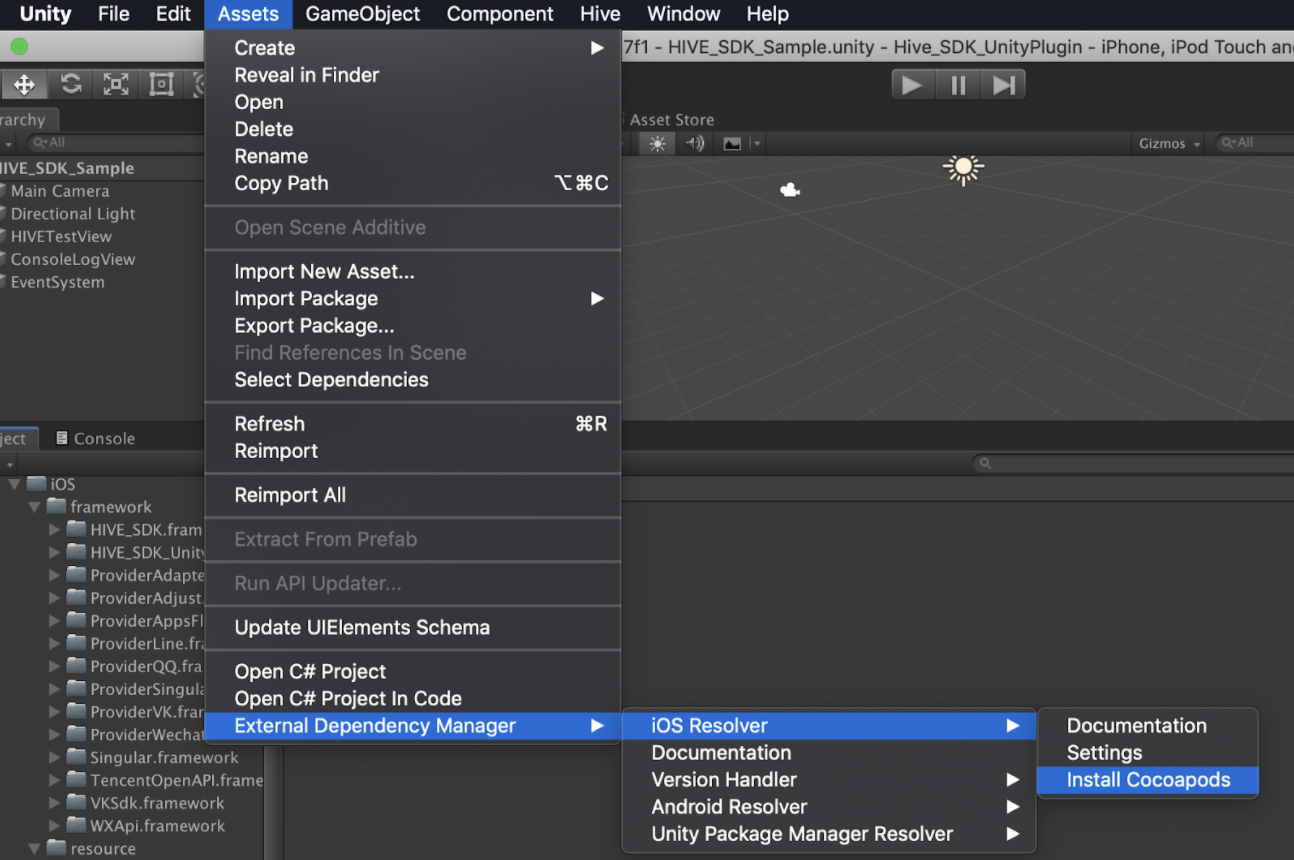
- CocoaPods installation
- Click Asset > External Dependency Manager > iOS Resolver > Install CocoaPods on Unity.
- Command lines on Bash is also available.
Installation is completed if the result is as follows.1$sudo gem install cocoapods

- Click Asset > External Dependency Manager > iOS Resolver > Install CocoaPods on Unity.
- CocoaPods settings
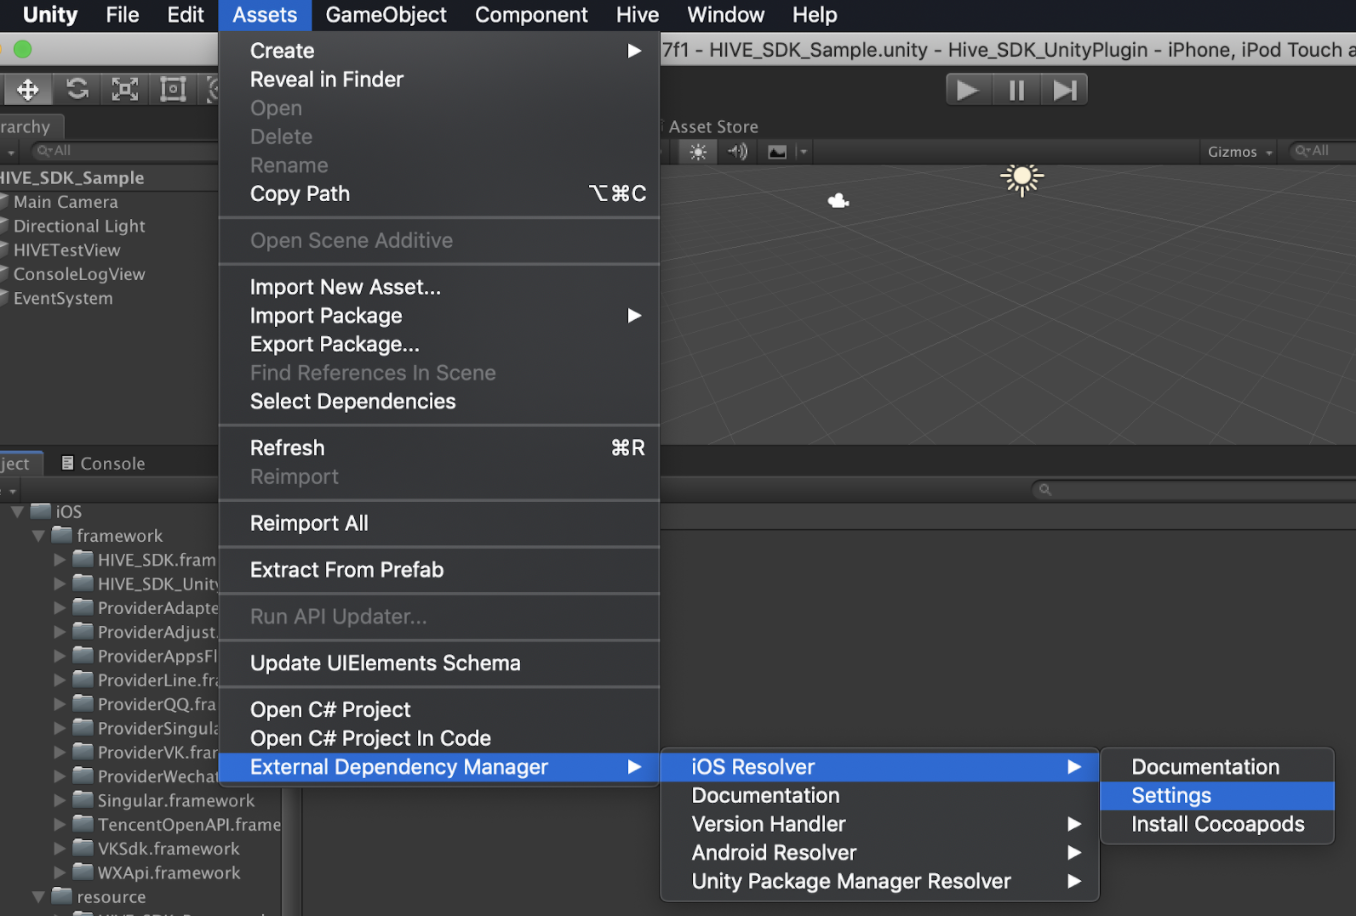
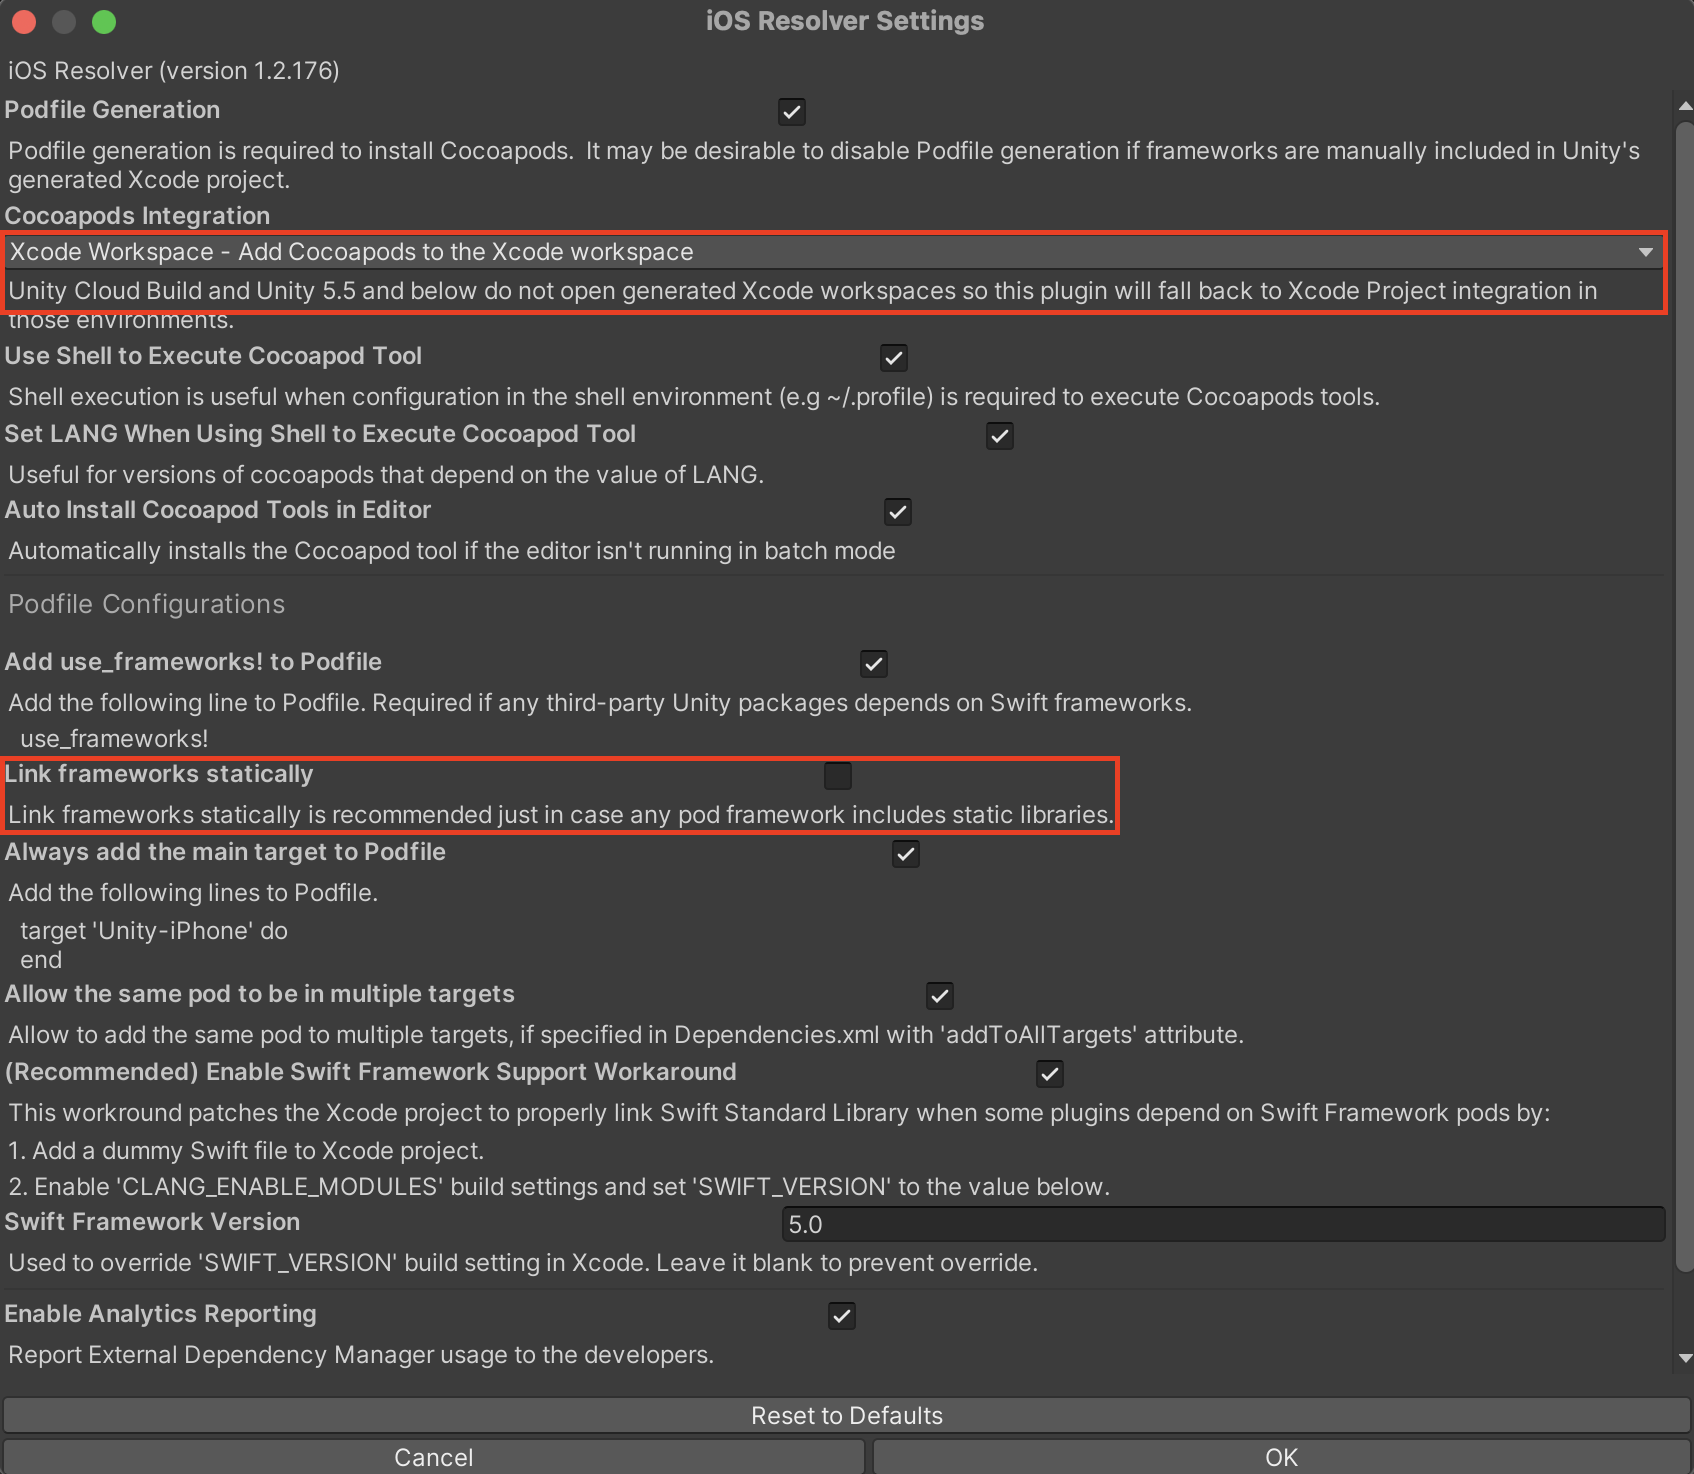
If some external libraries on iOS are provided via CocoaPods, .xcodeproj file is exchanged to .xcworkspace file. If you can’t build with the .xcworkspace format, change the settings through GUI. The method of running CocoaPods on Unity will be changed to build the project.- Click Asset > External Dependency Manager > iOS Resolver > Settings on Unity.
- If the iOS Resolver Settings window appears, set Cocoapods Integration as .xcworkspace, and uncheck Link framework statically to prevent the framework from being referred in static way.
- Click Asset > External Dependency Manager > iOS Resolver > Settings on Unity.
Include the required files to use Firebase (iOS)
If you place a GoogleService-Info.plist file containing project information under Assets/ExternalResources/iOS path in the Unity project, it will be connected to the default main target (Unity-iPhone) when building a Xcode project.
Hive Settings
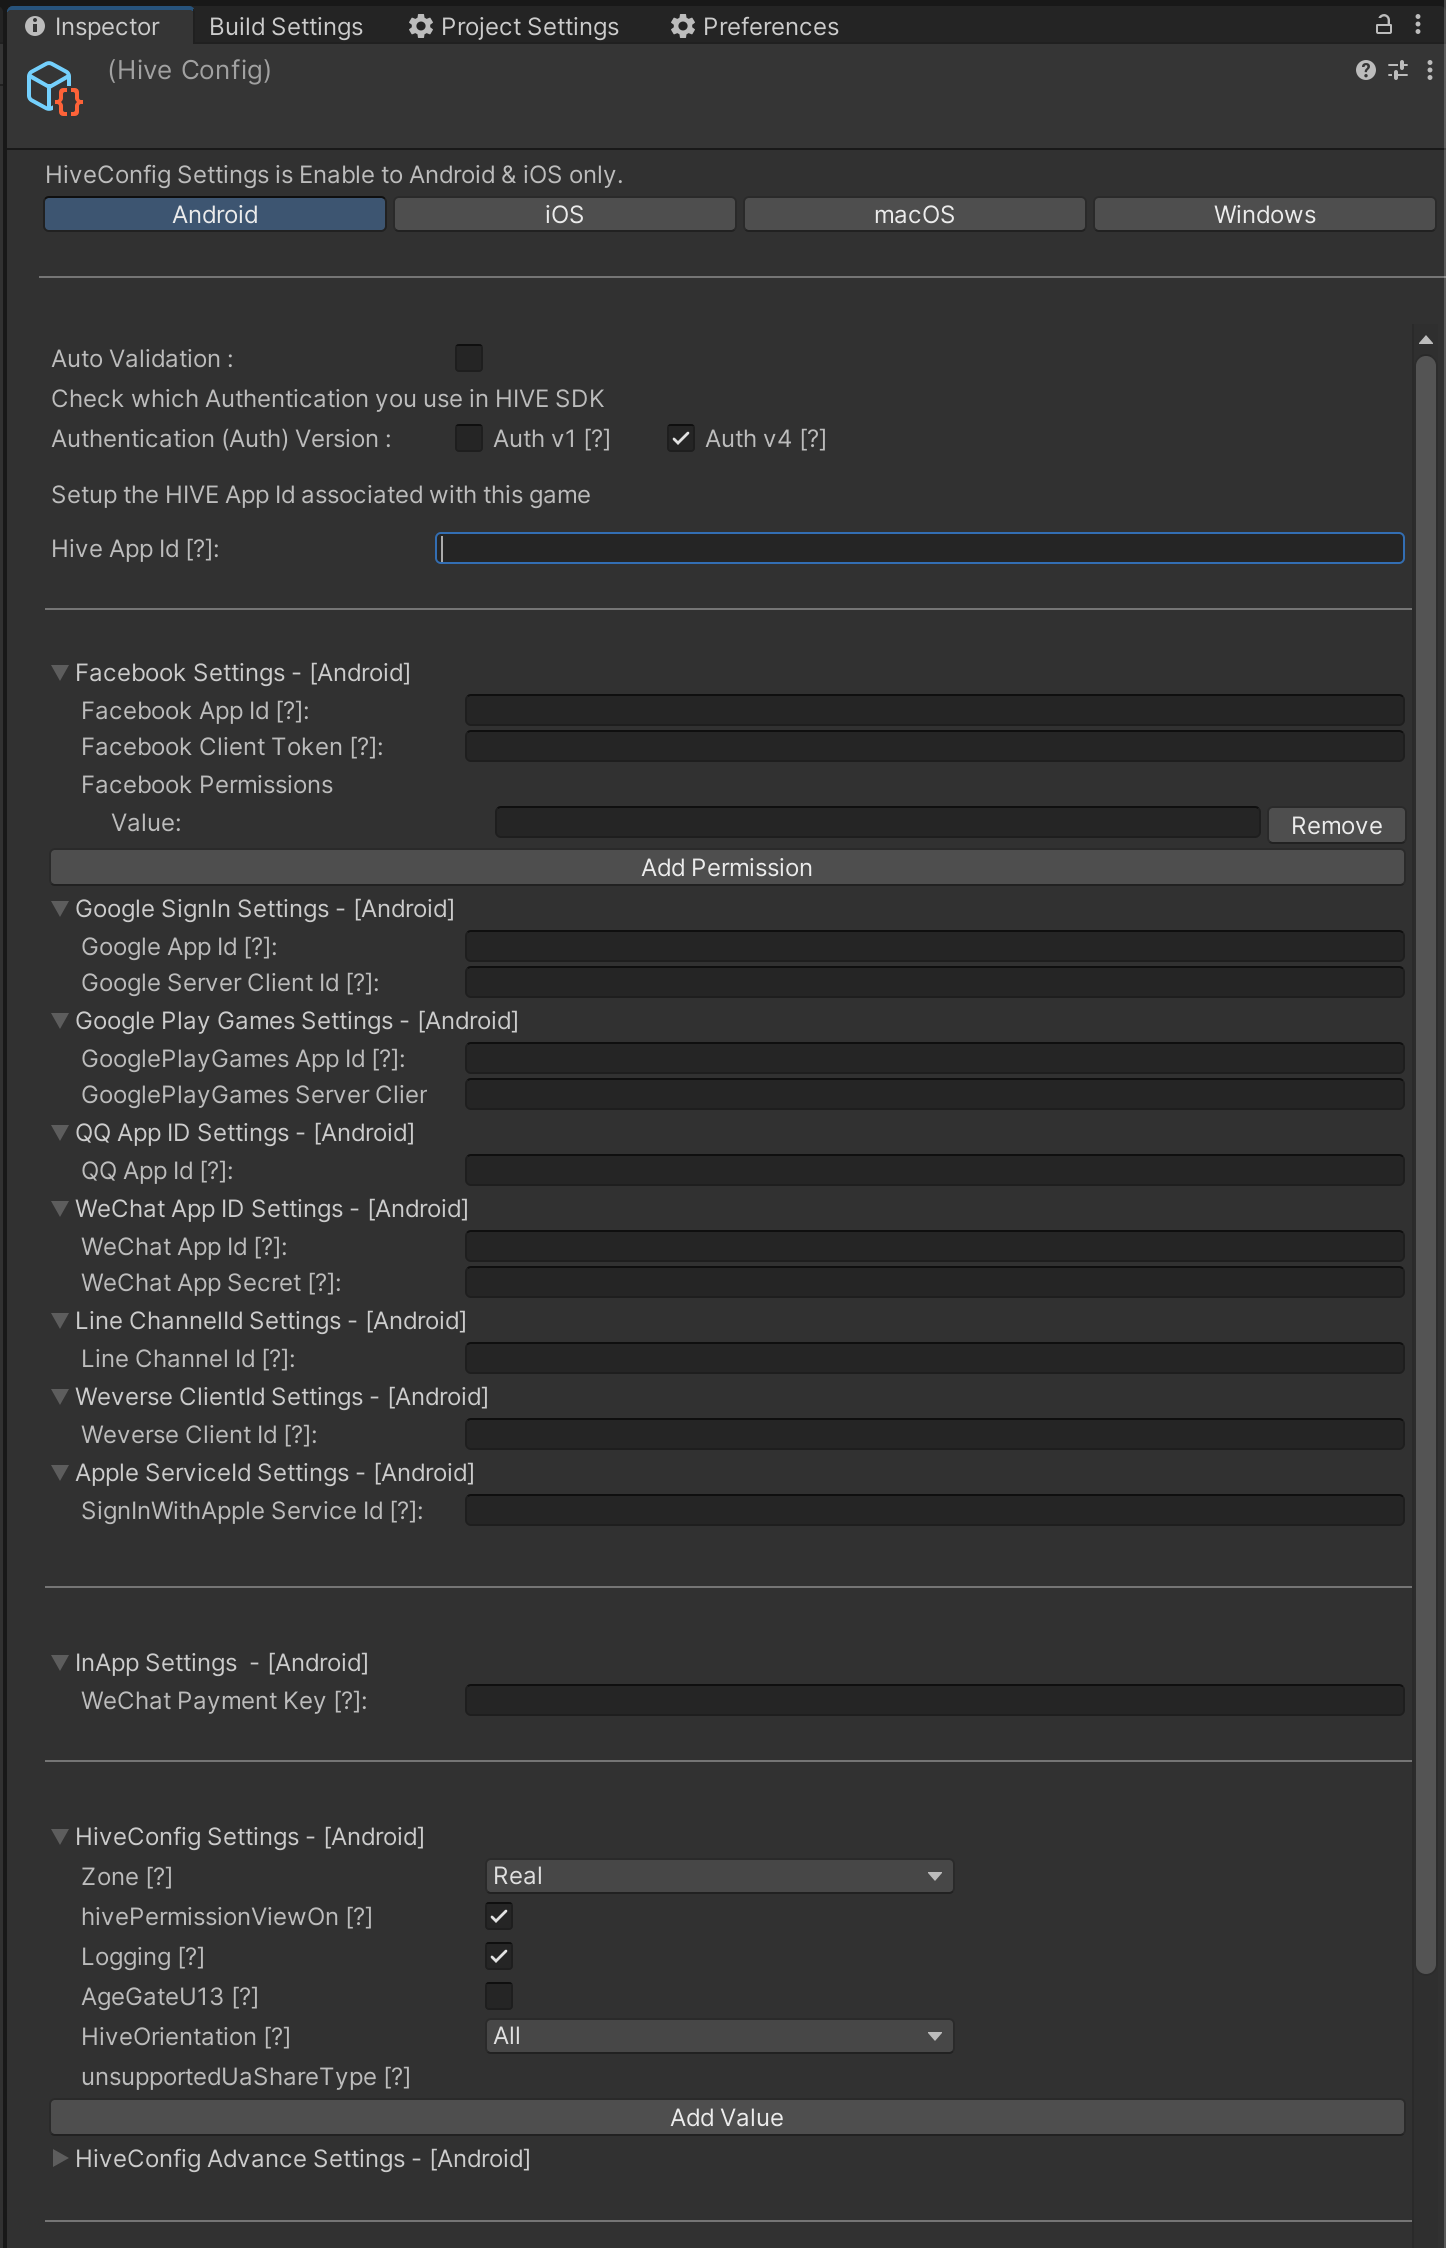
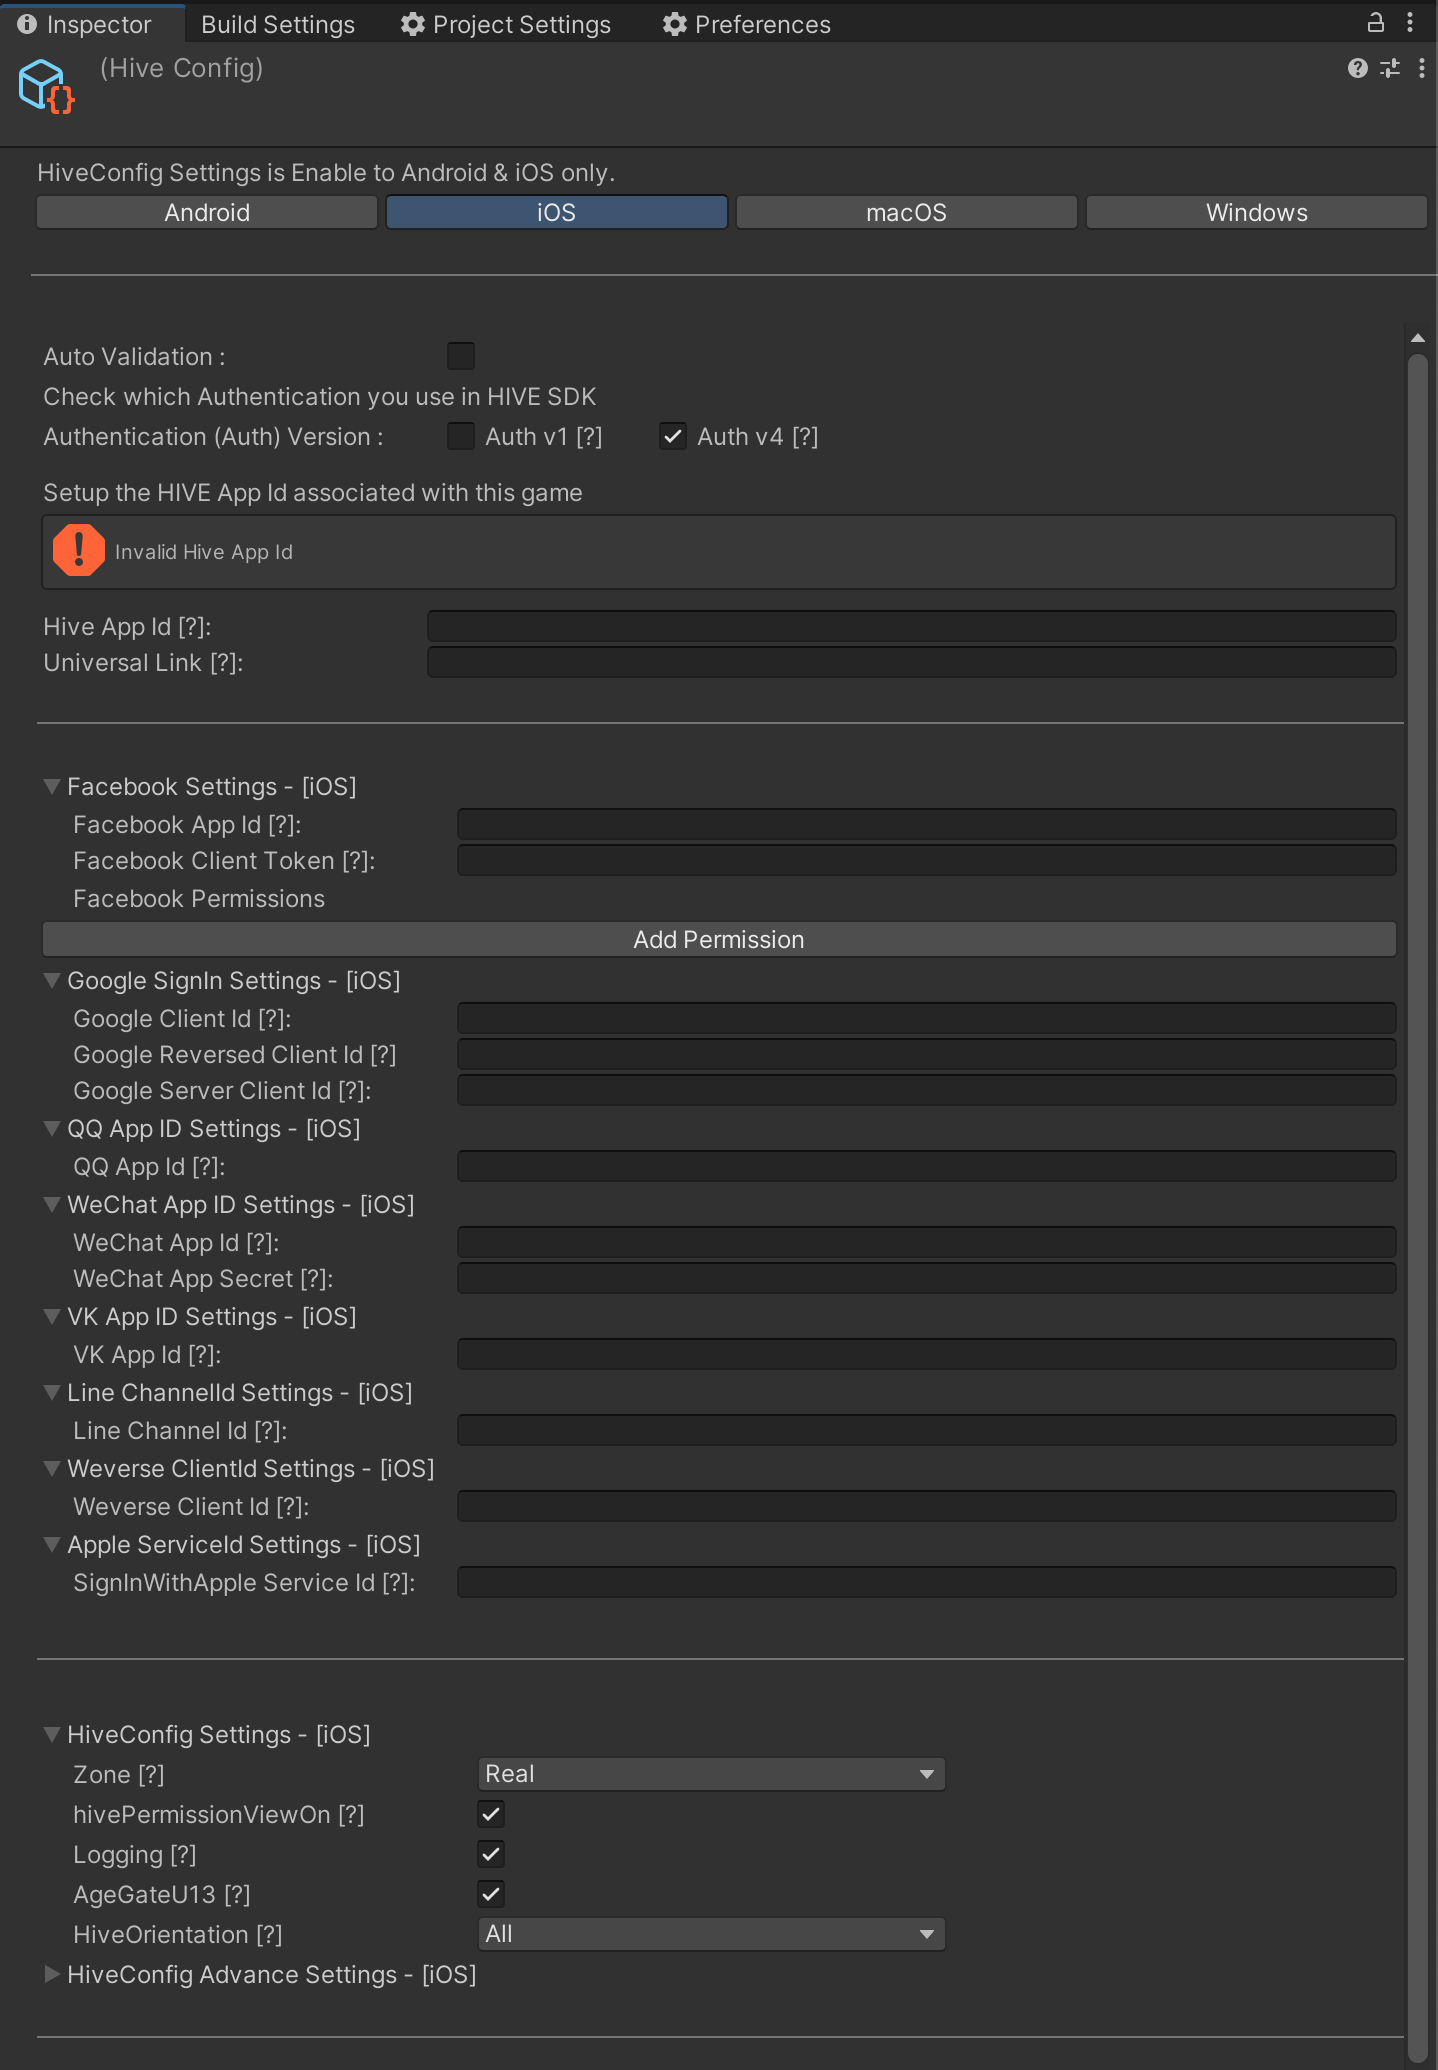
- Select Hive Edit Config. Inspector screen will show up.

- Set the values required to use Hive in Inspector screen.
- Select an OS.
- Authentication Version: Select the authentication version used in games.
- If you choose Auth v4, get the information of IdP used in the game, and input the data. For more detail about IdP information issuance, see Hive Implementation.
- Facebook Settings: Input Facebook AppID of the game in the Facebook App ID field.
- Google: With Auth v4, Google is exposed only when you select OS as Android.
- Input AppID of the game in the Google App ID field.
- Input Client ID of web application in the Google Server Client ID field.
- Google Play Games: With Auth v4, Google Play Games is exposed only when you select OS as Android.
- Input AppID of the game in the Google Play Games App ID field.
- Input Client ID of web application in the Google Play Games Server Client ID field.
- QQ App ID Settings: Input QQ AppID of the game in the QQ App ID field. QQ is available with Hive SDK v4.5.0 and higher.
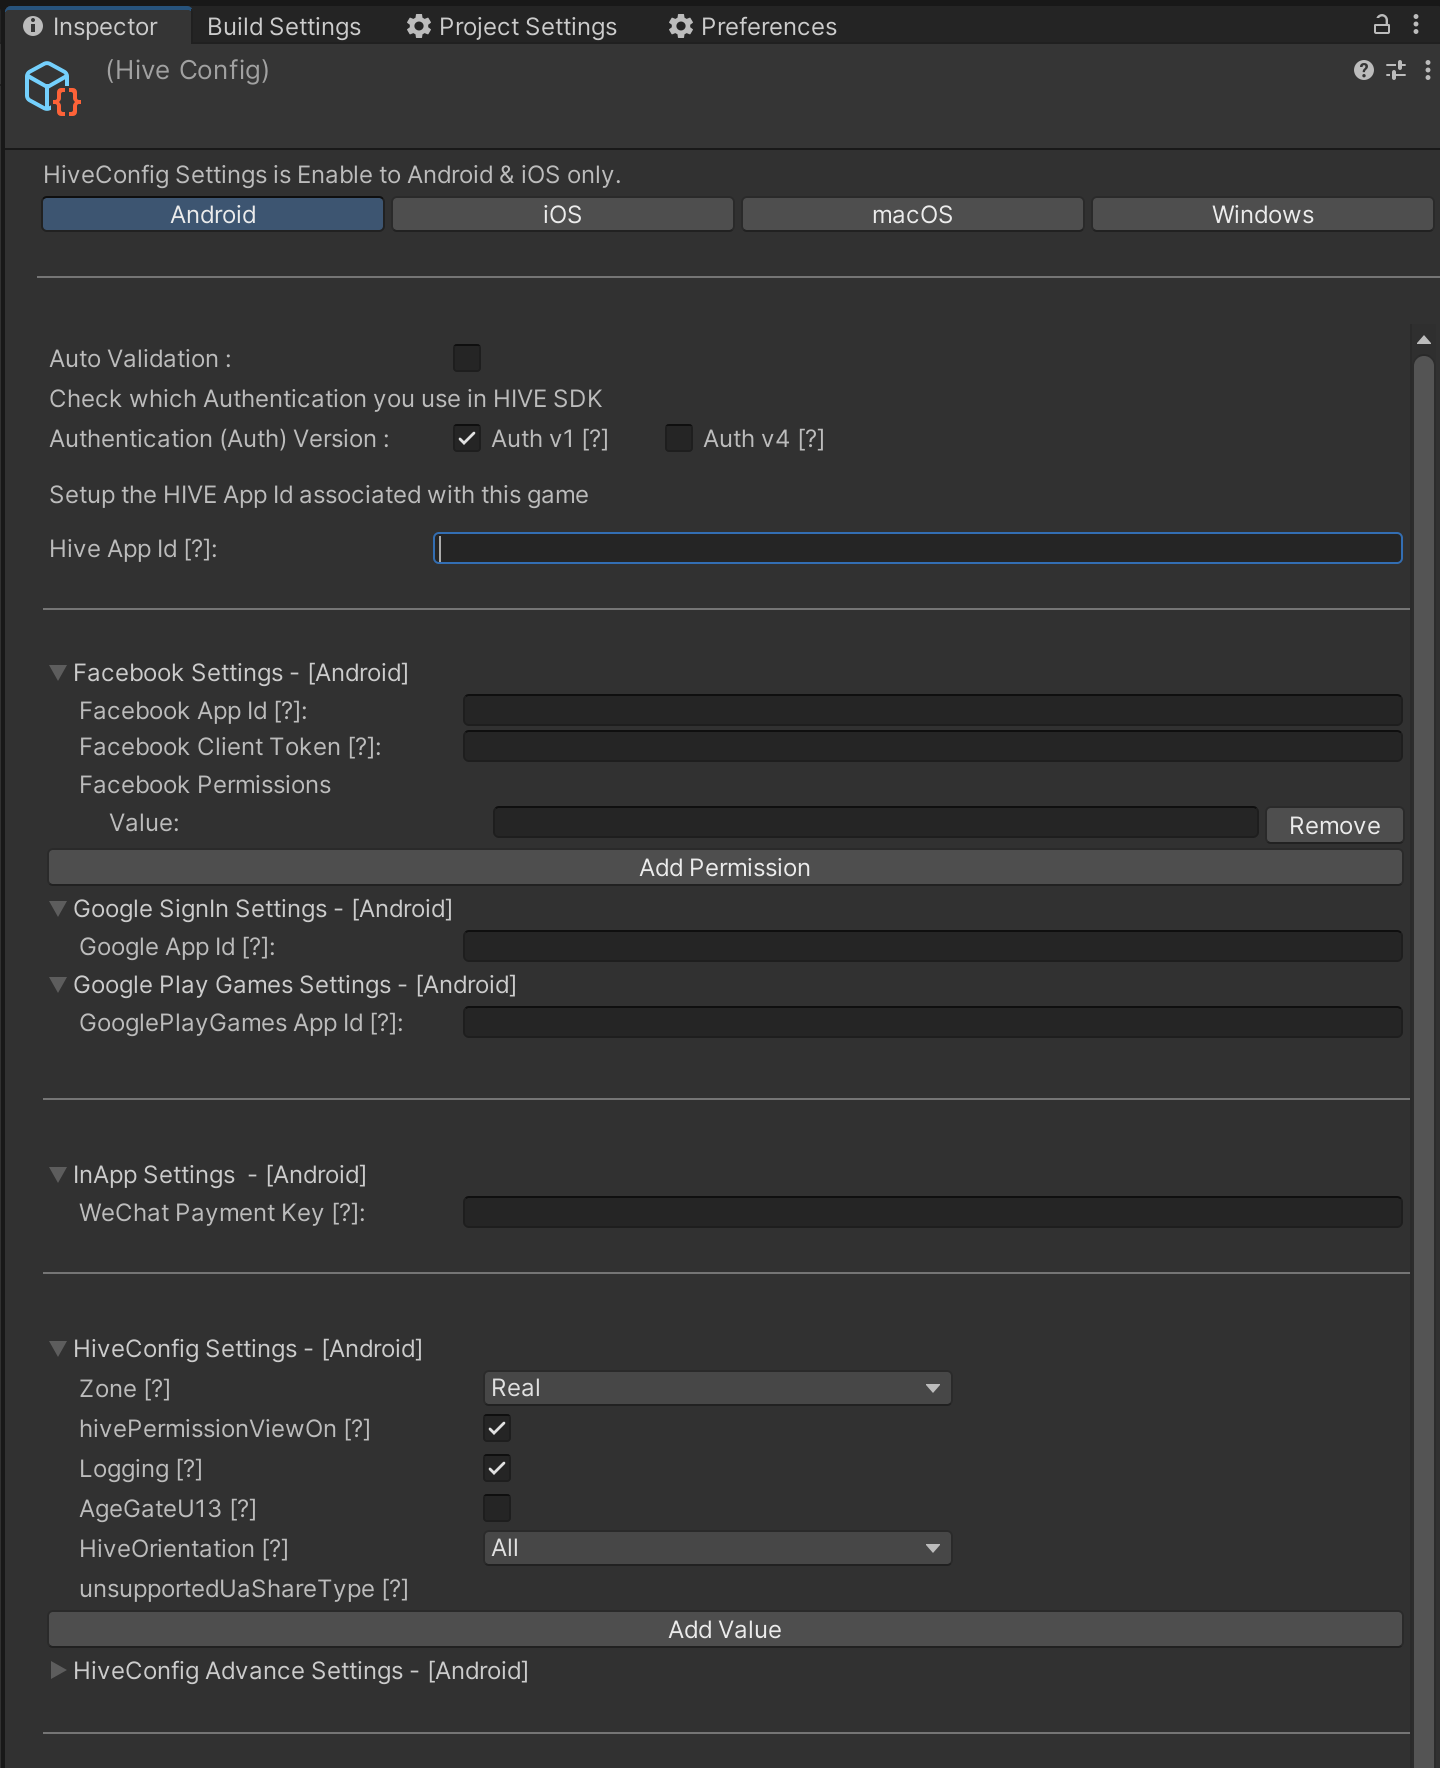
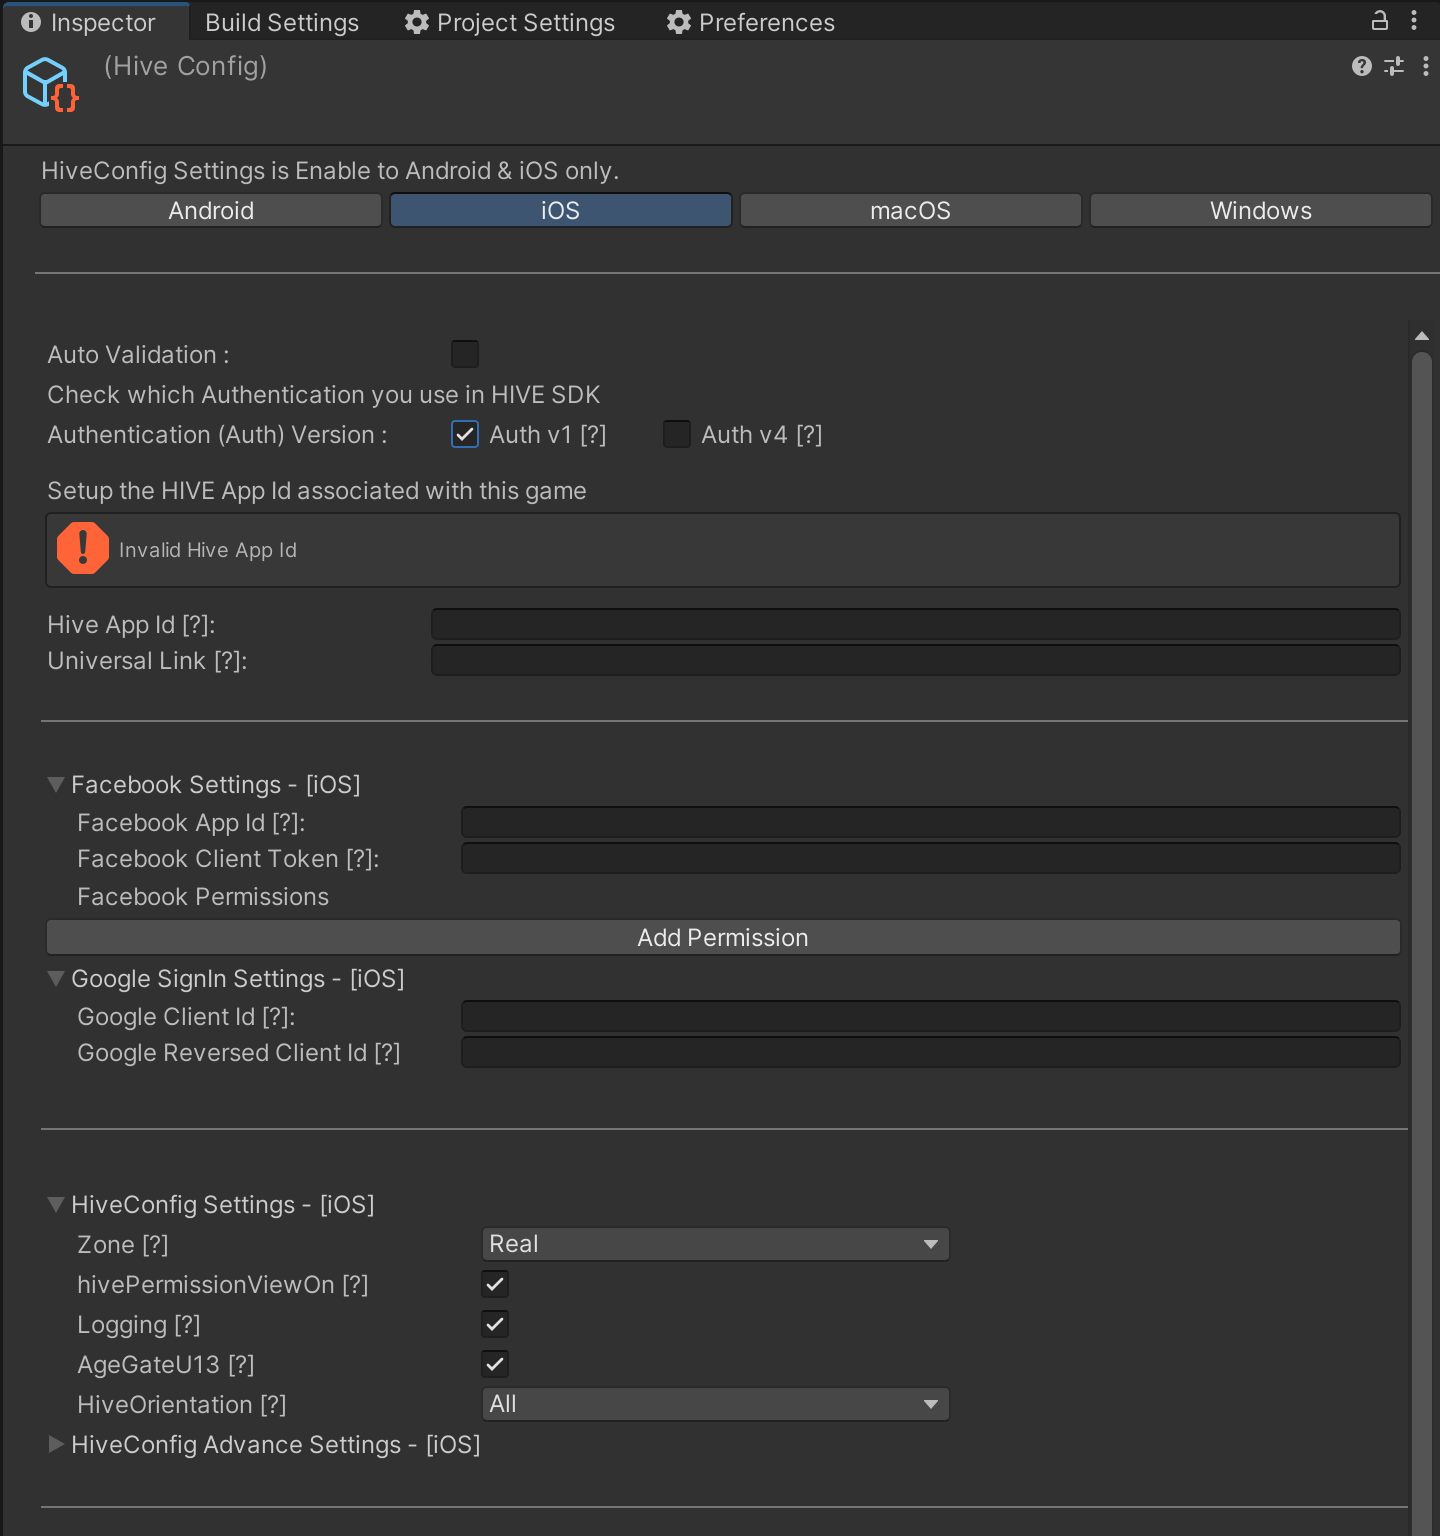
- If you choose Auth v1, get the information of social media data which game uses, and input the data.
- Facebook Settings: Input Facebook AppID of the game in the Facebook App ID field.
- Google Play Settings: Input Google Play AppID of the game in the GooglePlay App ID field.
- HiveConfig Settings: Among values in the hive_config.xml file, following values are available to configure. The values below are applied to the hive_config.xml file generated under Unity development environment:
Field Description The range of values Zone Hive Server Environment - Sandbox (Default)
- Live
Logging Whether to save internal action log of Hive Client or not - On (Default)
- Off
Push Whether to use Hive-providing push service or not - On (Default)
- Off
Company Game publishing company - Com2uS:C2S
- Com2uS Holdings:GVI
Channel Login service platform used by the game app Hive (Default) Market The market to launch this app - Android: GO (Google), LE (Lebi)
- iOS: AP (App Store)
hivePermissionViewOn Whether to expose permission notice popup by Hive SDK - On (Default)
- Off
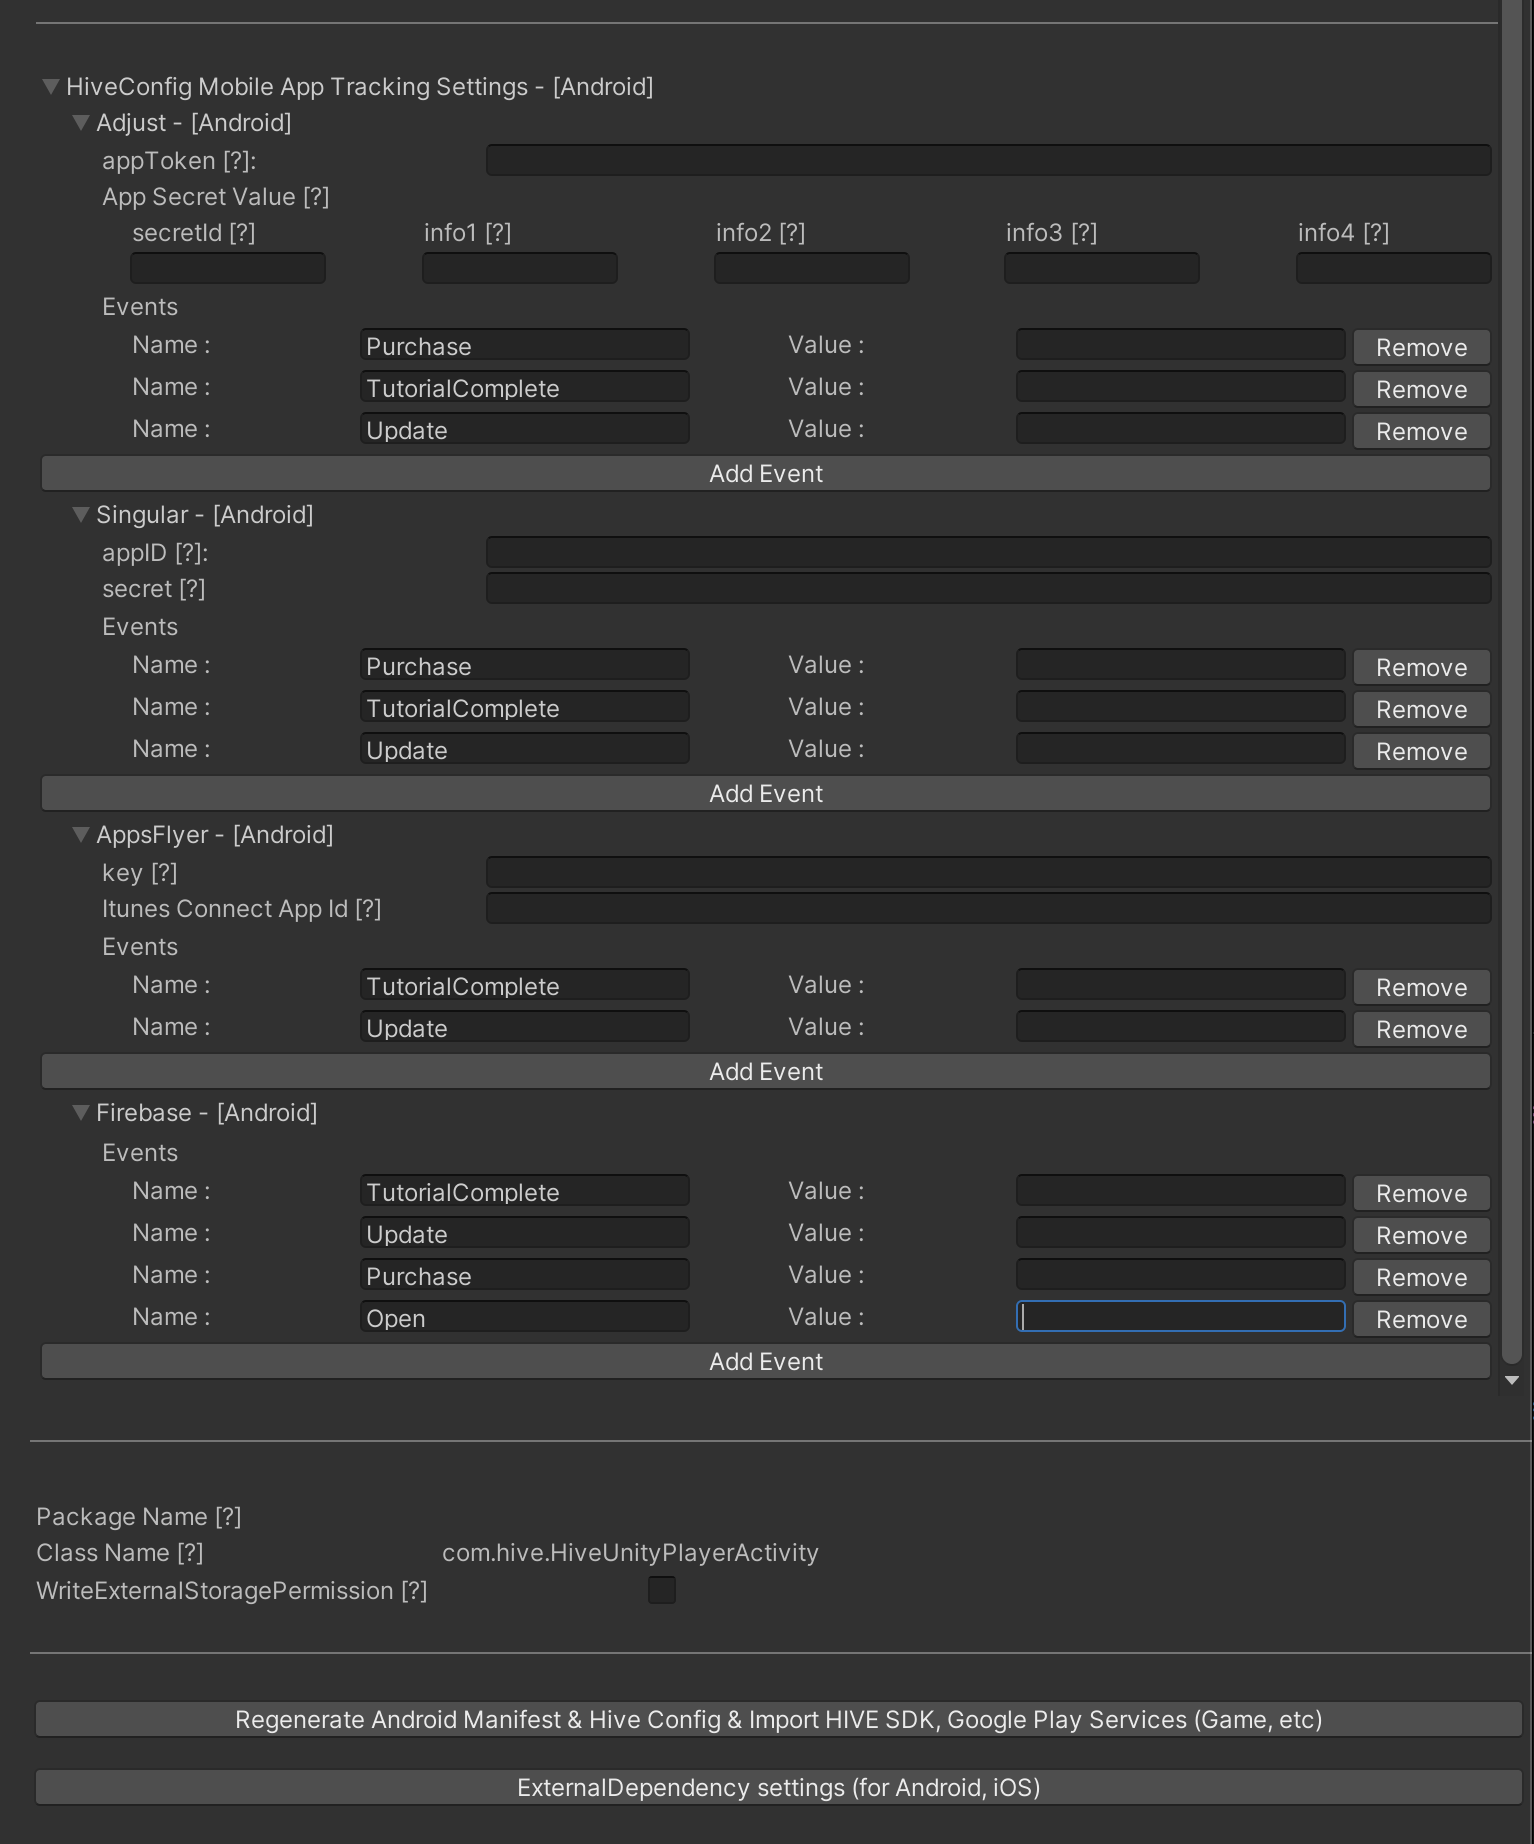
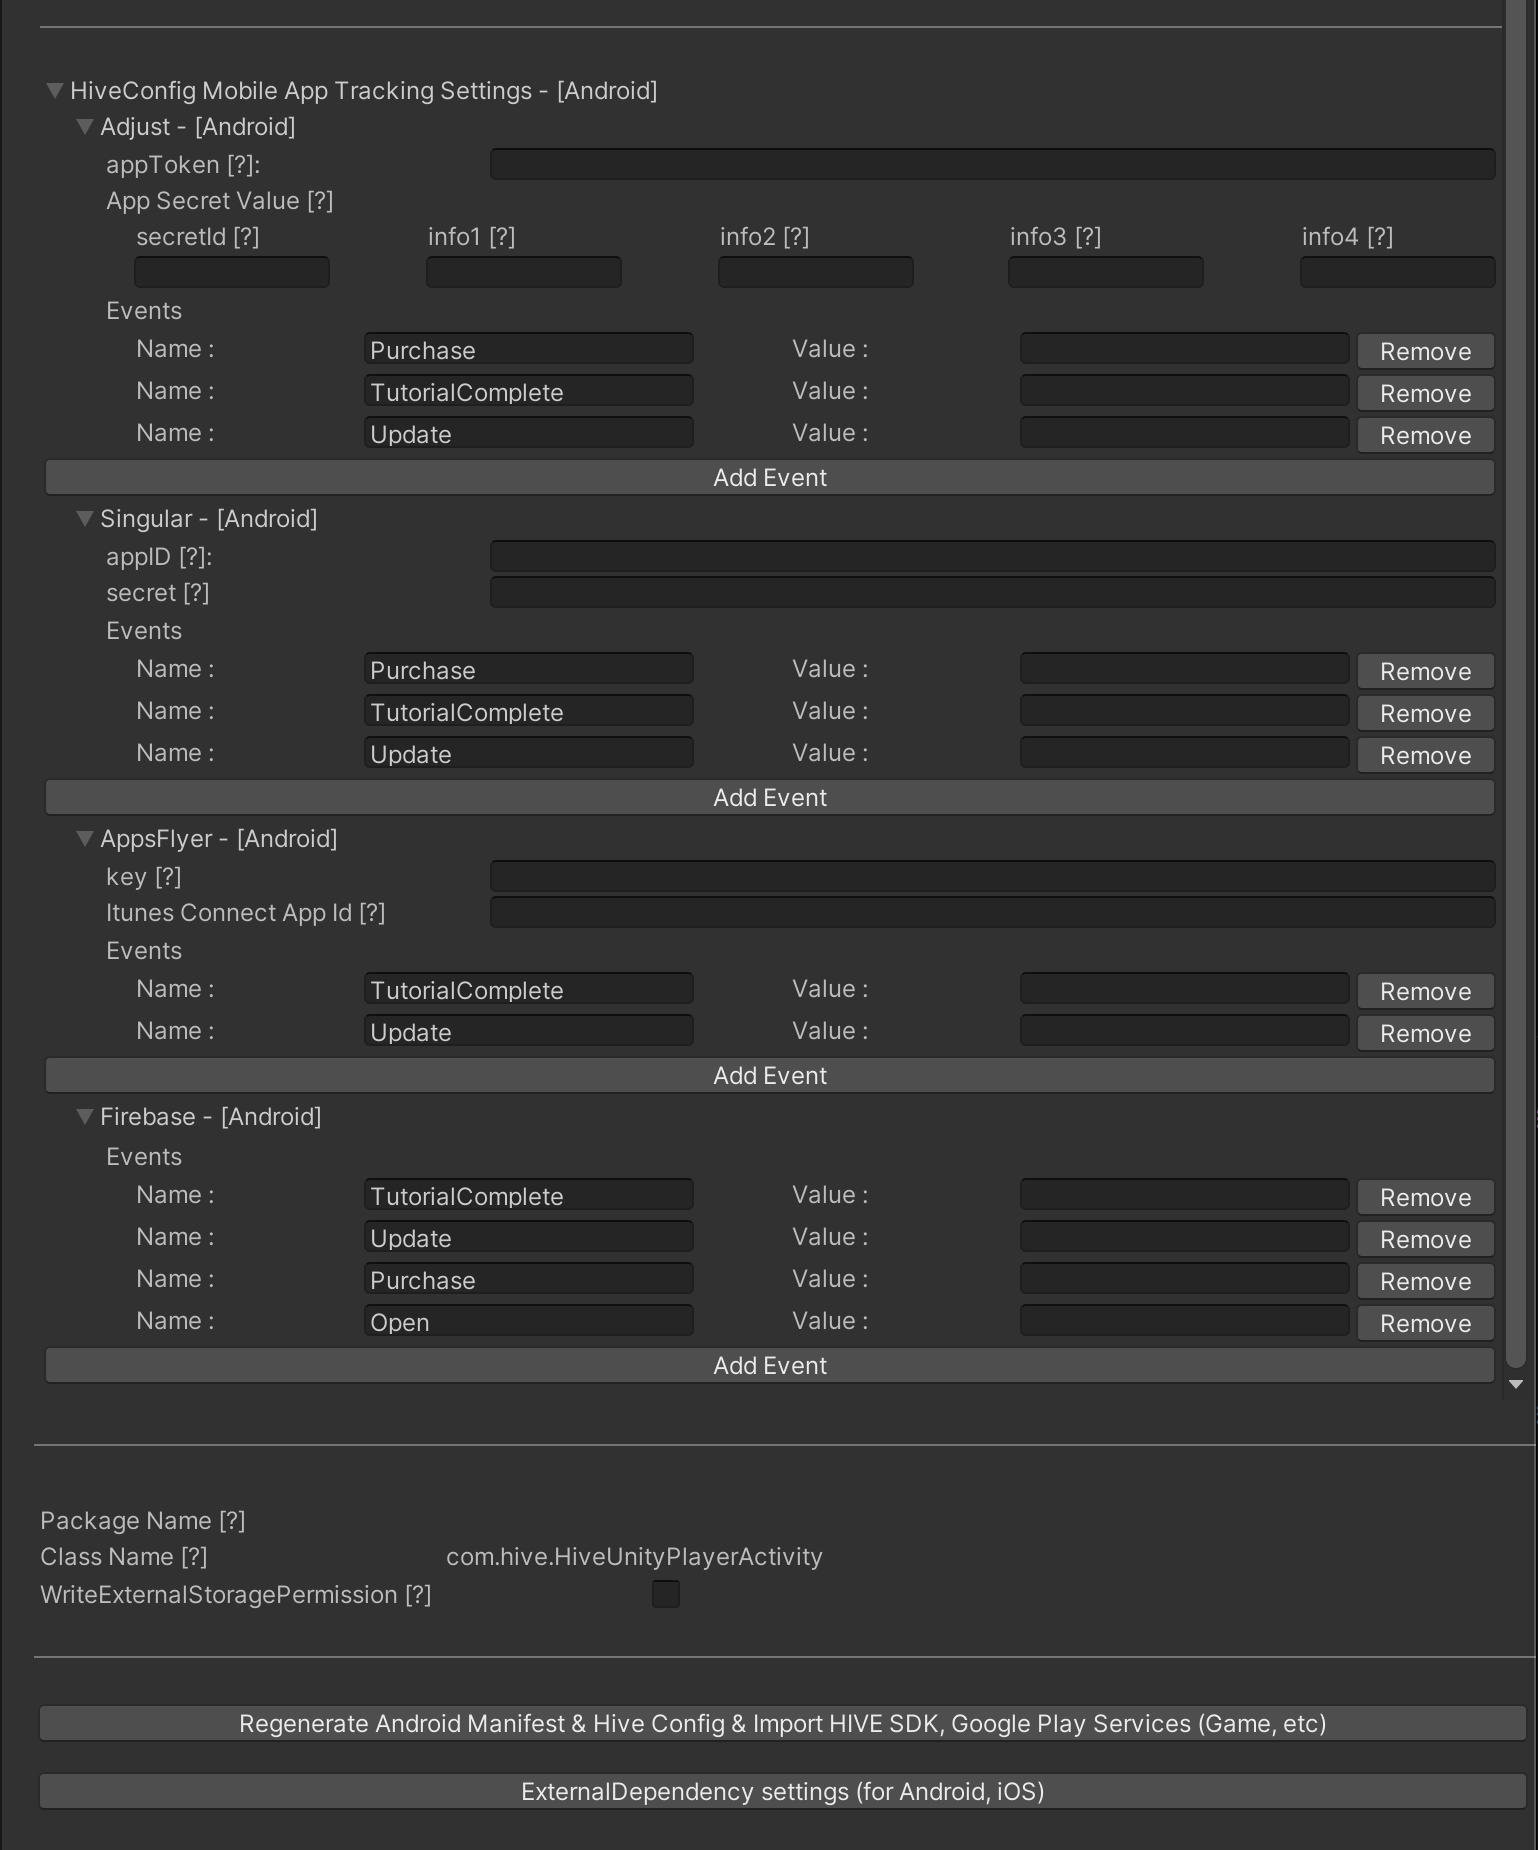
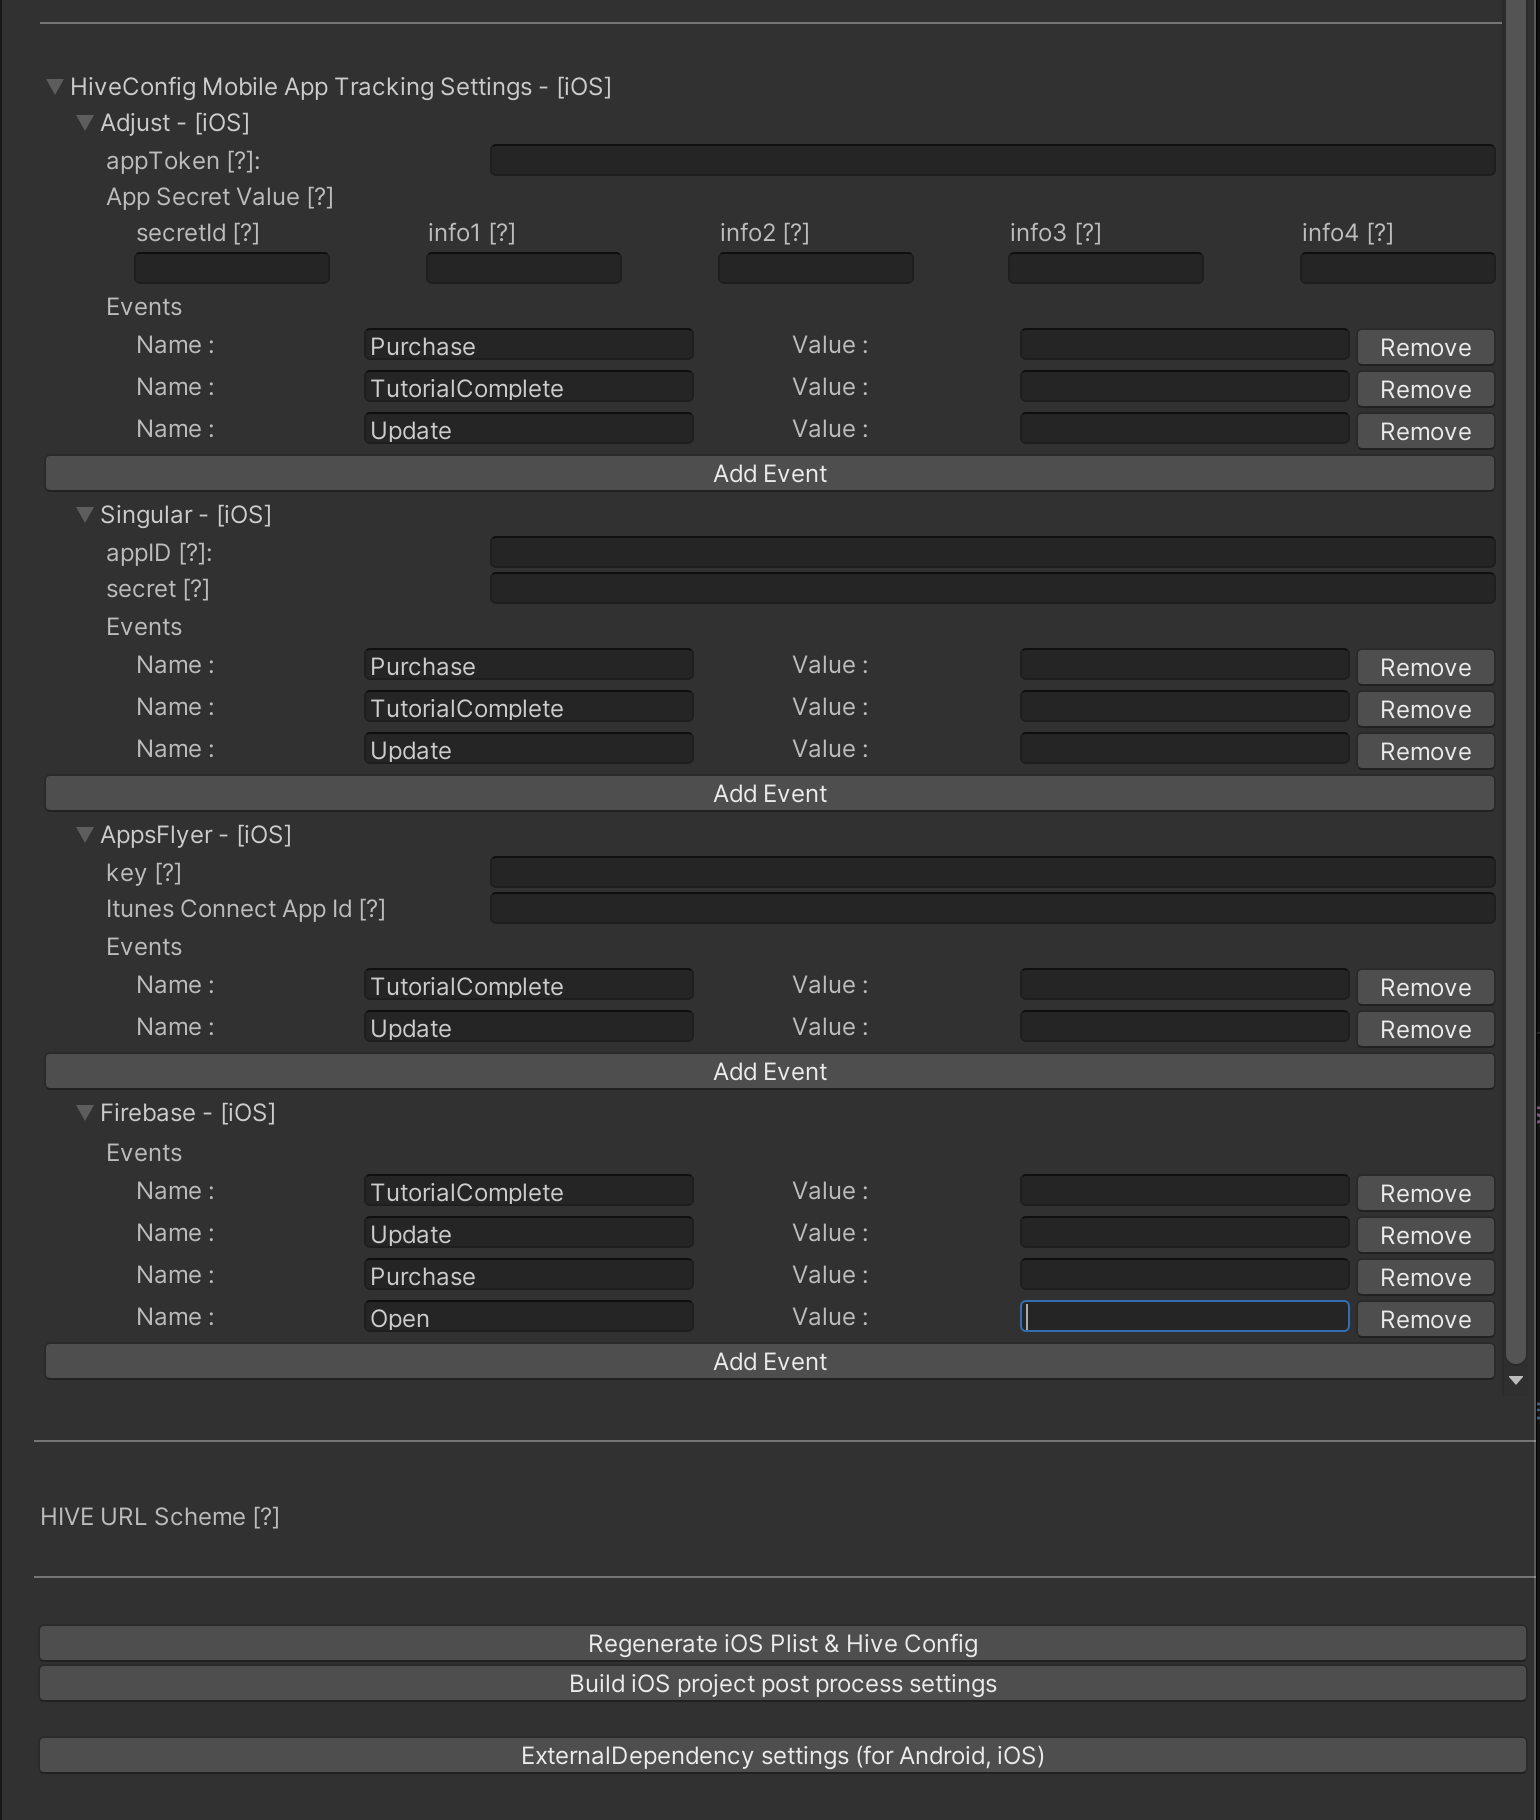
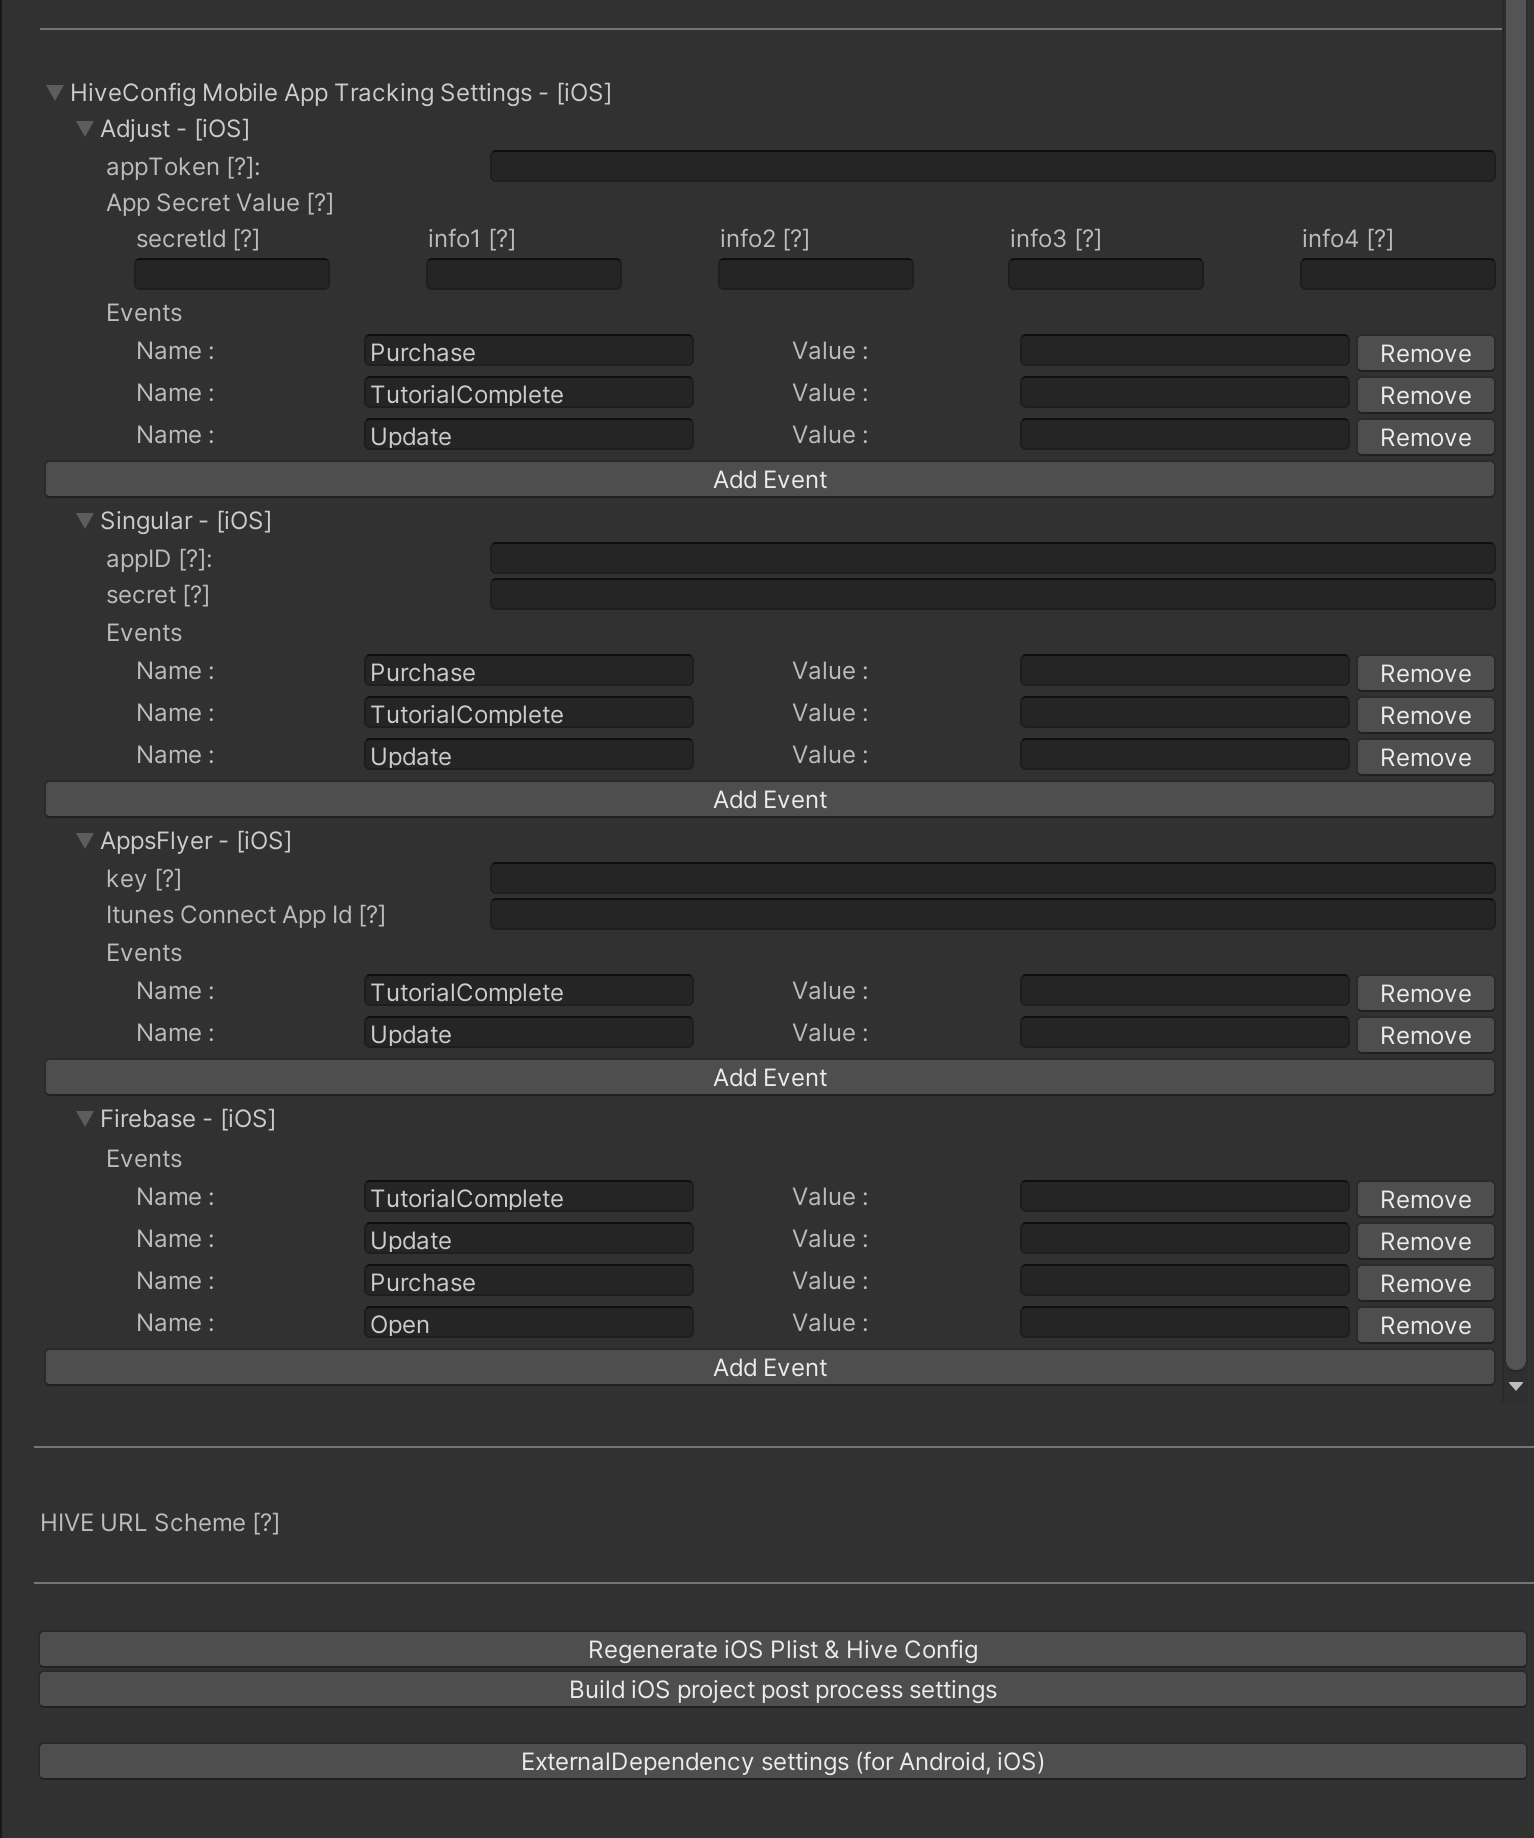
- HiveConfig Mobile App Tracking Settings: Input the settings for the marketing attribution to be used. Input the AppID, key or token issued from the marketing attribution dashboard.
View the Marketing Attribution Settings Guide - WriteExternalStoragePermission: The value required by Android to request a permission to access external storage to users or not. If checked, Hive Client requests access permission to external storage to users when initializing Hive SDK.
- An example screen when selecting Android, Auth v4
- An example screen when selecting Android, Auth v1
- An example screen of Inspector when selecting iOS, Auth v4
- An example screen of Inspector when selecting iOS, Auth v1
- Generate a Hive setting file.
- Android: Click Regenerate Android Manifest & Hive Config button to generate AndroidManifest.xml and hive_config.xml files. hive_config.xml file is generated in the following directory.
- Unity 2021 or higher
;/Assets/HiveSDK/hive.androidlib/src/main/res/raw - Prior to Unity 2021
;/Assets/Plugins/Android/res/raw/
- Unity 2021 or higher
- iOS: Click Regenerate iOS Plist Hive Config button to generate Info.plist and hive_config.xml files. hive_config.xml file is generated in the following directory.
;/Assets/Plugins/iOS/
- Android: Click Regenerate Android Manifest & Hive Config button to generate AndroidManifest.xml and hive_config.xml files. hive_config.xml file is generated in the following directory.
Check Hive SDK debug log
From Hive SDK v4 24.2.0, you can choose whether to expose Hive SDK debug logs by enabling/disabling Hive > Hive Debug Log in your Unity project. The default setting is disabled.
Adding Codes to Initialize Plugin
Generate a GameObject and add the following codes to the object to use Hive SDK Unity plugin. Make sure to implement the code before initializing Hive Client.
|
1 2 3 4 5 6 |
void Awake () { //Generate the game object for Hive plugin. hive.HIVEUnityPlugin.InitPlugin(); } |
Setting up a Facebook Cloud Game build for Android Unity Project
From the Hive SDK 4.16.1, we officially support the game build for the Facebook Cloud Game platform. For more information on Facebook Cloud Game, see Facebook Cloud Game See the Build Settings section.
To build a game for the Facebook Cloud Game platform in an Android Unity project, follow these steps.
Below Hive SDK v4 23.0.0
- Replace the Facebook module with the Facebook Cloud Game module in the following file.
- /Hive_SDK_v4/Dependencies/HIVESDK_ProviderFacebookDependencies.xml
- /Hive_SDK_v4/Editor/HIVESDK_ProviderFacebookDependencies.xml
-
Keep Facebook checked at the Hive > ExternalDependency in the Unity project.
|
1 2 3 4 5 6 7 |
// AS-IS <androidPackage spec="com.com2us.android.hive:hive-service-extension-facebook:HIVE_SDK_VERSION"/> // TO-BE <androidPackage spec="com.com2us.android.hive:hive-service-extension-facebookCloudGame:HIVE_SDK_VERSION"/> |
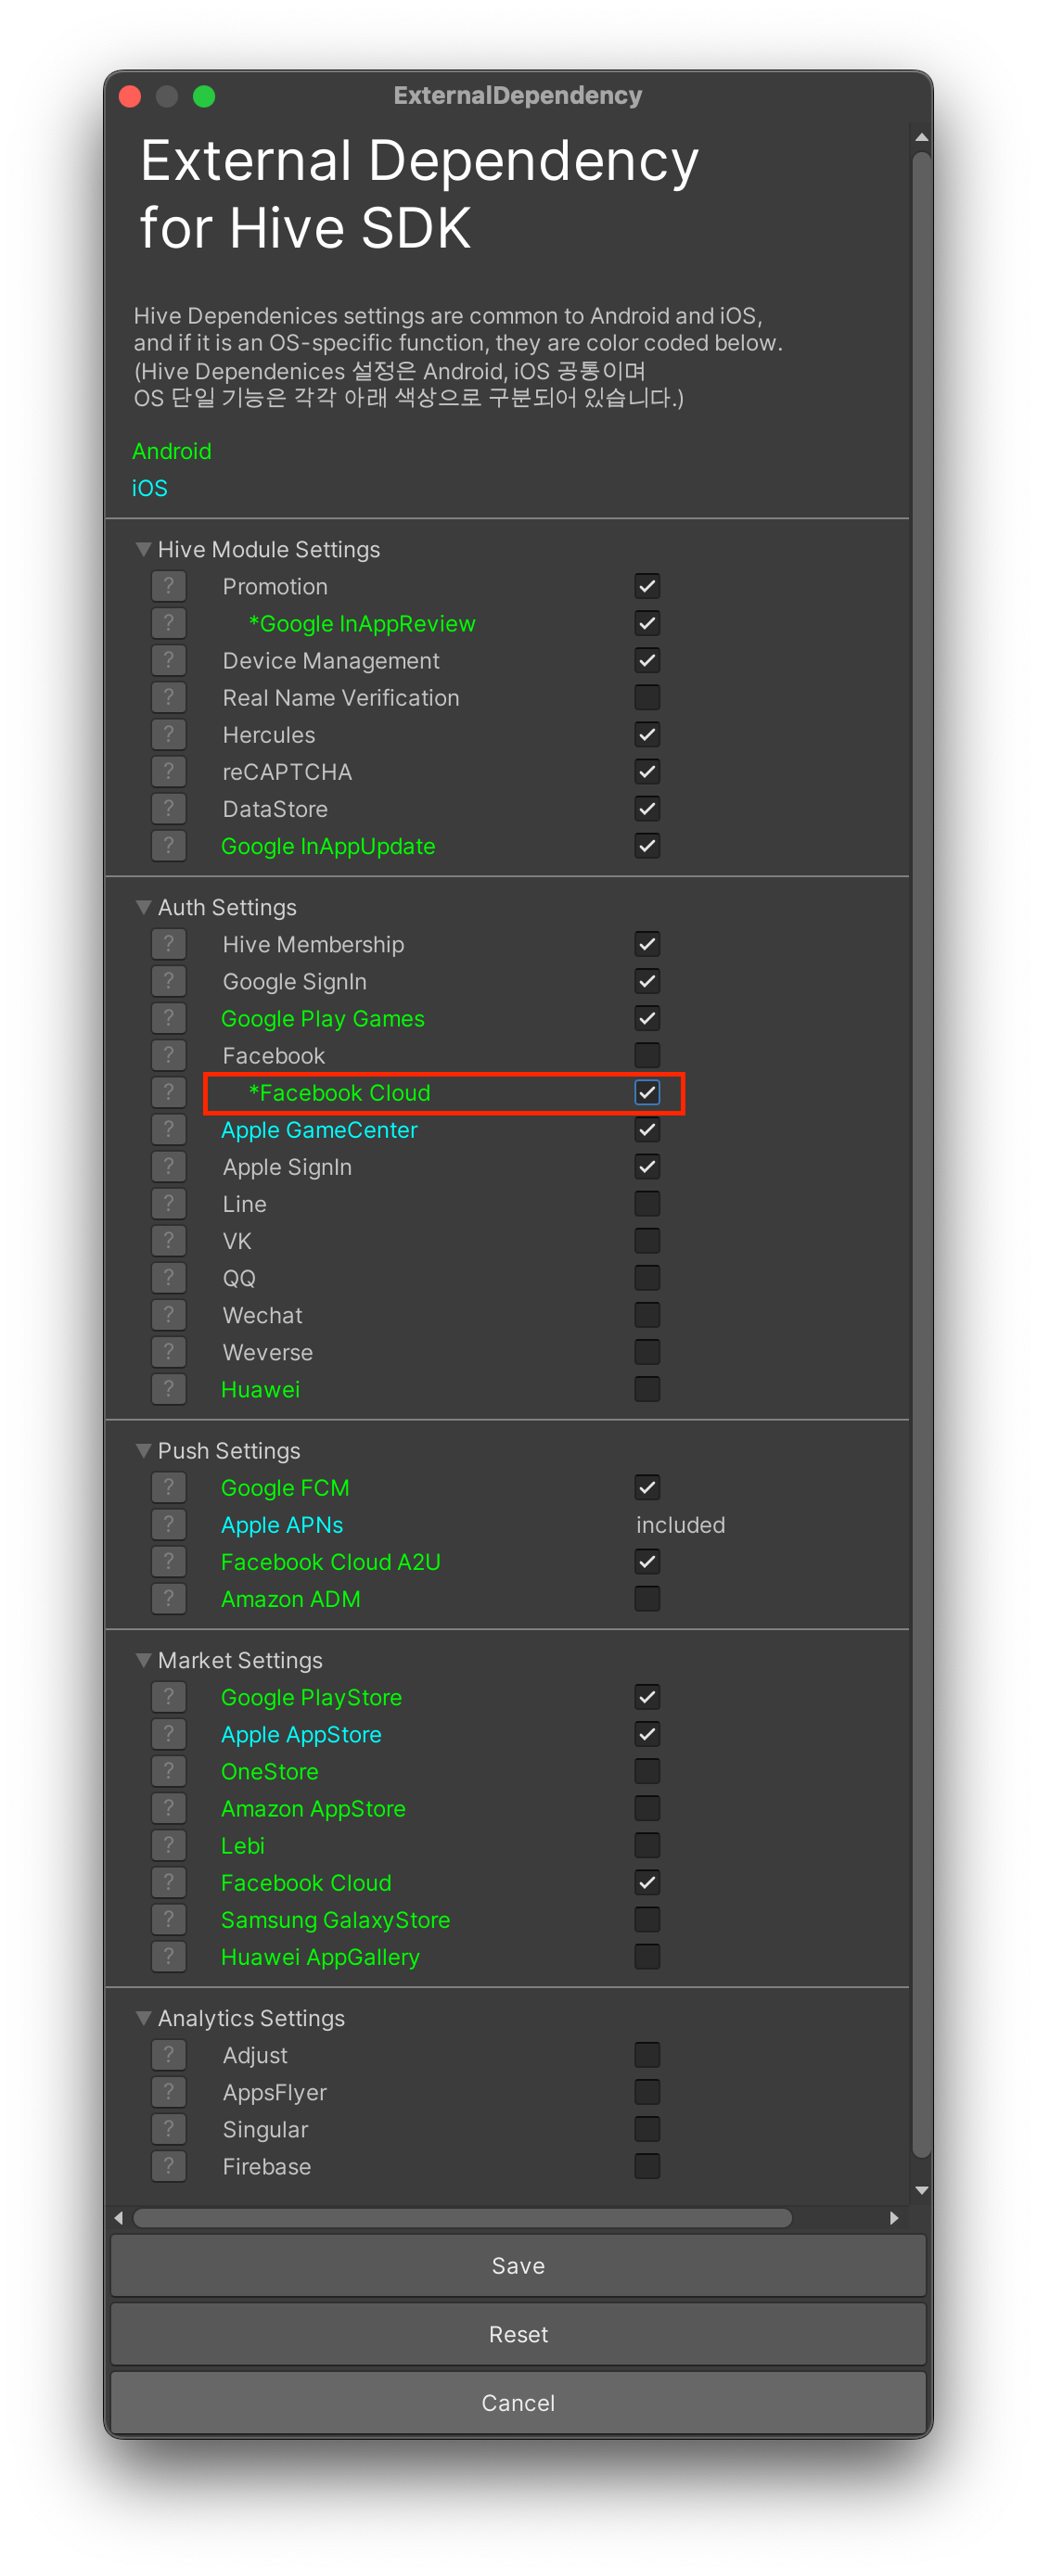
Hive SDK v4 23.0.0 or higher
Check Facebook Cloud in the Auth Settings in the Unity project Hive > External Dependency. The related items for Facebook Cloud in Push Settings and Market Settings will be automatically checked. Checking Facebook Cloud will uncheck the Facebook in Auth Settings.
Hive SDK v4 24.2.0 and above
The Hive SDK no longer supports Facebook Cloud Game builds. The Auth, Market, and Push Settings related to Facebook Cloud Game have been removed from Hive > Hive Dependencies (ExternalDependency) in your Unity project. If you were using an existing Unity project, please check the ExternalDependency, review the changed settings, and save them accordingly.
Setting up a Google Play Games on PC build for Android Unity Project
From the Hive SDK 4.16.2, Google Play Games on PC is officially supported. To learn more about Google Play Games on PC, see Setting up a Google Play Games on PC build.
To build a game for Google Play Games on PC from an Android Unity project, follow these steps.
Below Hive SDK v4 23.0.0
- In the following file, replace the existing Google module with the Google Play Games module, which contains the Google Play Games on PC features.
- /Hive_SDK_v4/Dependencies/HIVESDK_ProviderGoogleDependencies.xml
- /Hive_SDK_v4/Editor/HIVESDK_ProviderGoogleDependencies.xml
1234567// AS-IS<androidPackage spec="com.com2us.android.hive:hive-service-extension-google:HIVE_SDK_VERSION"/>// TO-BE<androidPackage spec="com.com2us.android.hive:hive-service-extension-google-playgames:HIVE_SDK_VERSION"/> -
Keep Google checked at the Hive > ExternalDependency in the Unity project.
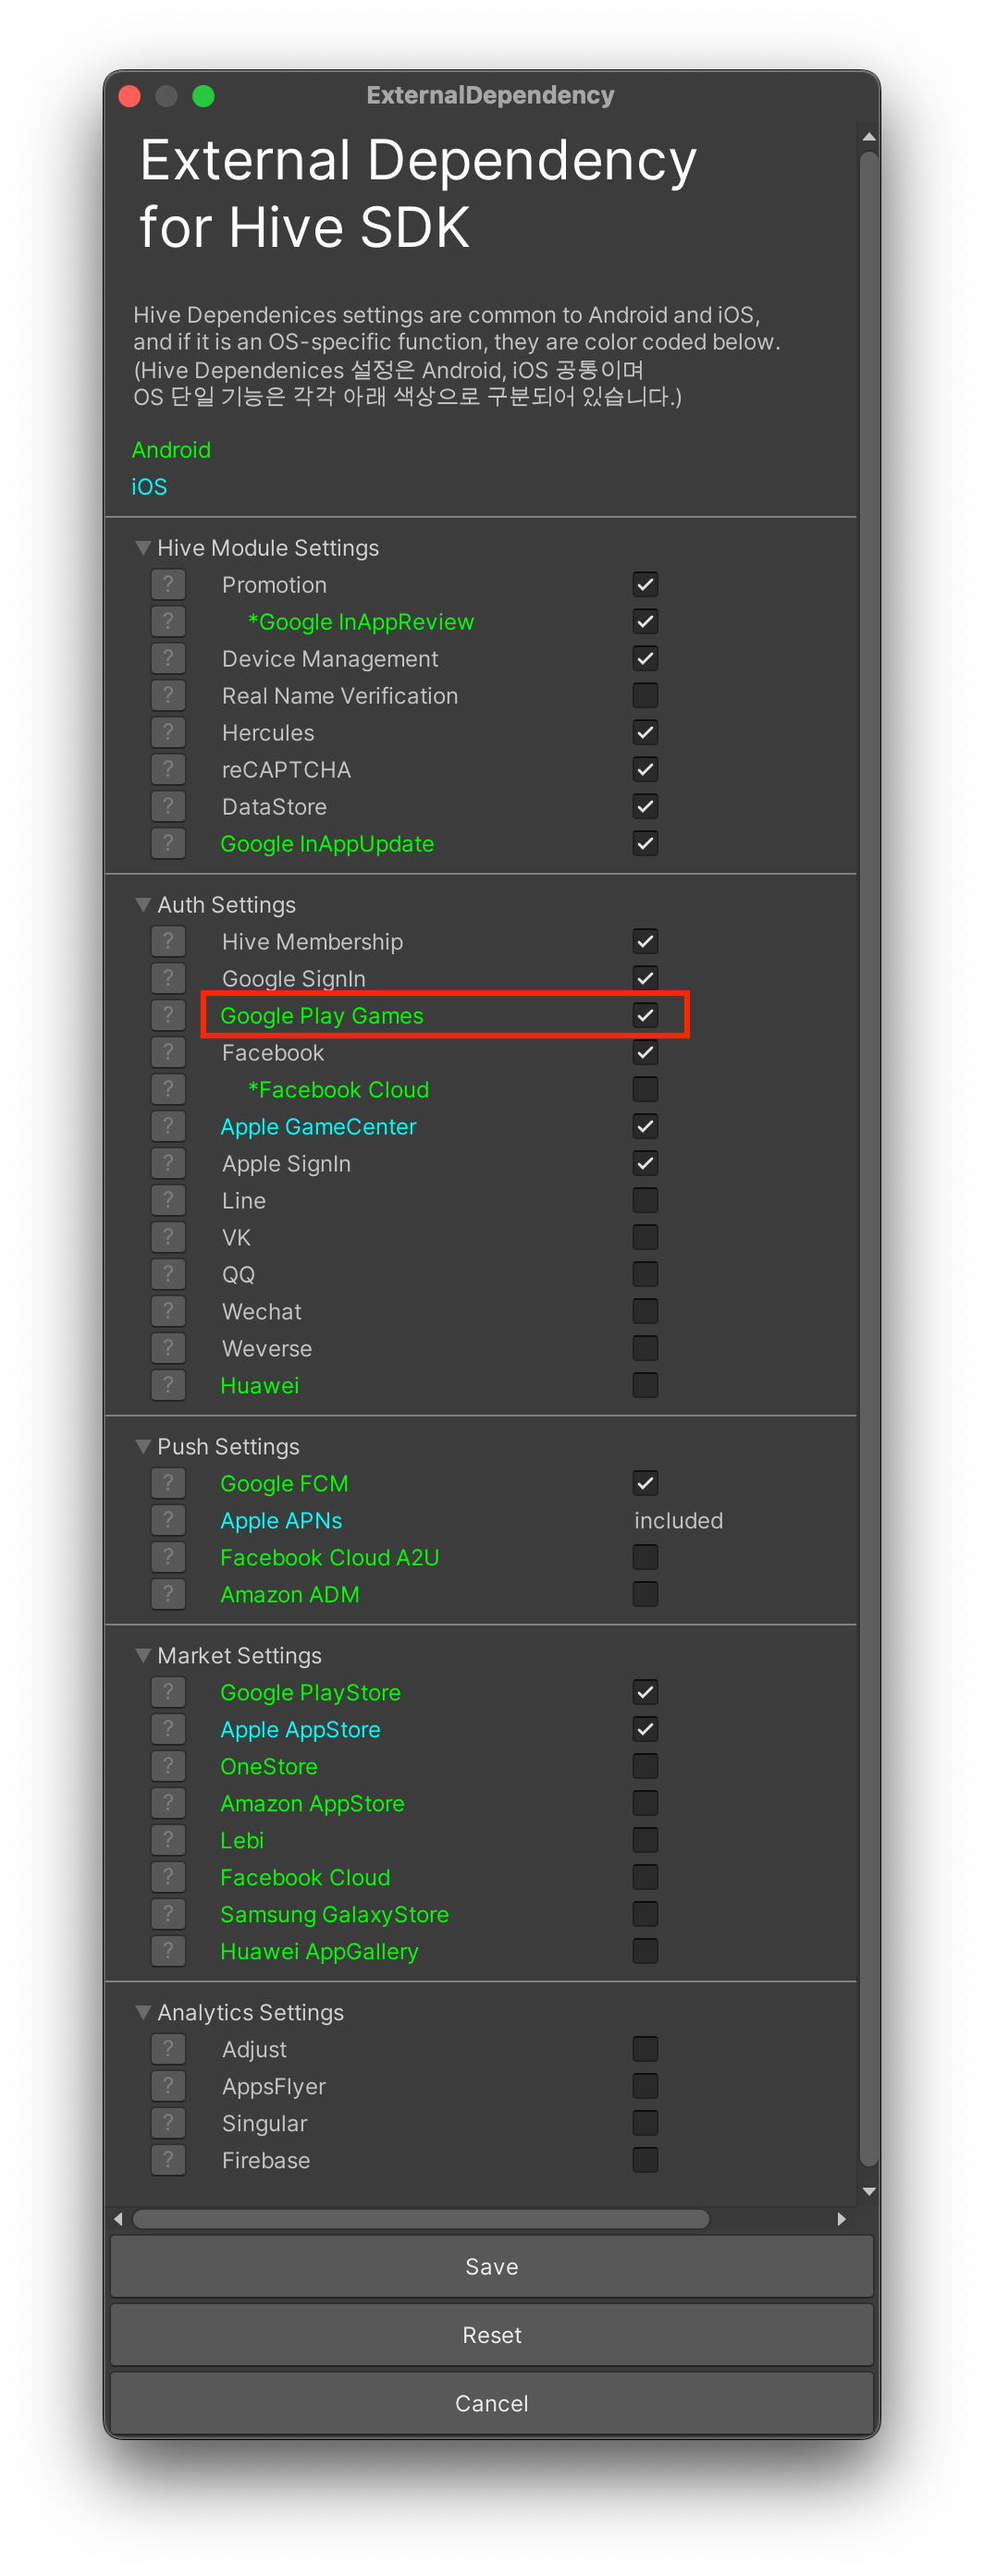
Hive SDK v4 23.0.0 or higher
In the Unity project, navigate to Hive > External Dependency and check Google Play Games in the Auth Settings.
Support Google login
To build a game supporting Google login, not Google Play Games login, from an Android Unity project, follow these steps.
- In the following file, remove the google-playgames module, and leave only the google-signin module.
- /Hive_SDK_v4/Dependencies/HIVESDK_ProviderGoogleDependencies.xml
- /Hive_SDK_v4/Editor/HIVESDK_ProviderGoogleDependencies.xml
1234567<!-- AS-IS --><androidPackage spec="com.com2us.android.hive:hive-service-extension-google-signin:HIVE_SDK_VERSION"/><androidPackage spec="com.com2us.android.hive:hive-service-extension-google-playgames:HIVE_SDK_VERSION"/><!-- TO-BE --><androidPackage spec="com.com2us.android.hive:hive-service-extension-google-signin:HIVE_SDK_VERSION"/><!--<androidPackage spec="com.com2us.android.hive:hive-service-extension-google-playgames:HIVE_SDK_VERSION"/>--> - Keep Google checked in your Unity Project Hive > In the ExternalDependency.
Building
Follow the rules by OS below to utilize Unity development environment.
Building Apps for Android
To build a project for Android under Unity development environment, execute one of following description.
- How to utilize Build Settings screen:
- Click File >; Build Settings…. Build Settings screen will show up.
- Click Android in the Platform list.
- Click Build System >; Gradle.
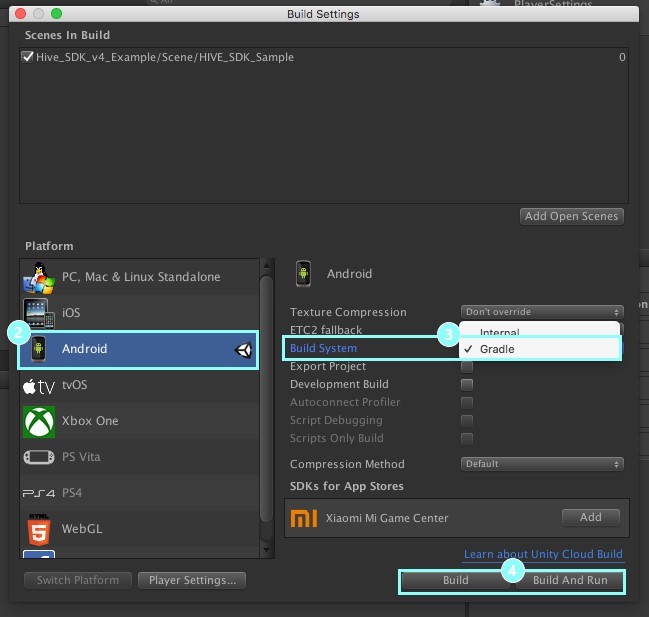
- Click Build or Build And Run button.
- How to build directly: Select File >; Build Run.
Building Google Android Project Export
To export the project created under Unity development environment as Google Android project, execute as follows:
- Select File >; Build Settings >; Player Settings…. Inspector screen will show up.
- On Inspector page, input the same value of AppID in Other Settings >; Bundle Identifier.

- Execute as follows depending on the version of Unity development environment.
- With Unity v5.5 and higher:
- Click File >; Build Settings…. Build Settings screen will show up.
- Click Android in the Platform list.
- Click Export Project >; Gradle.
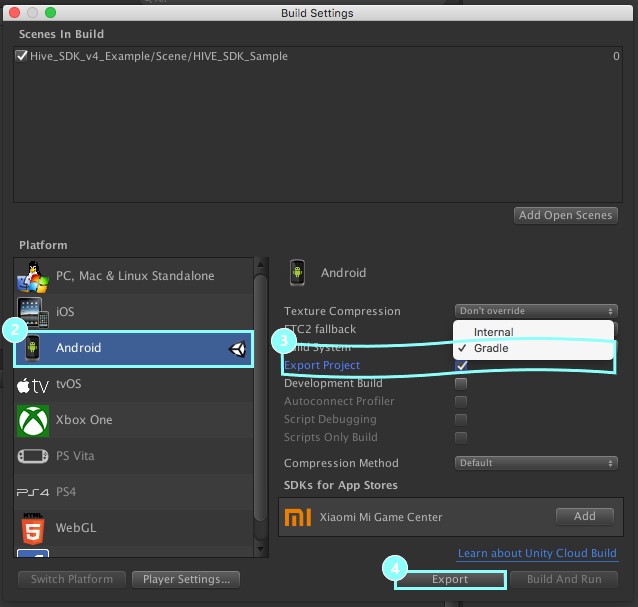
- Click Export button to extract Android project.
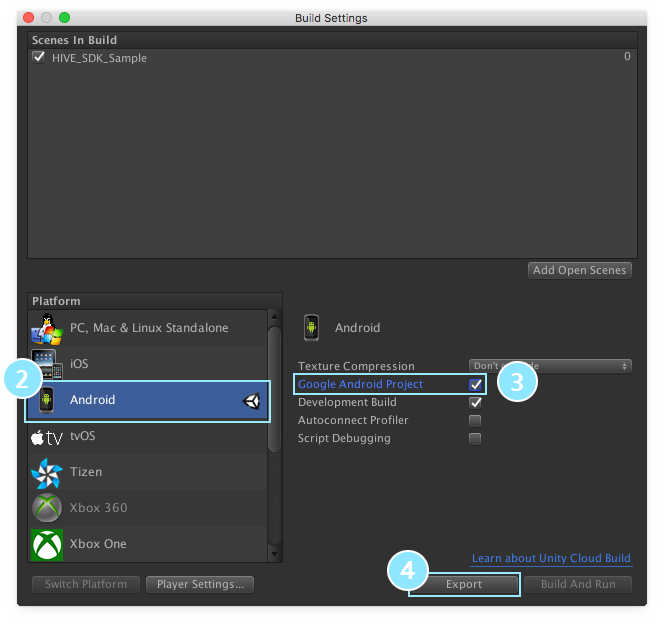
- Less than Unity v5.5:
- Click File >; Build Settings…. Build Settings screen will show up.
- Click Android in the Platform list.
- Mark a check on the Google Android Project field.
- Click Export button to extract Android projects.
- Execute Android Studio and select Import project (Eclipse ADT, Gradle, etc.) .
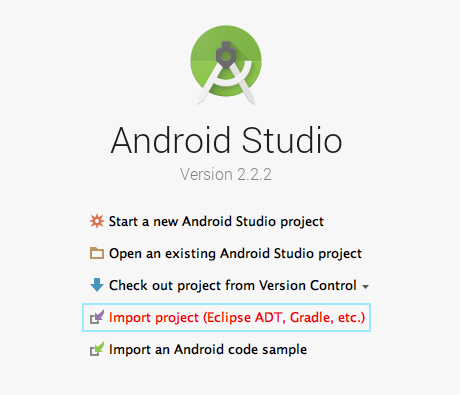
- Select the route of Unity3D Android project to import the exported project.
Building Apps for iOS
Automatically Add Required Permissions for Hive SDK to Xcode Project
When building the Xcode project from Unity, using the HivePostProcess.cs file automatically configures the following items, adding the permissions required for Hive SDK to operate to the Xcode project:
- info.plist file
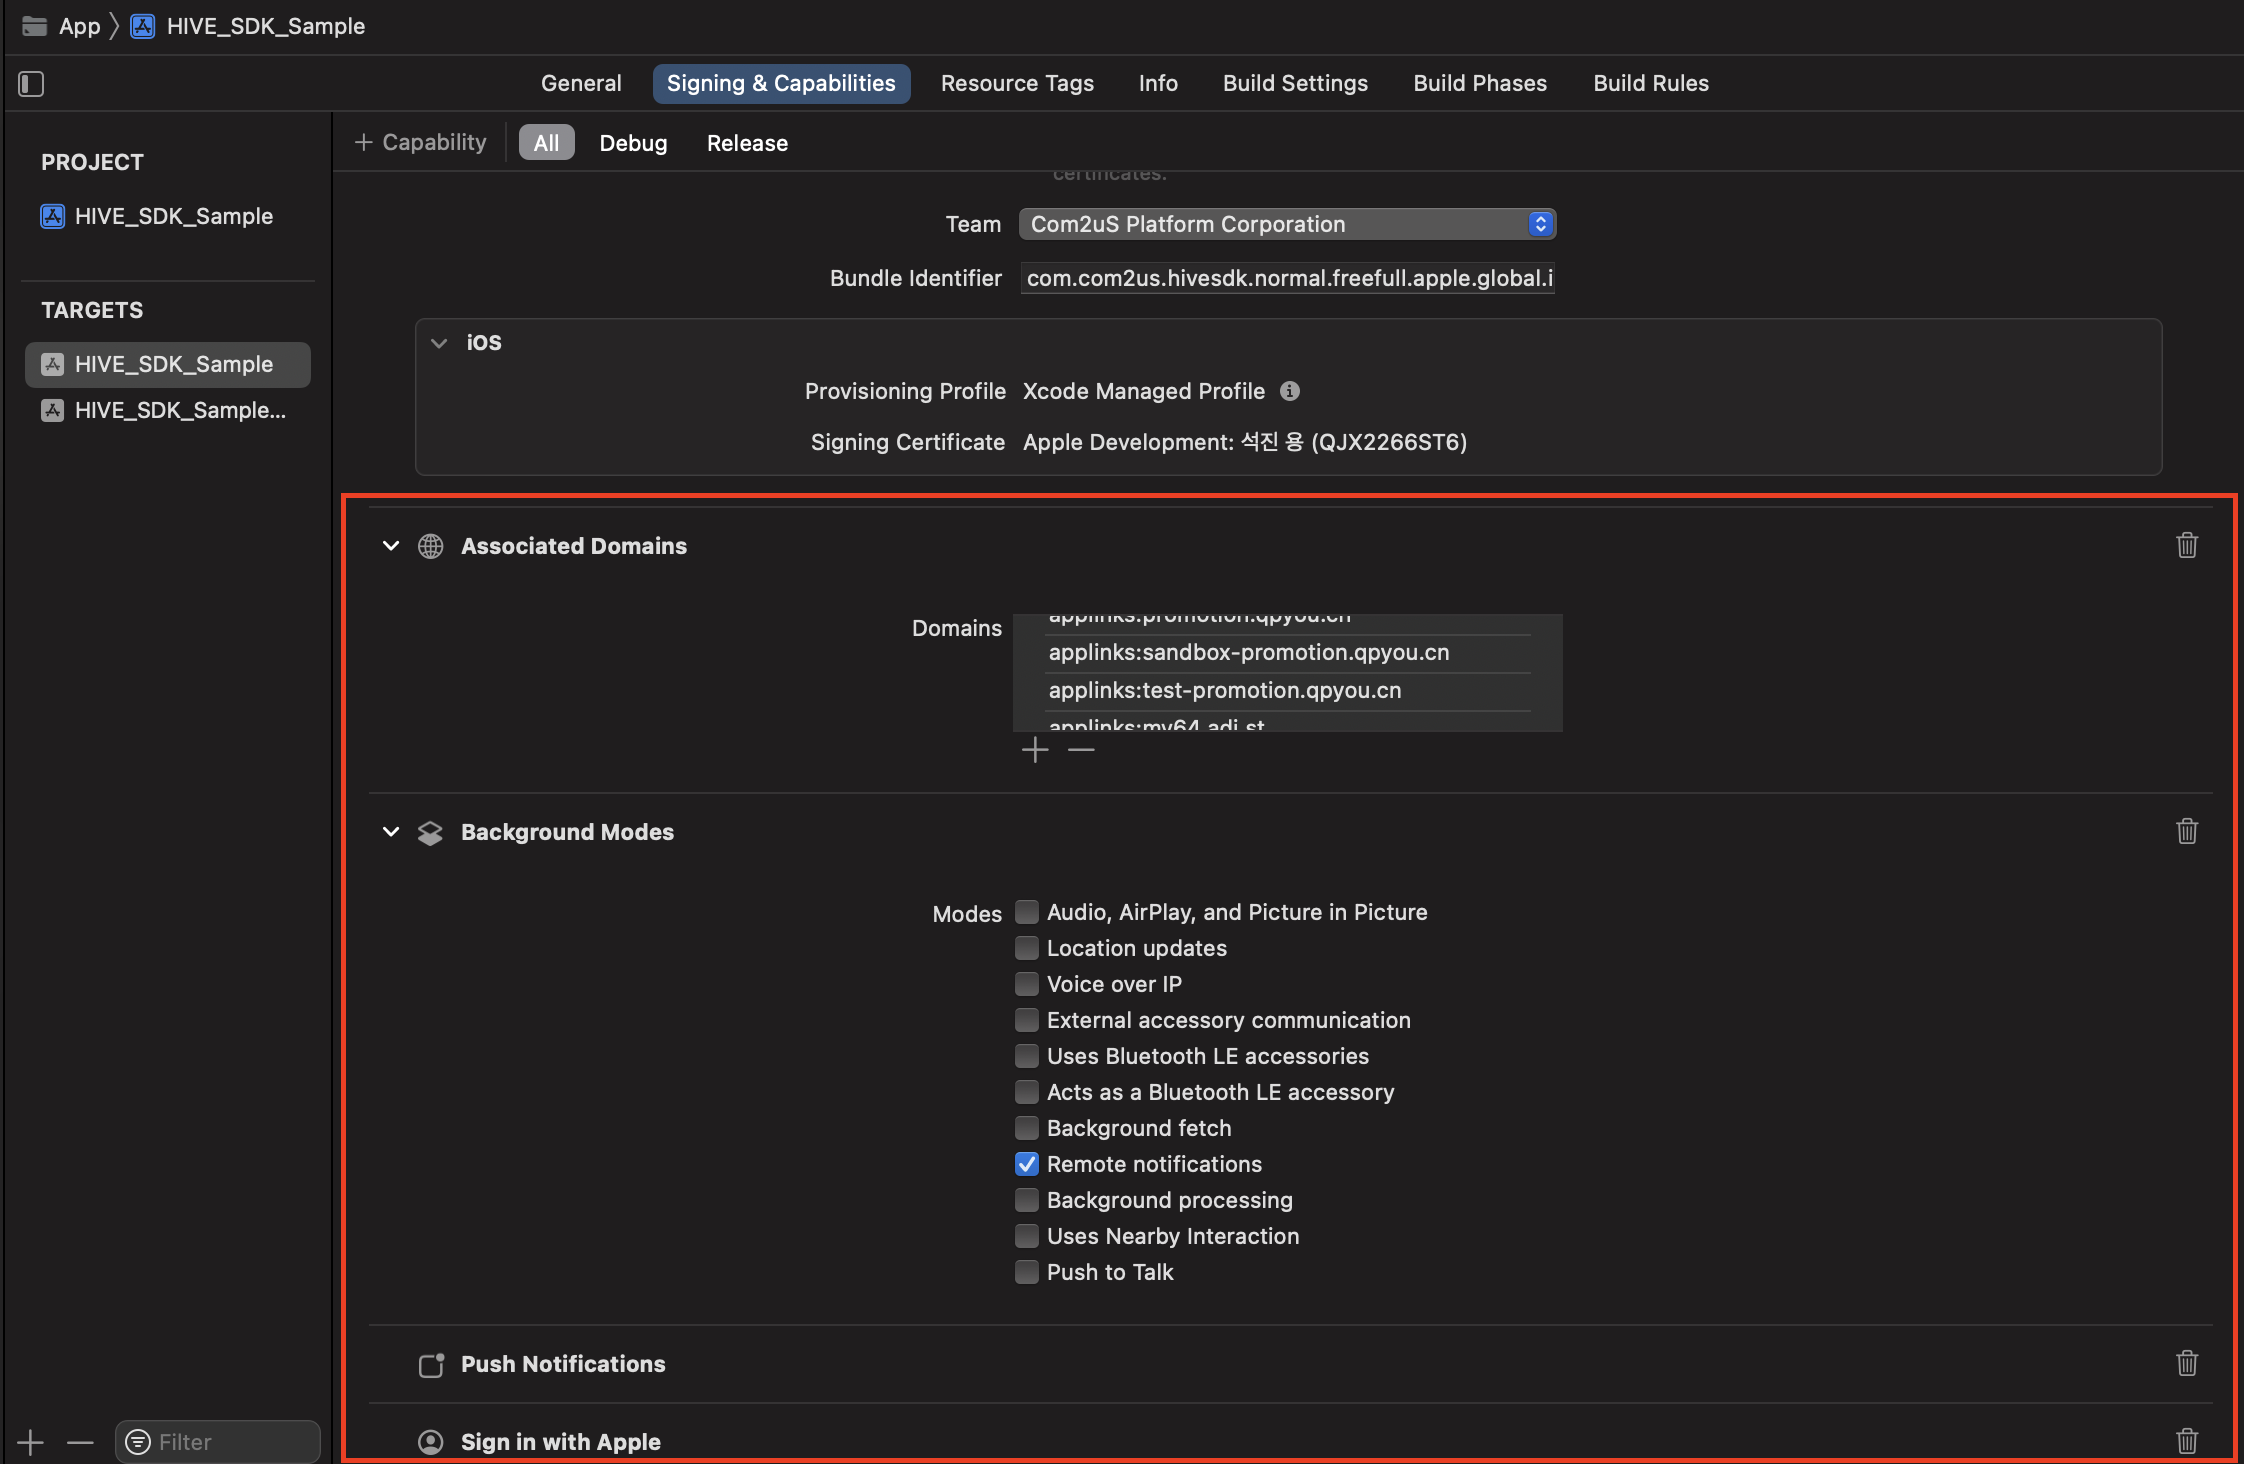
- Signing & Capabilities
Uncommenting/commenting in the HivePostProcess.cs file automatically adds/removes Hive SDK feature permissions to/from the info.plist files and Signing & Capabilities.
For instance, if you enable Firebase in Unity > Hive Dependencies and place the GoogleService-Info.plist file downloaded from the Google Firebase Console into the Assets/ExternalResources/iOS directory, and then write the following code in HivePostProcess.cs, the GoogleService-Info.plist file will be automatically linked to the Xcode project built with Unity.
|
1 2 3 4 5 6 7 8 9 10 11 12 13 14 15 16 17 18 19 20 21 22 23 24 25 26 27 28 29 30 31 32 33 34 35 36 37 38 39 40 41 42 43 44 45 46 |
private static void iOSSettingProject(string buildPath) { ... // To disable the automatic linking of the GoogleService-Info.plist file to the Xcode project, comment out the line below. iOSAddGoogleServiceInfoPlist(buildPath, project, targets[mainTarget]); ... } #if UNITY_IOS public static void iOSAddGoogleServiceInfoPlist(string buildPath, PBXProject project, string target) { var isUseFirebase = ExternalDependencyDictionaryManager.isUseDependency(ExternalDependencyType.Firebase); if (!isUseFirebase) { Debug.Log("[iOSAddGoogleServiceInfoPlist] ExternalDependencyType Firebase not use. Skip process."); return; } string[] filesToCopy = new string[] { "GoogleService-Info.plist", }; foreach (string file in filesToCopy) { var srcPath = Path.Combine("Assets/ExternalResources/iOS", file); var relativePath = Path.Combine("", file); var physicalPath = Path.Combine(buildPath, relativePath); if (!File.Exists(srcPath)) { Debug.Log("[iOSAddGoogleServiceInfoPlist] " + file + " not exist. Skip process."); continue; } Debug.Log("[iOSAddGoogleServiceInfoPlist] srcPath = " + srcPath); Debug.Log("[iOSAddGoogleServiceInfoPlist] relativePath = " + relativePath); Debug.Log("[iOSAddGoogleServiceInfoPlist] physicalPath = " + physicalPath); File.Copy(srcPath, physicalPath, true); var fileGuid = project.AddFile(physicalPath, relativePath); Debug.Log("[iOSAddGoogleServiceInfoPlist] fileGuid = " + fileGuid); project.AddFileToBuild(target, fileGuid); } } #endif |
Manually Add Required Permissions for Hive SDK to Xcode Project
In the Unity development environment, you can run the Hive PostProcess editor through Hive > Build project post process settings > iOS or Hive > Edit Config > Build iOS project post process settings. This allows you to selectively add permissions for desired features of the Hive SDK to the Signing & Capabilities section of the Xcode project.
The Hive SDK features that can be added are as follows:
- Push Notifications: Whether local and remote push features are activated.
- Development Mode: Set when using a development provisioning profile certificate.
- Release Mode: Set when using a distribution provisioning profile certificate.
- Background Modes (Remote Notifications): Whether to receive remote push notifications when the app is in the background.
- Apple Login (Sign In Apple): Whether the Sign In Apple login feature is activated.
- Associated Domains (Allows the app to be installed and executed from the web): List of allowed domains to be used as the app’s Universal Link.
- In-App Purchase: Whether in-app purchase features are activated.
- Game Center: Whether Game Center login and related features are activated.
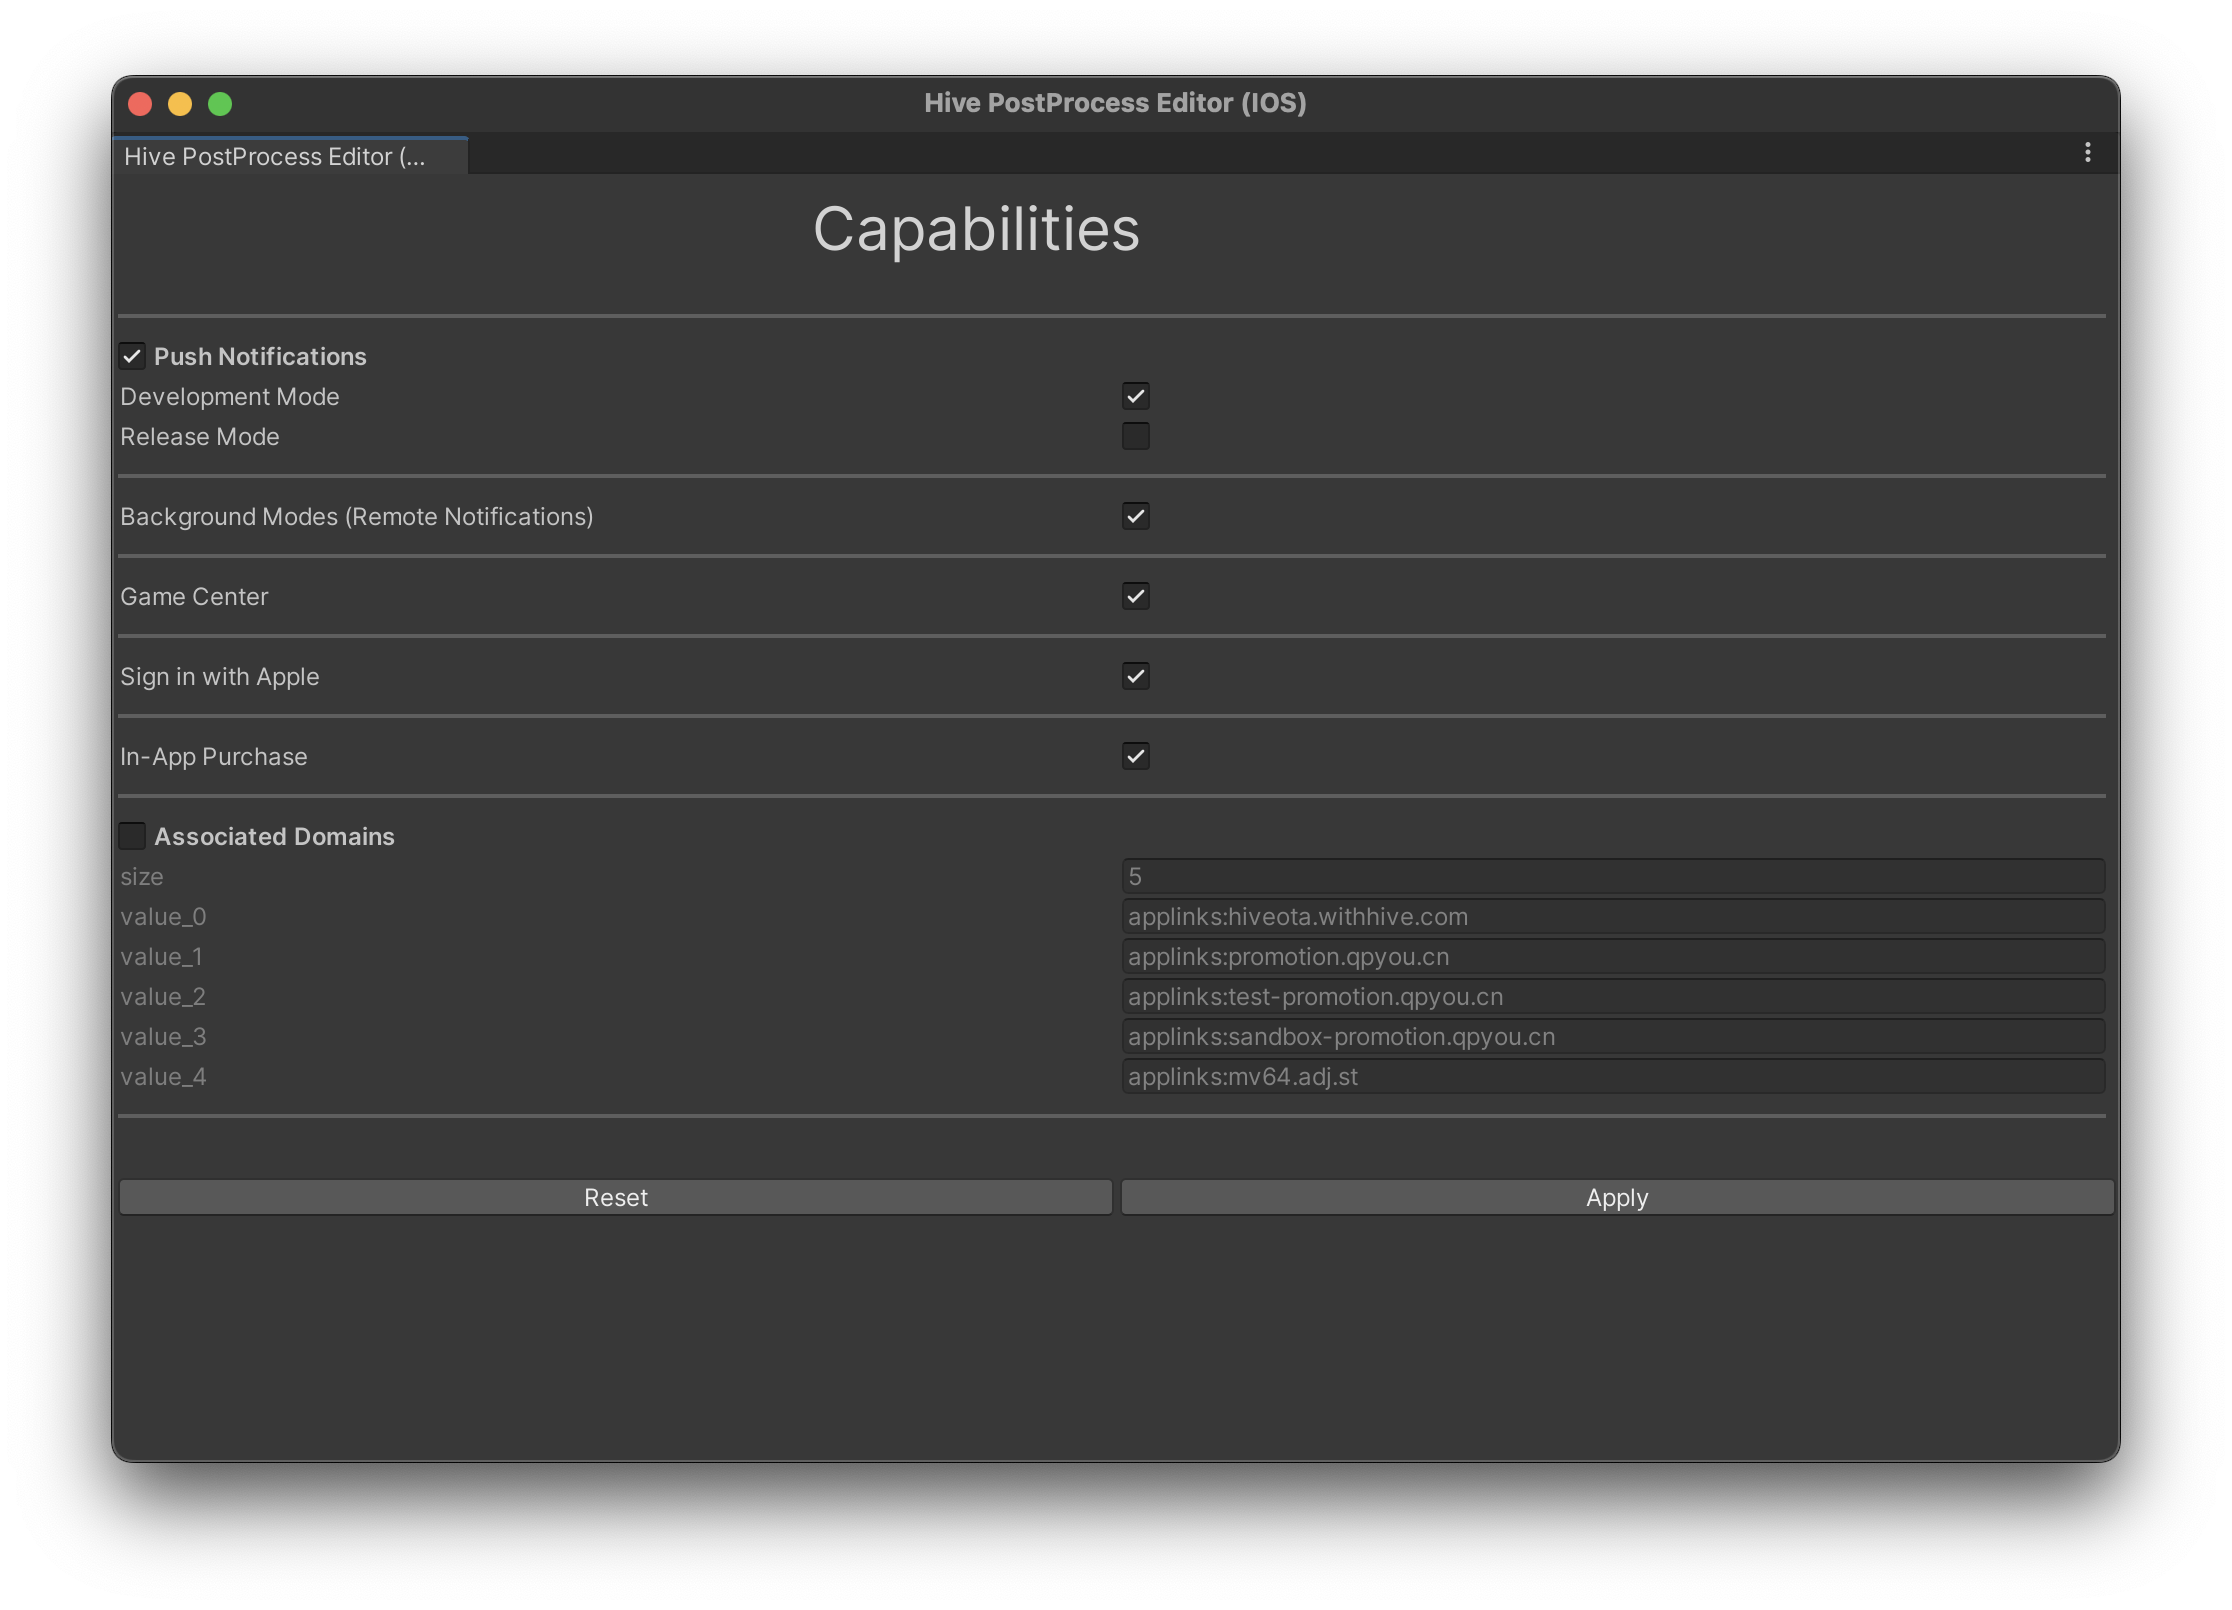
Click Apply to add the selected features to Xcode Signing & Capabilities. Click Reset to reset the settings to their default values.
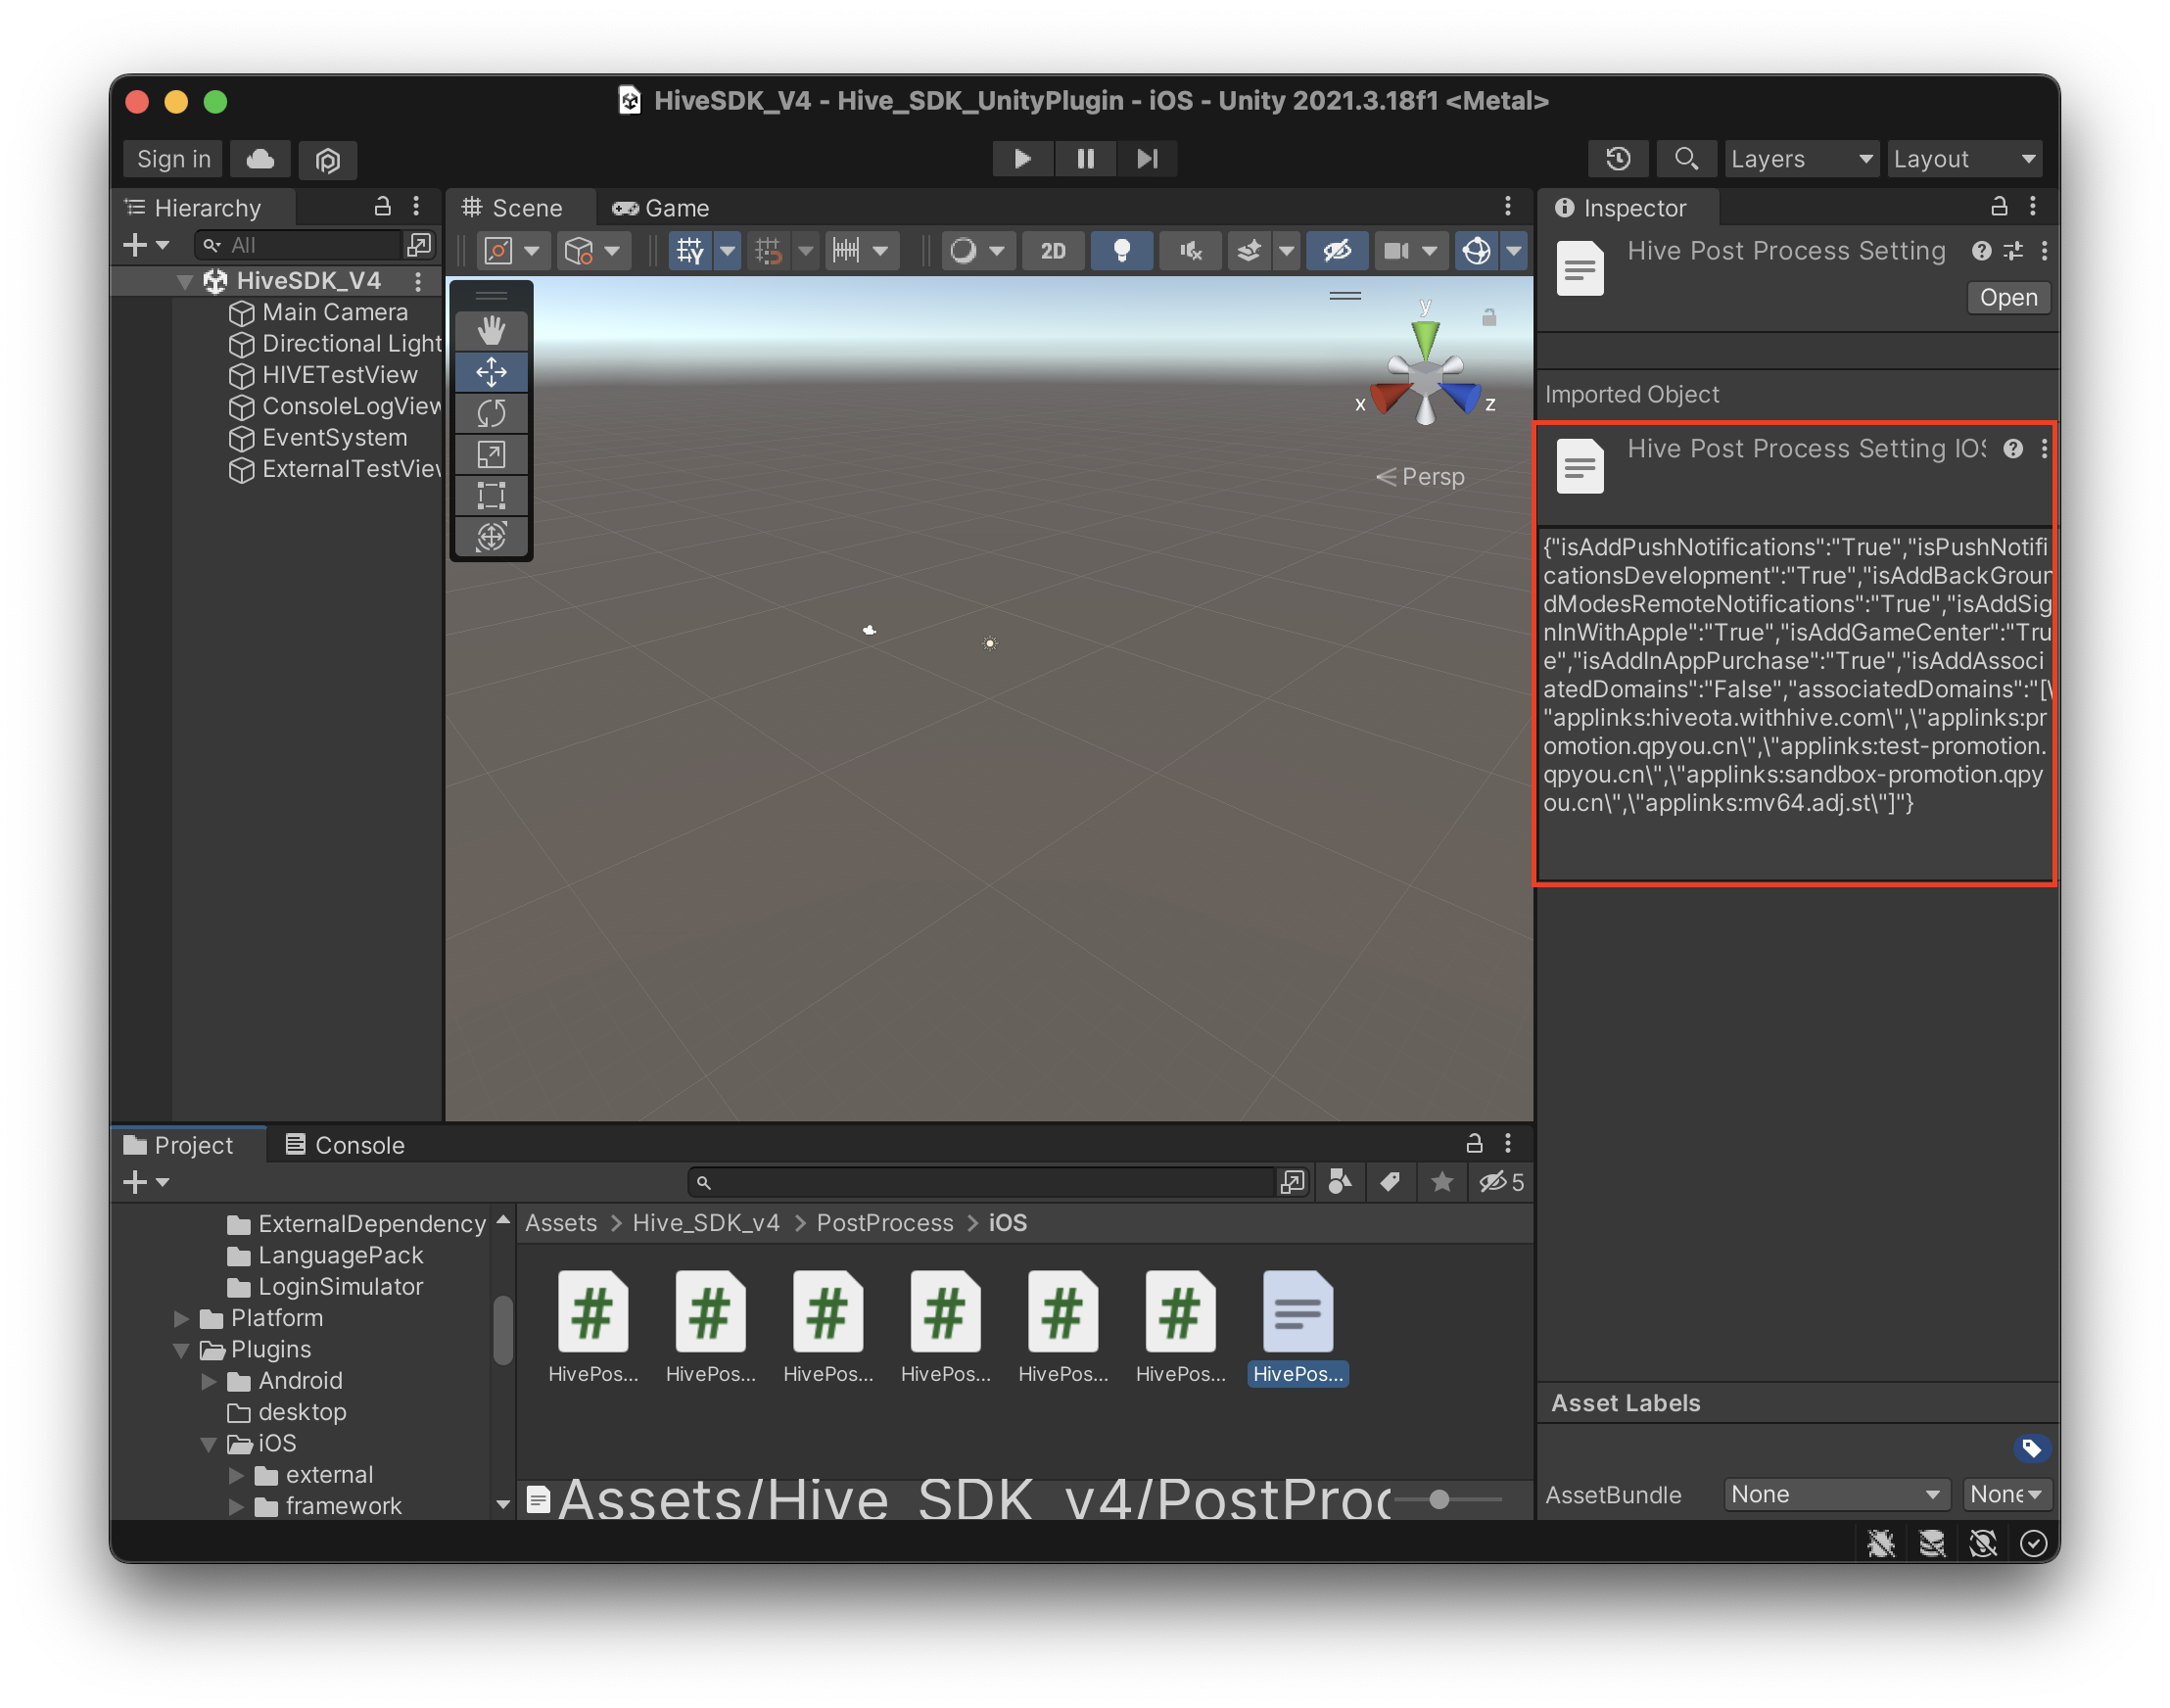
The configured values are saved in JSON String format in Assets > Hive_SDK_v4 > PostProcess > iOS > HivePostProcessSettingIOS.txt.
Create a Xcode project
To build an app for iOS, comply with the following rules:
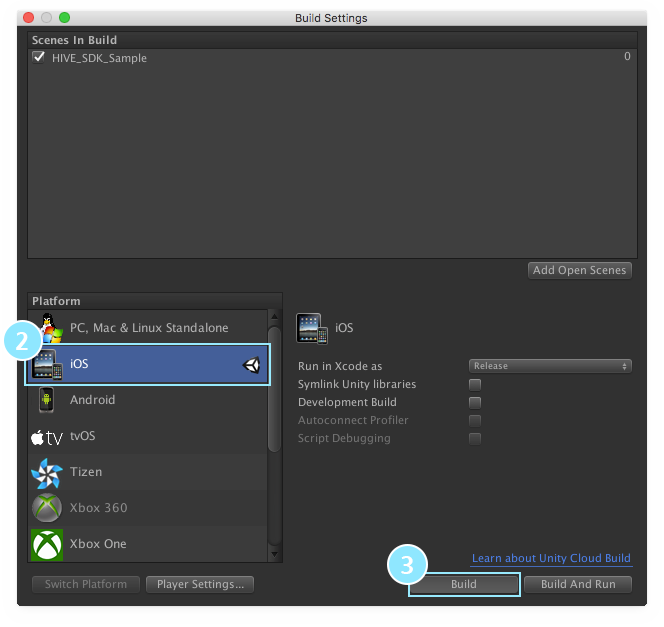
- Click File >; Build Settings… in the development environment of Unity. Build Settings screen will show up.
- Click iOS in the Platform list.
- Click Build button to create a Xcode project.
- Open the project created in steps 1 to 3 on Xcode.
- Select Build Settings tab and search bitcode. Among the result, set the Enable Bitcode option as No.
Build for Windows
Follow Option 1 or Option 2 below depending on whether you select Create Visual Studio Solution or not when configuring the Build Settings.
- Find the Assets\Plugins\Windows\res\hive_config.xml file from your project in the editor.
- The Hive SDK‘s additional files, such as .dll, .pak, and .bin, are copied by Assets\Hive_SDK_v4\Editor\HivePostprocess.cs to the folder with a .exe file created through building Unity.
If it has not copied, follow the steps below to copy manually:- Assets\Hive_SDK_v4\Plugins\desktop\hive_string → [A folder with a .exe file]\resources\hive_string
- Assets\Hive_SDK_v4\Plugins\Windows\additional → [A folder with a .exe file] (Exclude a .meta file)
- Assets\Plugins\Windows\res\hive_config.xml → [A folder with a .exe file]\resources\hive_config.xml
- Using the version set in your project proceeds Version settings with the script, Assets\Hive_SDK_v4\Editor\HivePostprocess.cs.
If the version of the results executable has not changed, you can also change it directly in CMD or PowerShell using Assets\Hive_SDK_v4\Plugins\Windows\postBuildUtil\rcedit.exe. (Link: Google Play Developer API)- Example:
rcedit.exe "D:\Hive_SDK_UnityPlugin_Sample\b\Hive_SDK_v4_Unity.exe" --set-product-version 1.0.3 --set-file-version 1.0.3 - result

- Example:
Option 1. Create Visual Studio Solution: False
Option 2. Create Visual Studio Solution: True
-
Build your Unity project targeting Windows with the environment that is set up in the step Pre-build setup in a folder you want.
Settings after the completion of building Windows apps
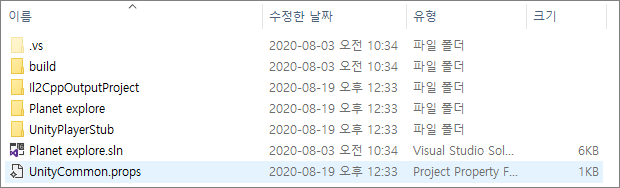
The followings are the files generated after completing build Unity.
- build
- Il2CppOutputProject
- [Project name] folder
- UnityPlayerStub
- [Project name].sln
- UnityCommon.props
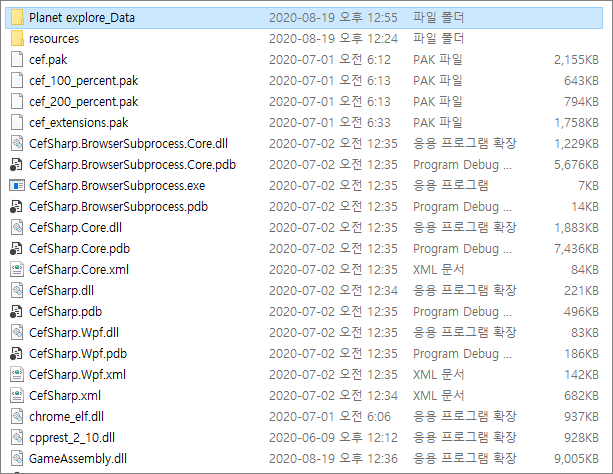
- locales
- resources
- swiftshader
- .dll
- cef.subprocess.exe
- .pak
- .bin
- icudtl.dat
version configuration
You can set the version by editing FILEVERSION and PRODUCTVERSION of the WindowsPlayerVersion.rc file in the [Project title] folder. The edited version is used for the appversion information when communicating with Hive server.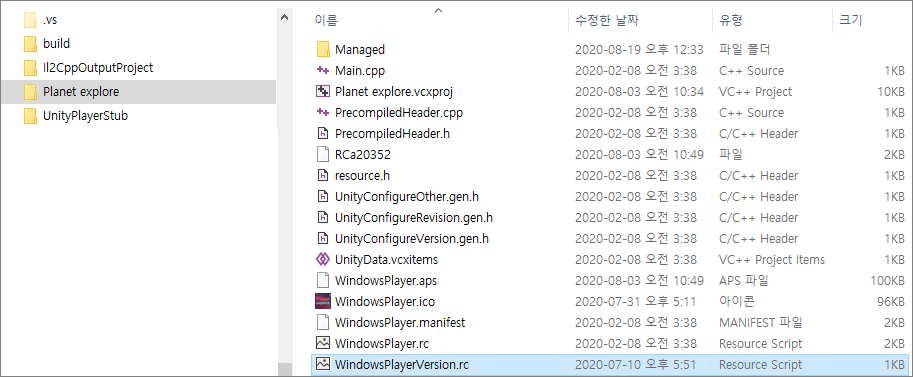
Build Visual Studio and copy Hive SDK
- Open a .sln file with Visual Studio to build, and an executable is created in the build\bin\x64\Debug(or Master) folder.
- When running the Unity 2018.4.17 project with Visual Studio 2019, it is needed to Retarget Solution.
- Copy the files from the folder, which is created during Unity build, to the same folder with the executable. (except to copy [Project name_Data].sln and UnityCommon.props)
- Copy the folders–locales, resources, and swiftshader–as the same with step 2.
- Modify hive_config.xml to match your project and set it to be located in the resources folder, which is a subfolder with an executable. (relating to an appid, Google, and Facebook)
- But, if your game is required to use the value, enter
HS, which is the market code of Hive Store, to hive_config.xml. (The values for market registered in the hive_config.xml does not affect your service.)
- But, if your game is required to use the value, enter
- Copy the build\bin{Project name_Data} folder to a folder with an executable.
- You can delete the .dll files in the build\bin\ [Project name_Data]\plugins folder because the files are duplicated.
- Some functions may not operate even if the additional .dll files and resources are located in build\bin\ [Project name_Data]\plugins, so you should copy and use the files in a folder with an executable.
Reducing App Size
You can delete unused language resources among the 16 languages supported by the Hive SDK to shrink the app.
-
in Unity, click Hive > Resource Settings > UI Language (Android Only).
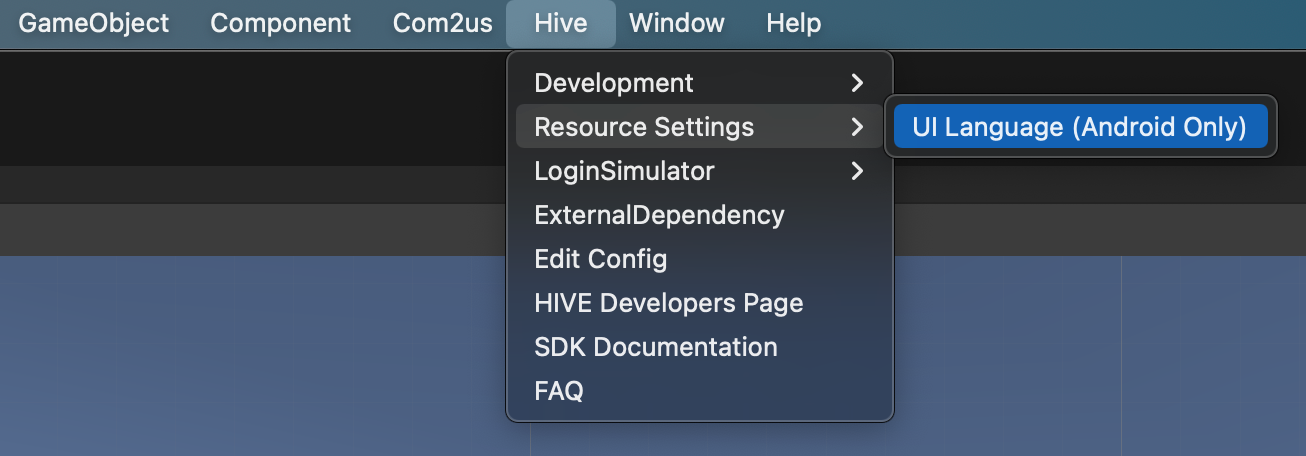
-
When the language settings window appears, select the language you need to use.
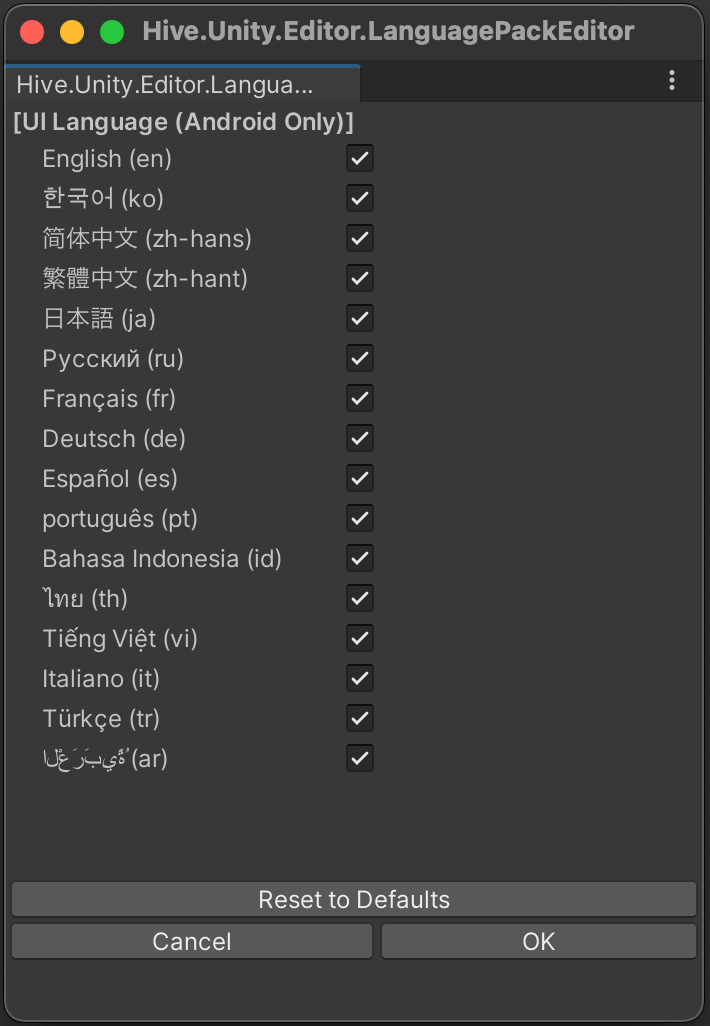
- Click OK, complete the setup, and rebuild the app.
Using Unity Login Simulator
Starting with Hive SDK v4 24.0.0, the Unity login simulator is used to temporarily issue AuthV4 guest accounts that can be used in a Hive Sandbox server environment.
The Unity login simulator function can be checked in the Hive > LoginSimulator > Open AuthV4 Setting menu as shown below.
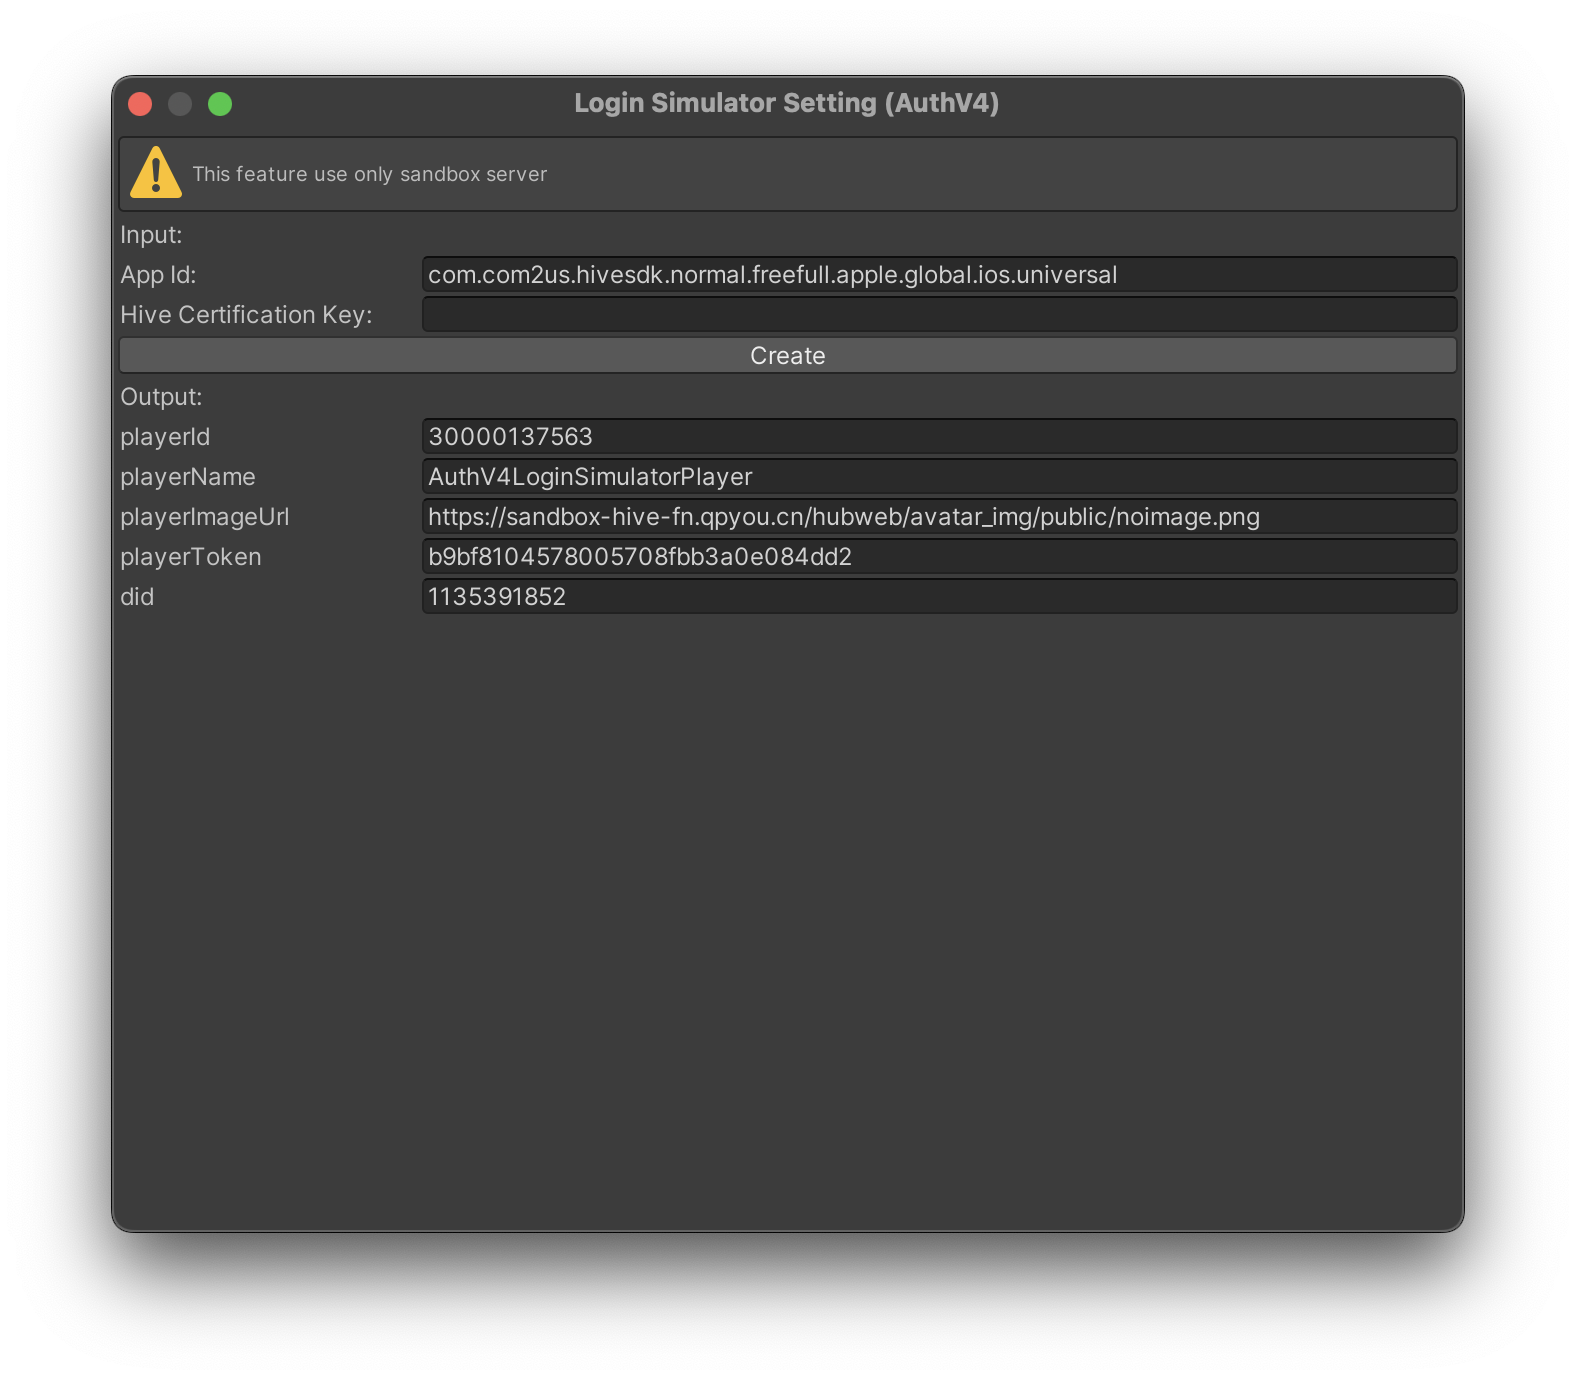
To use this feature, you must meet the conditions below.
- Write appId in hive_config.xml of the current platform (iOS, Android, Windows, Mac) set in the Unity–Build settings menu (automatically entered)
- Enter Hive authentication key
Afterwards, each time you press the Create button, a new guest account will be issued and the account information will be saved in a file.
You can obtain temporary guest account information through the following example code. did except playerId, playerToken, and other additional information can be obtained from the client. This is a temporarily created or specified value.
|
1 2 3 4 5 6 7 8 9 10 |
// playerId issued by Hive Sandbox server long playerId = AuthV4LoginData.playerId; // playerToken issued by Hive Sandbox server string playerToken = AuthV4LoginData.playerToken; // playerName temporarily set on the client string playerName = AuthV4LoginData.playerName; // playerImageUrl temporarily set on the client string playerImageUrl = AuthV4LoginData.playerImageUrl; // did temporarily set by the client (random value between 1000000000 and less than 2000000000) string did = AuthV4LoginData.did; |
Debugging Unity Scripts
In Unity, by activating the Script Debugging option and building the app, you can debug the app behavior while connected to a mobile device in the IDE. Refer to the Visual Studio IDE example below.
- Activate the Script Debugging option in the Unity Editor and build the app for a mobile device.

- Execute Process Attach in Visual Studio to add your mobile device.
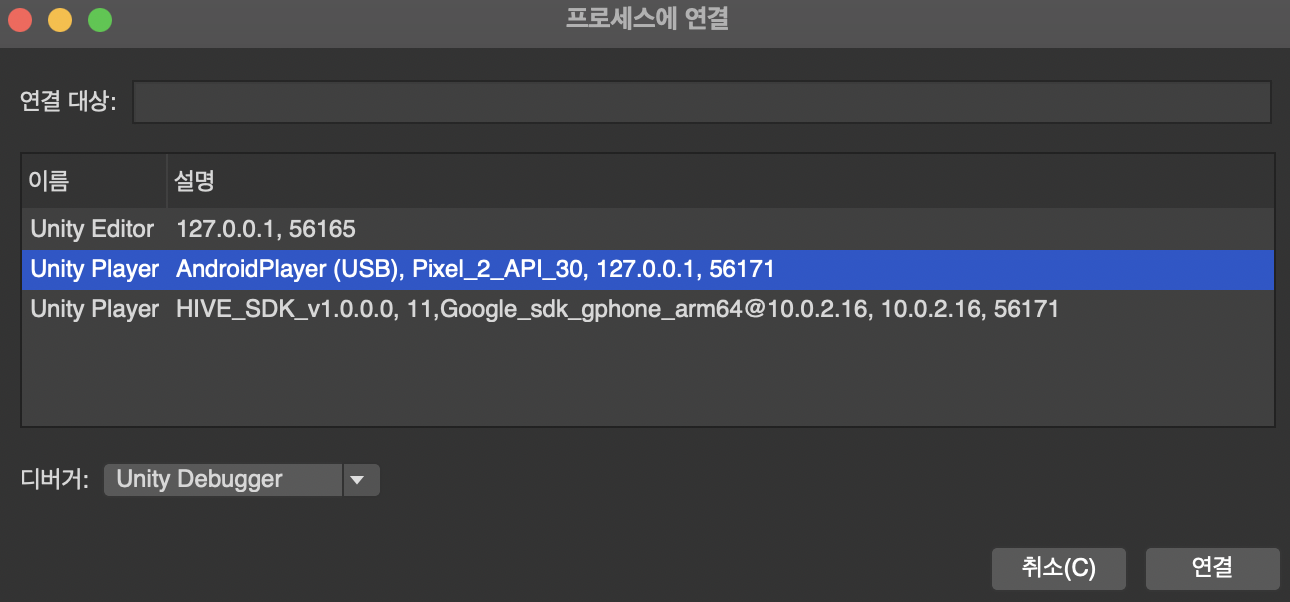
- Debug by observing the device behavior connected to the debugger.