This page informs you how to port and build Hive SDK when developing games with Xcode.
Porting
To port Hive SDK into iOS-Xcode, you need Hive SDK dedicated for iOS. Hive SDK for iOS is required to port Hive SDK to Xcode. If you do not have Hive SDK yet, download Hive SDK Package for iOS from SDK Download Page and unzip the file.
Applying Framework
From Hive SDK v4.16.3, you can install Hive SDK framework with CocoaPods.
How to install CocoPods and Hive SDK
- Install CocoaPods.
12$sudo gem install cocoapods - Create Podfile for the composition of CocoaPods configuration file.
12$sudo pod init - Add Hive SDK repository to the created Podfile using source command.
12source 'https://github.com/Com2uSPlatformCorp/HiveSDK-iOS' - Open Podfile with an editor and add frameworks required for Hive SDK. First, see the third party frameworks and their versions bound to Hive SDK iOS
Dependencies on third-party frameworks
- HiveAuthV4ProviderAppsFlyer (24.0.0)
- AppsFlyerFramework (6.13.1)
- AppsFlyer-AdRevenue (6.13.1)
- HiveAuthV4ProviderFacebook (24.0.0)
- FBSDKCoreKit (16.2.1)
- FBSDKLoginKit (16.2.1)
- FBSDKShareKit (16.2.1)
- HiveAnalyticsProviderFirebase (24.0.0)
- FirebaseCore (10.22.0)
- FirebaseAnalytics (10.22.0)
- HiveAnalyticsProviderAdjust (24.0.0)
- Adjust (4.38.0)
- HiveAnalyticsProviderSingular (24.0.0)
- Singular-SDK (12.3.2)
- HiveAuthV4ProviderGoogle (24.0.0)
- GoogleSignIn (7.0.0)
- HiveGoogleRecaptcha (24.0.0)
- RecaptchaEnterprise (18.4.0)
- HiveAuthV4ProviderLine (24.0.0)
- LineSDKSwift (5.10.0)
- HiveAuthV4ProviderLine/LineSDKSwift11
- LineSDKSwift (5.11.0)
- HiveAuthV4ProviderVK (24.0.0)
- VK-ios-sdk (1.6.4)
- HiveSDK (24.0.0)
- SDWebIamge (5.18.7)
- HerculesSwift (24.0.0)
- Hercules (2024.04.11)
//The existing module ‘Hercules’ was renamed to ‘HerculesSwift’ and the newly distributed ‘Hercules’ library through CocoaPods was changed to be used as a third-party framework.
The below is an example of writing a Podfile file. For more details, see Podfile.lock created after the installation of framework.
123456789101112131415161718192021222324252627282930313233343536373839404142434445464748495051525354555657585960616263646566676869707172737475source 'https://github.com/CocoaPods/Specs.git'# Adding Hive SDK repository as a sourcesource 'https://github.com/Com2uSPlatformCorp/HiveSDK-iOS'# Adding Hercules-iOS repository as a sourcesource 'https://github.com/Com2uSPlatformCorp/Hercules-iOS.git' # Must be added to the Podfile to use the CocoaPods Hercules third-party frameworkplatform :ios, '12.0'use_frameworks!inhibit_all_warnings!workspace 'HIVE_GAME'project 'ProjectPath/Project/HIVE_GAME.xcodeproj'# Main target of the projecttarget 'HIVE_GAME_COOL' doproject 'ProjectPath/Project/HIVE_GAME.xcodeproj'pod 'HerculesSwift', '${HIVE_SDK_VERSION}' #'Hercules' renamed to 'HerculesSwift'pod 'HiveAnalyticsProviderAdjust', '${HIVE_SDK_VERSION}'pod 'HiveAnalyticsProviderAppsFlyer', '${HIVE_SDK_VERSION}'pod 'HiveAnalyticsProviderFirebase', '${HIVE_SDK_VERSION}'pod 'HiveAnalyticsProviderSingular', '${HIVE_SDK_VERSION}'pod 'HiveAuthV4ProviderAppleGameCenter', '${HIVE_SDK_VERSION}'pod 'HiveAuthV4ProviderAppleSignIn', '${HIVE_SDK_VERSION}'pod 'HiveAuthV4ProviderFacebook', '${HIVE_SDK_VERSION}'pod 'HiveAuthV4ProviderGoogle', '${HIVE_SDK_VERSION}'pod 'HiveAuthV4ProviderHive', '${HIVE_SDK_VERSION}'pod 'HiveAuthV4ProviderLine', '${HIVE_SDK_VERSION}'pod 'HiveAuthV4ProviderLine/LineSDKSwift11', '${HIVE_SDK_VERSION}' # XCPrivacy-applied LineSDK version 5.11.0. Minimum OS support is 13.0pod 'HiveAuthV4ProviderQQ', '${HIVE_SDK_VERSION}'pod 'HiveAuthV4ProviderVK', '${HIVE_SDK_VERSION}'pod 'HiveAuthV4ProviderWechat', '${HIVE_SDK_VERSION}'pod 'HiveAuthV4ProviderWeverse', '${HIVE_SDK_VERSION}'pod 'HiveDataStore', '${HIVE_SDK_VERSION}'pod 'HivePromotion', '${HIVE_SDK_VERSION}'pod 'HiveDeviceManagement', '${HIVE_SDK_VERSION}'pod 'HiveExtensions', '${HIVE_SDK_VERSION}'pod 'HiveGoogleRecaptcha', '${HIVE_SDK_VERSION}'pod 'HiveIAPV4', '${HIVE_SDK_VERSION}'pod 'HiveRealNameVerification', '${HIVE_SDK_VERSION}'pod 'HiveSDKPlugin', '${HIVE_SDK_VERSION}' # CPP interface pluginpod 'HiveSDKUnityPlugin', '${HIVE_SDK_VERSION}' # C# interface pluginend# If the App Extension target is added to use Hive's Push Extension featuretarget 'HIVE_GAME_COOL_EXTENSION' doproject 'ProjectPath/Project/HIVE_GAME.xcodeproj'pod 'HiveExtensions', '${HIVE_SDK_VERSION}'endpost_install do |installer|installer.pods_project.targets.each do |target|target.build_configurations.each do |config|# Fix for dyld issue in pods when using Project# Necessary to change pod project settings when using LineSDKSwiftif ["LineSDKSwift"].include? target.nameconfig.build_settings["BUILD_LIBRARY_FOR_DISTRIBUTION"] = "YES"# Addressing CocoaPods bundle target code signing compile error issue in Xcode 14elsif config.build_settings['WRAPPER_EXTENSION'] == 'bundle'config.build_settings['CODE_SIGNING_ALLOWED'] = 'NO'end# Addressing TOOLCHAIN_DIR related compile error issue in Xcode 15xcconfig_path = config.base_configuration_reference.real_pathxcconfig = File.read(xcconfig_path)xcconfig_mod = xcconfig.gsub(/DT_TOOLCHAIN_DIR/, 'TOOLCHAIN_DIR')File.open(xcconfig_path, 'w') { |file| file << xcconfig_mod }if config.build_settings['IPHONEOS_DEPLOYMENT_TARGET'].to_f < 12.0config.build_settings['IPHONEOS_DEPLOYMENT_TARGET'] = '12.0'end# If the App Extension target is added to use Hive's Push Extension featureconfig.build_settings["APPLICATION_EXTENSION_API_ONLY"] = "NO"endendend - HiveAuthV4ProviderAppsFlyer (24.0.0)
- Install the frameworks in accordance with the CocoaPods settings.
12$pod install
The list of frameworks that need to be added in the project’s main target in the CocoaPods Podfile is described as below.
- HiveSDK
- The essential one for the overall Hive SDK features
- Automatic installation when additional optional applicable frameworks are installed
- Hercules
- Security Module Framework
- HiveExtensions
- Framework for additional extended features of Hive push notifications
- HiveAnalyticsProviderAdjust
- Adjust Marketing Tracking Framework
- HiveAnalyticsProviderAppsFlyer
- AppsFlyer Marketing Tracking Framework
- HiveAnalyticsProviderFirebase
- Firebase Marketing Tracking Framework
- HiveAnalyticsProviderSingular
- Singular Marketing Tracking Framework
- HiveAuthV4ProviderAppleGameCenter
- Framework for Apple Game Center Login
- HiveAuthV4ProviderAppleSignIn
- Framework for Sign in with Apple Login
- HiveAuthV4ProviderFacebook
- Framework for Facebook login and other social features
- HiveAuthV4ProviderGoogle
- Framework for Google Login
- HiveAuthV4ProviderHive
- Framework for Hive Membership Login
- HiveAuthV4ProviderLine
- Framework for Line Login
- HiveAuthV4ProviderQQ
- Framework for QQ Login
- HiveAuthV4ProviderVK
- Framework for VK Login
- HiveAuthV4ProviderWechat
- Framework for Wechat Login
- HiveAuthV4ProviderWeverse
- Framework for Weverse Login
- HiveDataStore
- Framework for storing and retrieving ancillary data per app user
- HiveDeviceManagement
- Framework for managing app users’ devices
- HiveGoogleRecaptcha
- Framework to use Google reCAPTCHA Enterprise based on bot score for guest logins
- HiveIAPV4
- Framework for in-app purchases and refund user repayment
- HiveRealNameVerification
- Framework for real-name verification of users with China IP
- HiveSDKPlugin
- Hive SDK Interface Plugin Framework for C++ language
- HiveSDKUnityPlugin
- Hive SDK Interface Plugin Framework for C# language
General settings
Follow the
instructions to set the following items:
- [Set app status bar exposure]#statusbar) [Add whitelist]#whitelist) [Set access permission request]#permission) [Set notification]#push) [Add Apple Log-in to the IdP list]#idp-apple) [Setting up KeyChain]#keychain) Setting up Universal Link
Setting App Status Bar Exposure
Set the View Controller-Based Status Bar Appearance field value to NO not to expose the status bar in your app:
- Select your project in the Project Navigator in the Xcode Project window.
- Select your app from the TARGETS list.
- Click Info tab.
-
Depending on the existence of the View Controller-Based Status Bar Appearance field in the Info tab, do the following:
- If there is a field, select the field and set the value to NO.
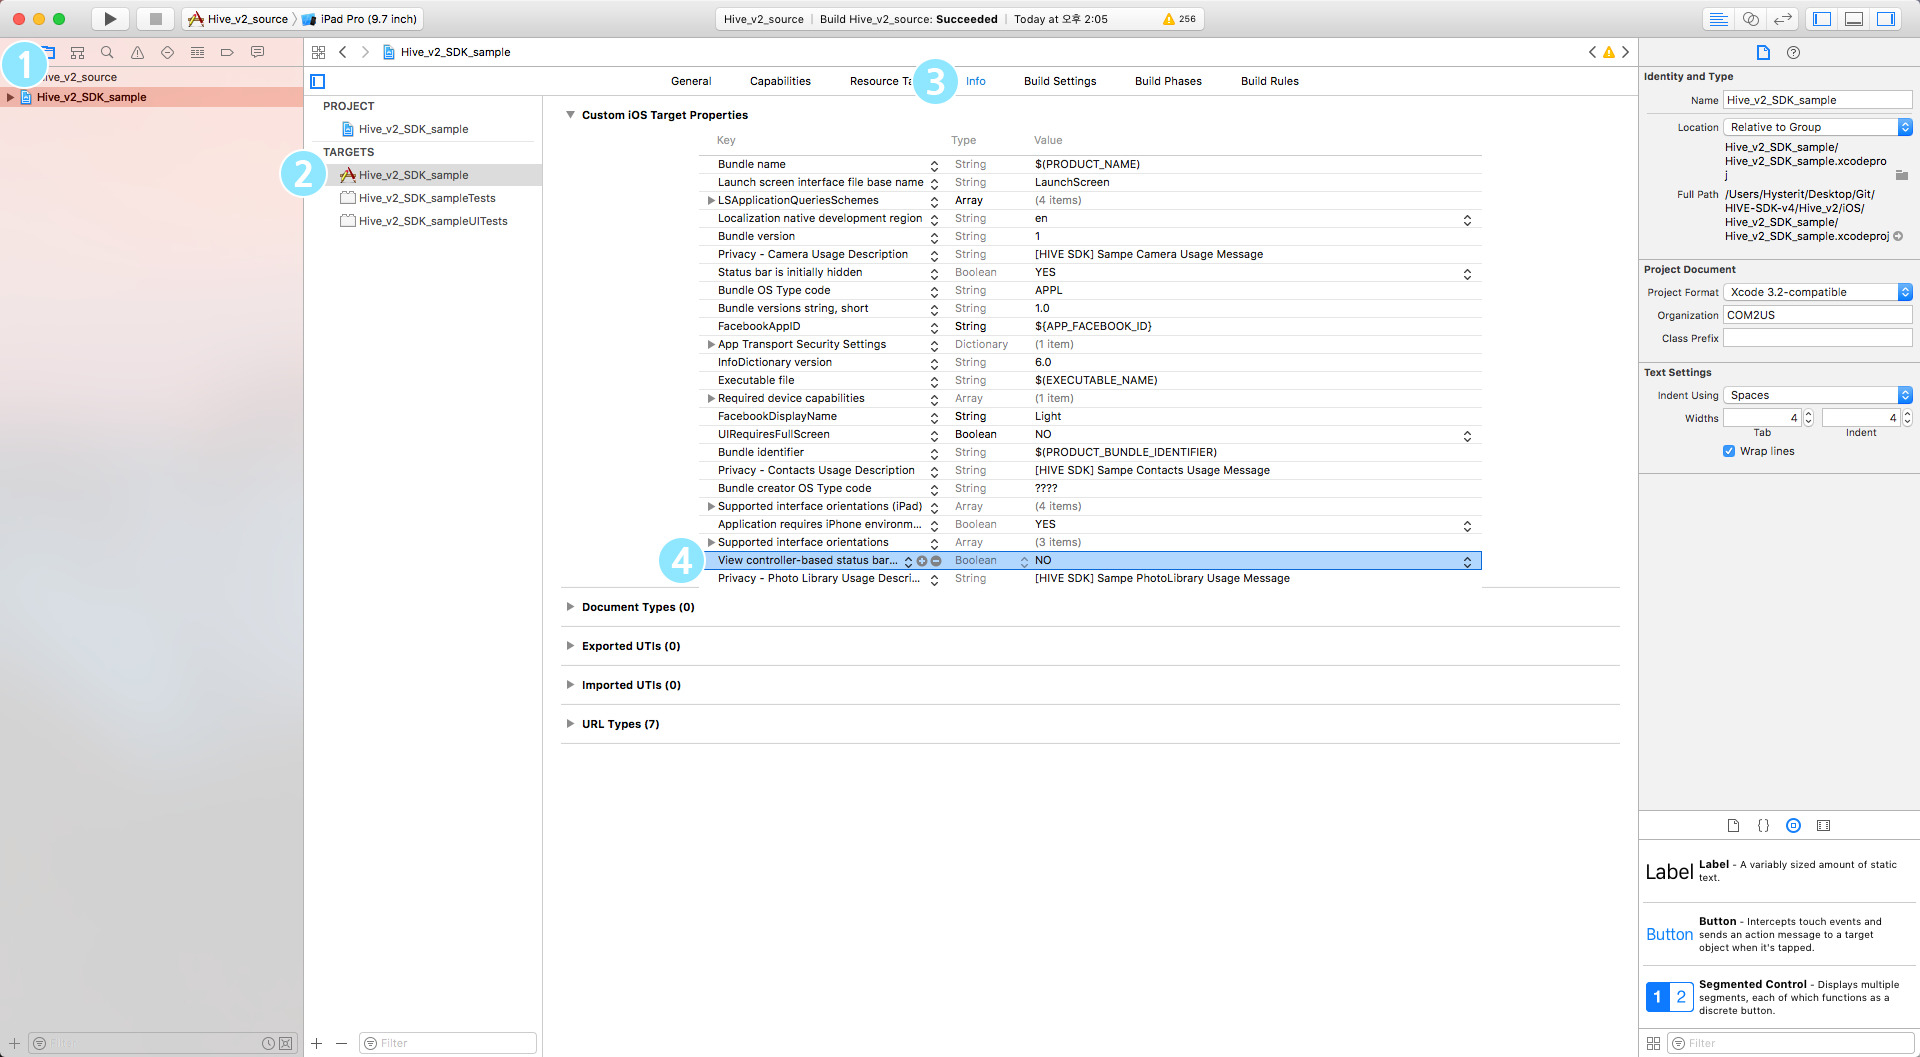
- If the field does not exist, add one.
- Right-click on the list of Info tab.
- Click the Add Row menu.
- Enter View Controller-Based Status Bar Appearance in the Key field.
- Set Type to Boolean.
- Set Value to NO.
- If there is a field, select the field and set the value to NO.
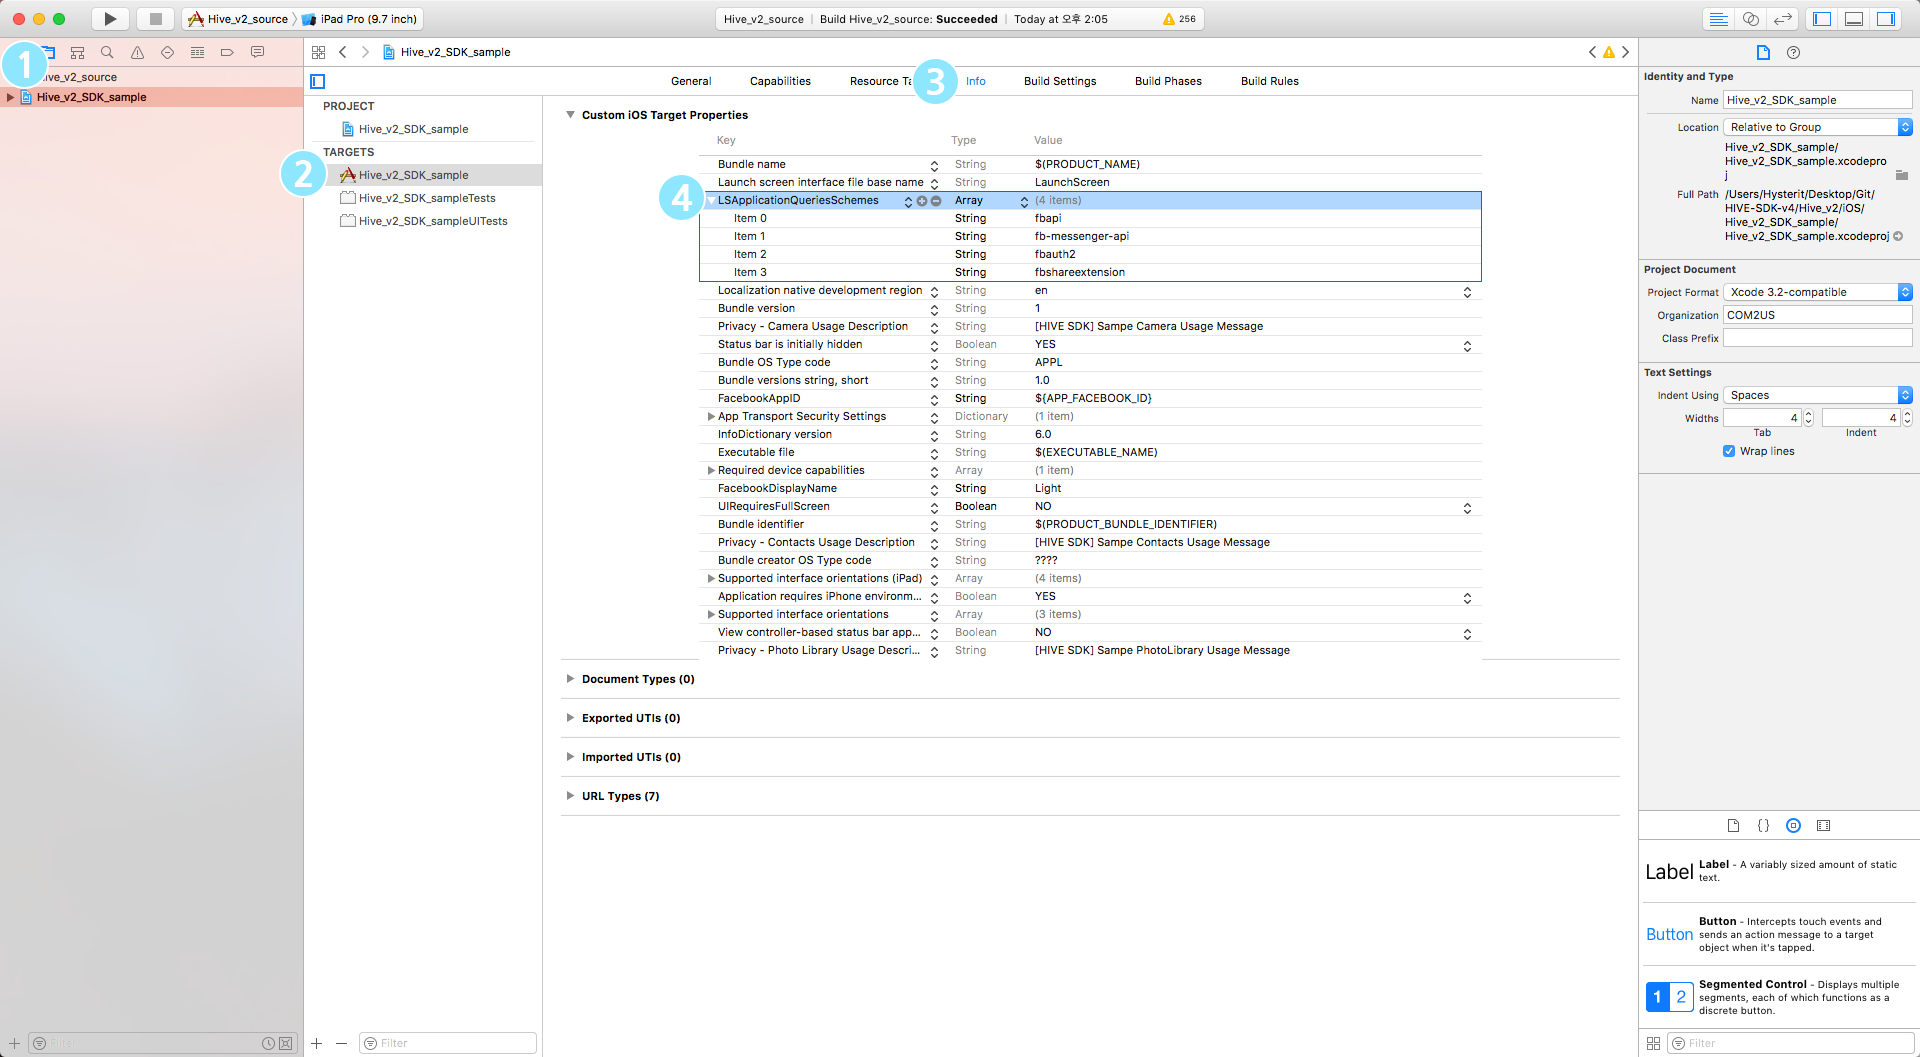
Add whitelist
To add Facebook Scheme to the whitelist, you can either [use the project window]#modify-ui-fb) or [add the code directly to the Info.plist file]#modify-infoplist-fb).
Editing in the project window1. Select your project in the Project Navigator in the Xcode Project window.
- Select your app from the TARGETS list.
- Click Info tab.
-
Click LSApplicationQueriesSchemes in the Info tab and click the + button to add the following two schemes.
- fbapi * fb-messenger-share-api
 Editing Info.plist DirectlyYou can also add the code below directly to Info.plist.
- fbapi * fb-messenger-share-api
|
1 2 3 4 |
"LSApplicationQueriesSchemes" : [ "fbapi", "fb-messenger-share-api" ] |
To add QQ Scheme to the whitelist, you can either [use the project window] (#modify-ui-qq) or [add the code directly to the Info.plist file] (#modify-infoplist-qq).
Editing in the project window1. Select your project in the Project Navigator in the Xcode Project window.
- Select your app from the TARGETS list.
- Click Info tab.
-
Click LSApplicationQueriesSchemes in the Info tab and click the + button to add the following six schemes.
- mqqOpensdkSSoLogin mqqopensdkapiV2 mqqopensdkapiV3 wtloginmqq2 mqq mqqapi mqqopensdknopasteboard * mqqopensdknopasteboardios16Editing Info.plist DirectlyYou can also add the code below directly to Info.plist.
|
1 2 3 4 5 6 7 8 |
"LSApplicationQueriesSchemes" : [ "mqqOpensdkSSoLogin", "mqqopensdkapiV2", "mqqopensdkapiV3", "wtloginmqq2", "mqq", "mqqapi" ] |
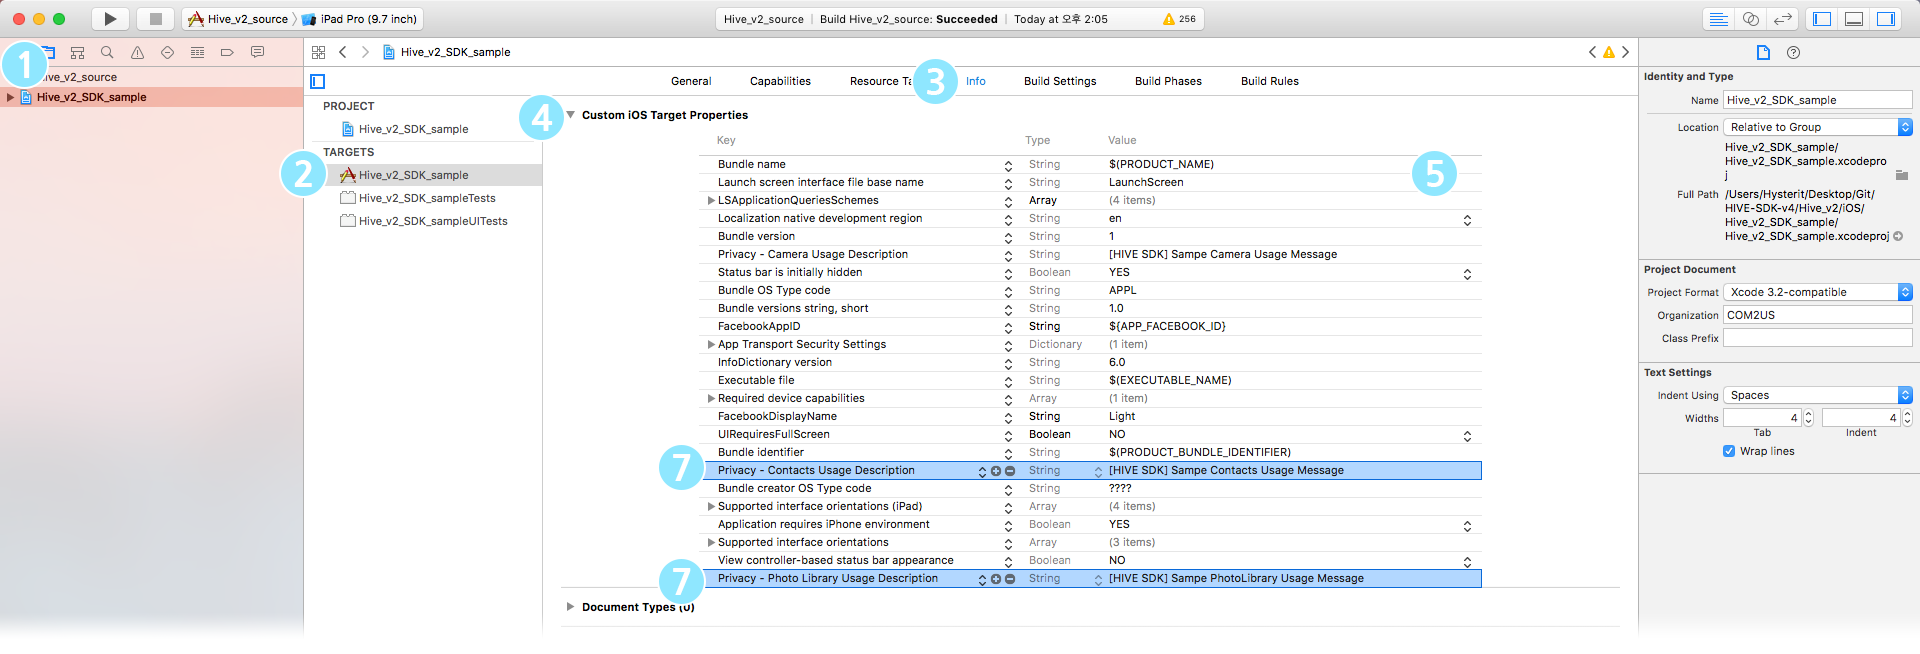
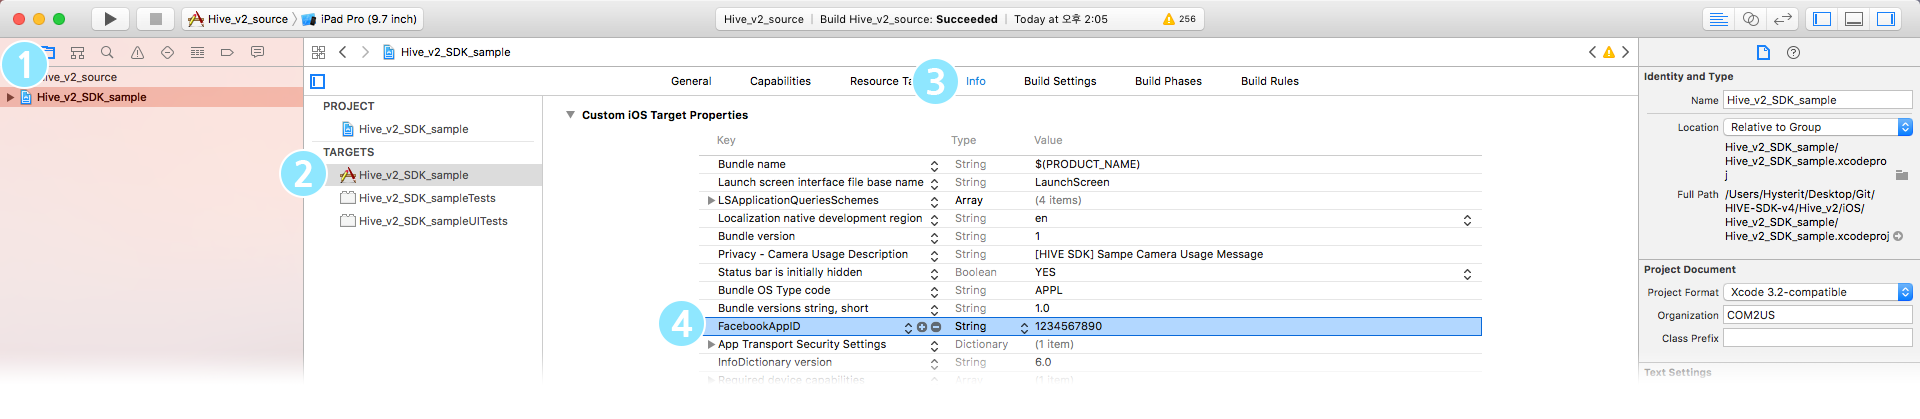
Configure access requests
Add keys to Info.plist to gain access to camera, photo album and tracking.
- Select your project in the Project Navigator in the Xcode Project window.
- Select your app from the TARGETS list.
- Click Info tab.
- Click the Custom iOS Target Properties item in the Info tab.
- Right-click on the Custom iOS Target Properties list.
- Click the Add Row menu.
-
Enter NSCameraUsageDescription in the Key item, and add the value specified in Multilingual Settings File > Base.Iproj folder > InfoPlist.strings to the Value item.
- Write a message requesting permission to the game user specified in the multilingual configuration file. If you do not insert the permission approval request pop-up message, the additional explanation guide for the active user's access permission is missing and you will be rejected during app review.
- If you apply the updated Permission.strings file from Hive SDK SDK v4.6.0, you must change this file as well. Otherwise, your app may be rejected at the App Store upload stage.
- Repeat steps 6-7 for NSPhotoLibraryUsageDescription and NSUserTrackingUsageDescription keys.
Configuring Notification
If push notification is not activated, the push tokens are not issued on iOS 10 devices, and apps may be rejected for the reason of 'Missing Push Notification Entitlement' during app review. Follow the instructions below to set up push notifications:
- Select your project in the Project Navigator in the Xcode Project window.
- Select your app from the TARGETS list.
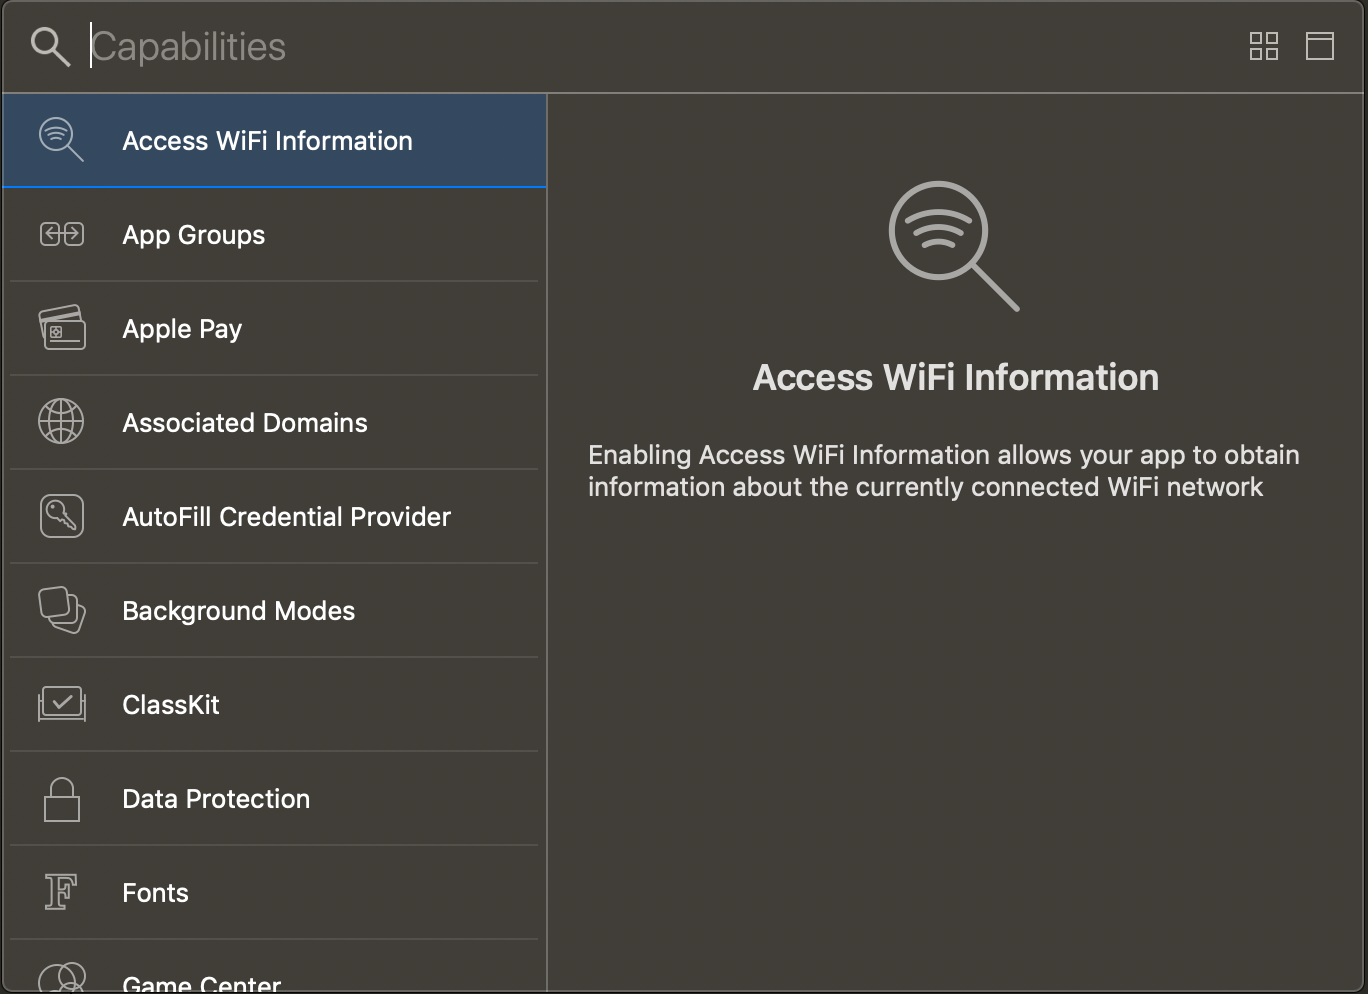
- Click Capabilities tab.
- In the Capabilities tab, turn Push Notification on.
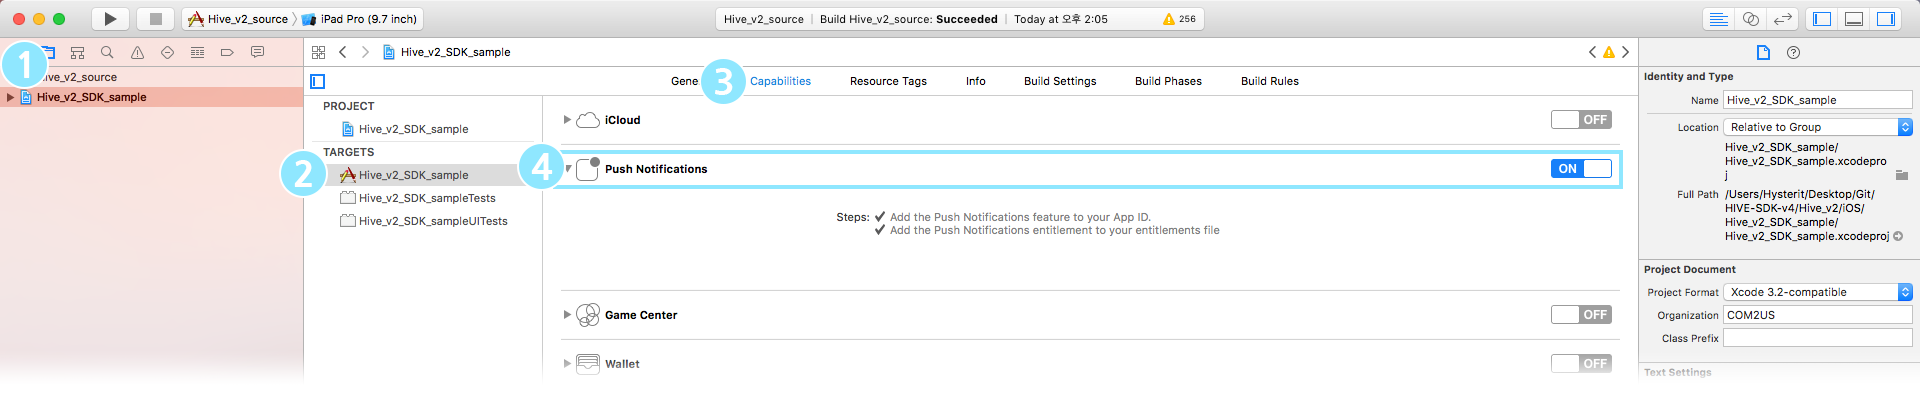
- To use Time Sensitive Notifications, set Capabilities > Time Sensitive Notifications as ON. (Operation Guide) - Users can receive the remote push of an app by turning on its Time Sensitive Notifications which is available from iOS 15.
Adding Sign In with Apple on IdP list
Hive v4.11.7.3 adds Apple, which is supported from iOS 13 on the available IdP list. This new IdP is available to add on Xcode 11 and later version. Follow the instructions to add a new IdP.
- Select your project in the Project Navigator in the Xcode Project window.
- Select your app from the TARGETS list.
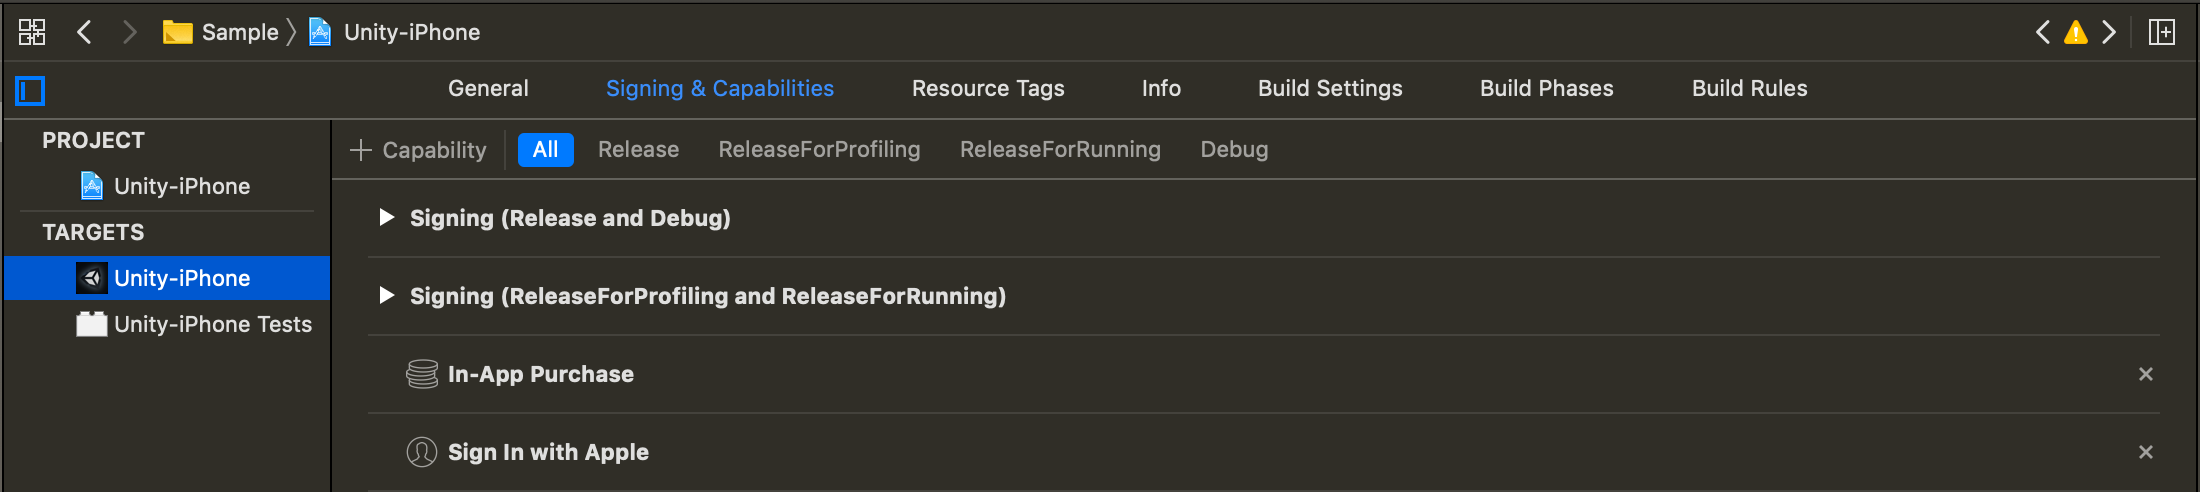
- Click Signing & Capabilities tab.
- Click + Capability button on the left top of the Signing & Capabilities tab.
- Select Sign In with Apple on the list and add it.
- You can see Sign In with Apple listed on the Signing & Capabilities.
- If Sign In with Apple is not on the Capability list due to authority or other issues, activate it on the Apple Developer Console. After the renewed provisioning is activated, add the new IdP by repeating from 4 to 6.
Configure KeyChain
Hive SDK KeyChain for the iOS target. No other additional configurations are needed when you do not use KeyChain-GroupSharing.
Setting up deferred deep links with universal links
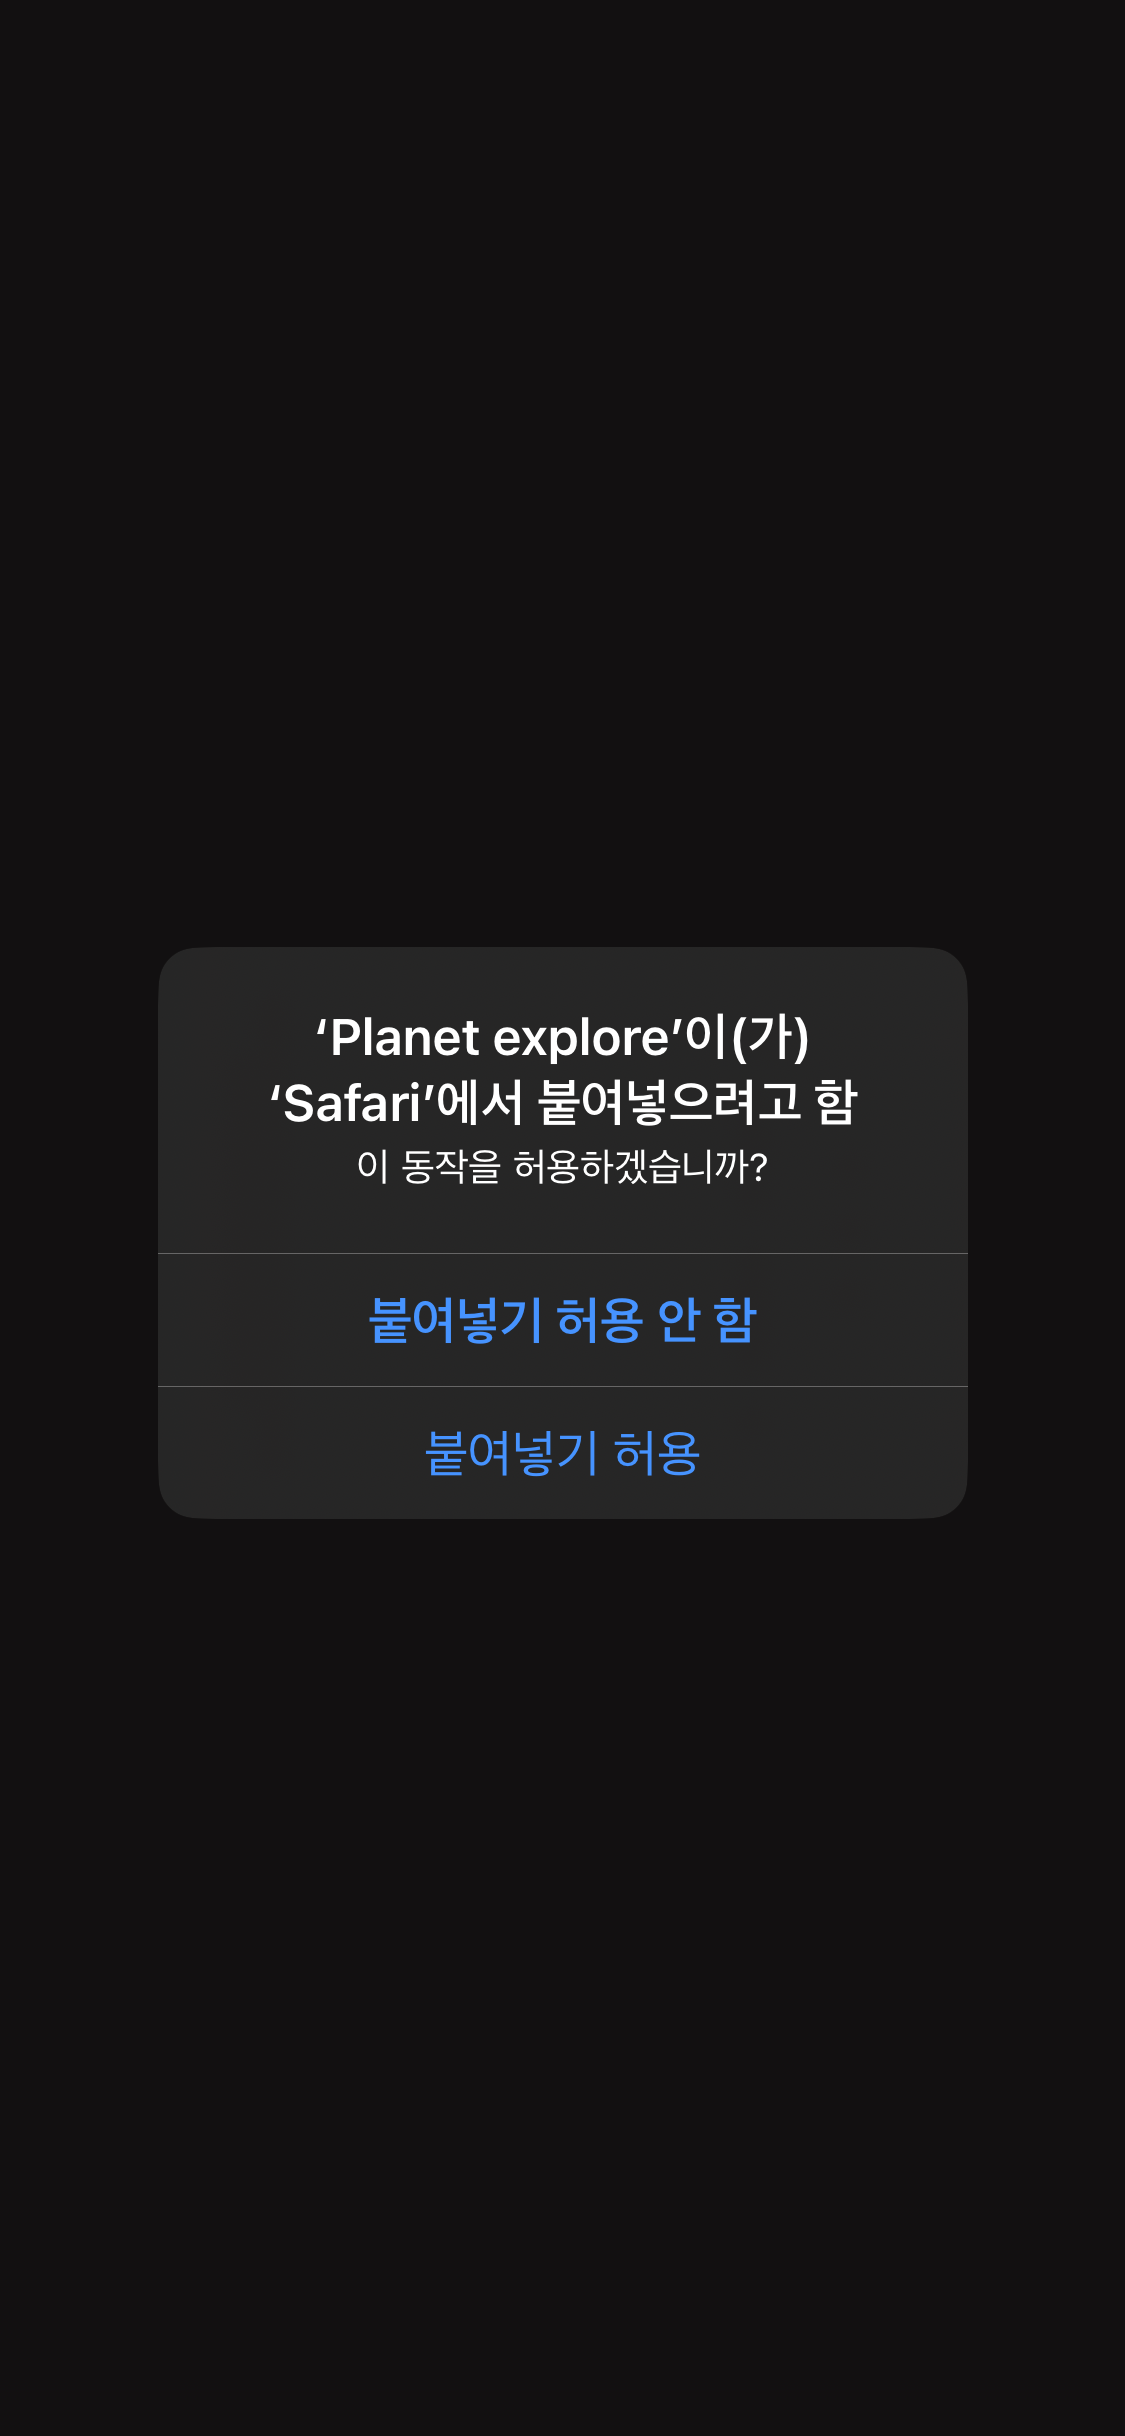
Starting from Hive SDK v4.15.8, you can use Universal Links along with URL Schemes to facilitate the initial installation and launch of the app through the invitation page, and to provide rewards to the inviter.
Executing invitation links based on universal links and providing rewards to the inviter require UIPasteboard paste system permission. When an invited user installs and launches the app for the first time using the invitation link, a toast popup may appear on iOS versions below 16.1, and a system permission request popup may appear on iOS versions 16.1 and above. If you want to avoid displaying the system permission request popup, please refer to the promotion operation guide on this site and set deferred deep link settings to unused.
|
|
|

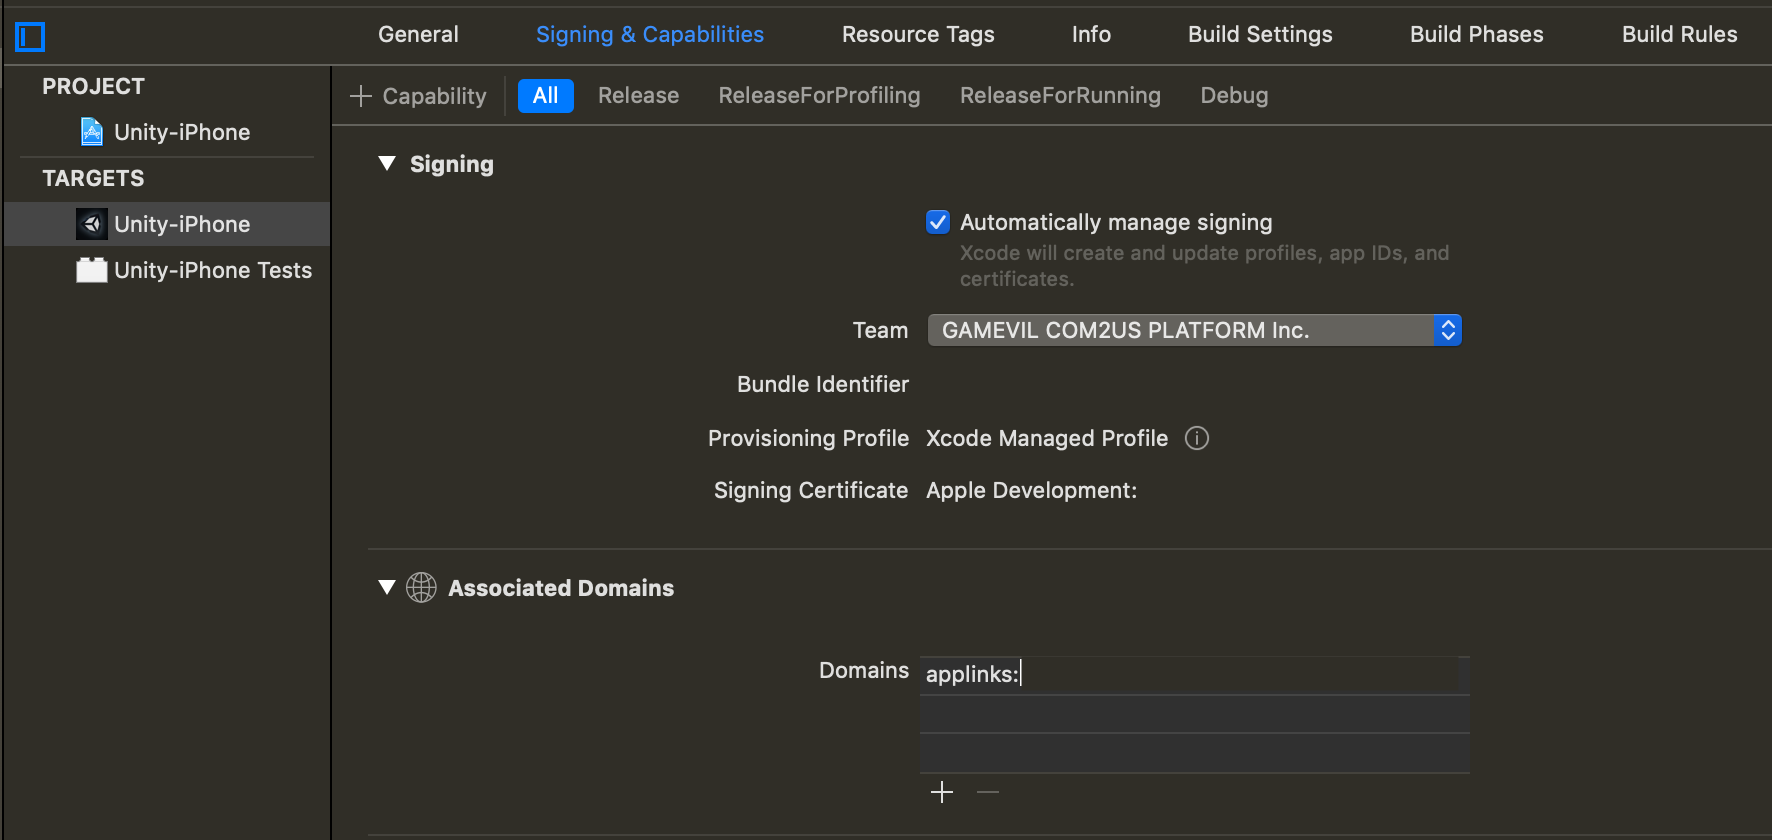
Select the main TARGETS of the Xcode project, and set Domains as follows in the Associated Domains item of the Signing & Capabilities tab.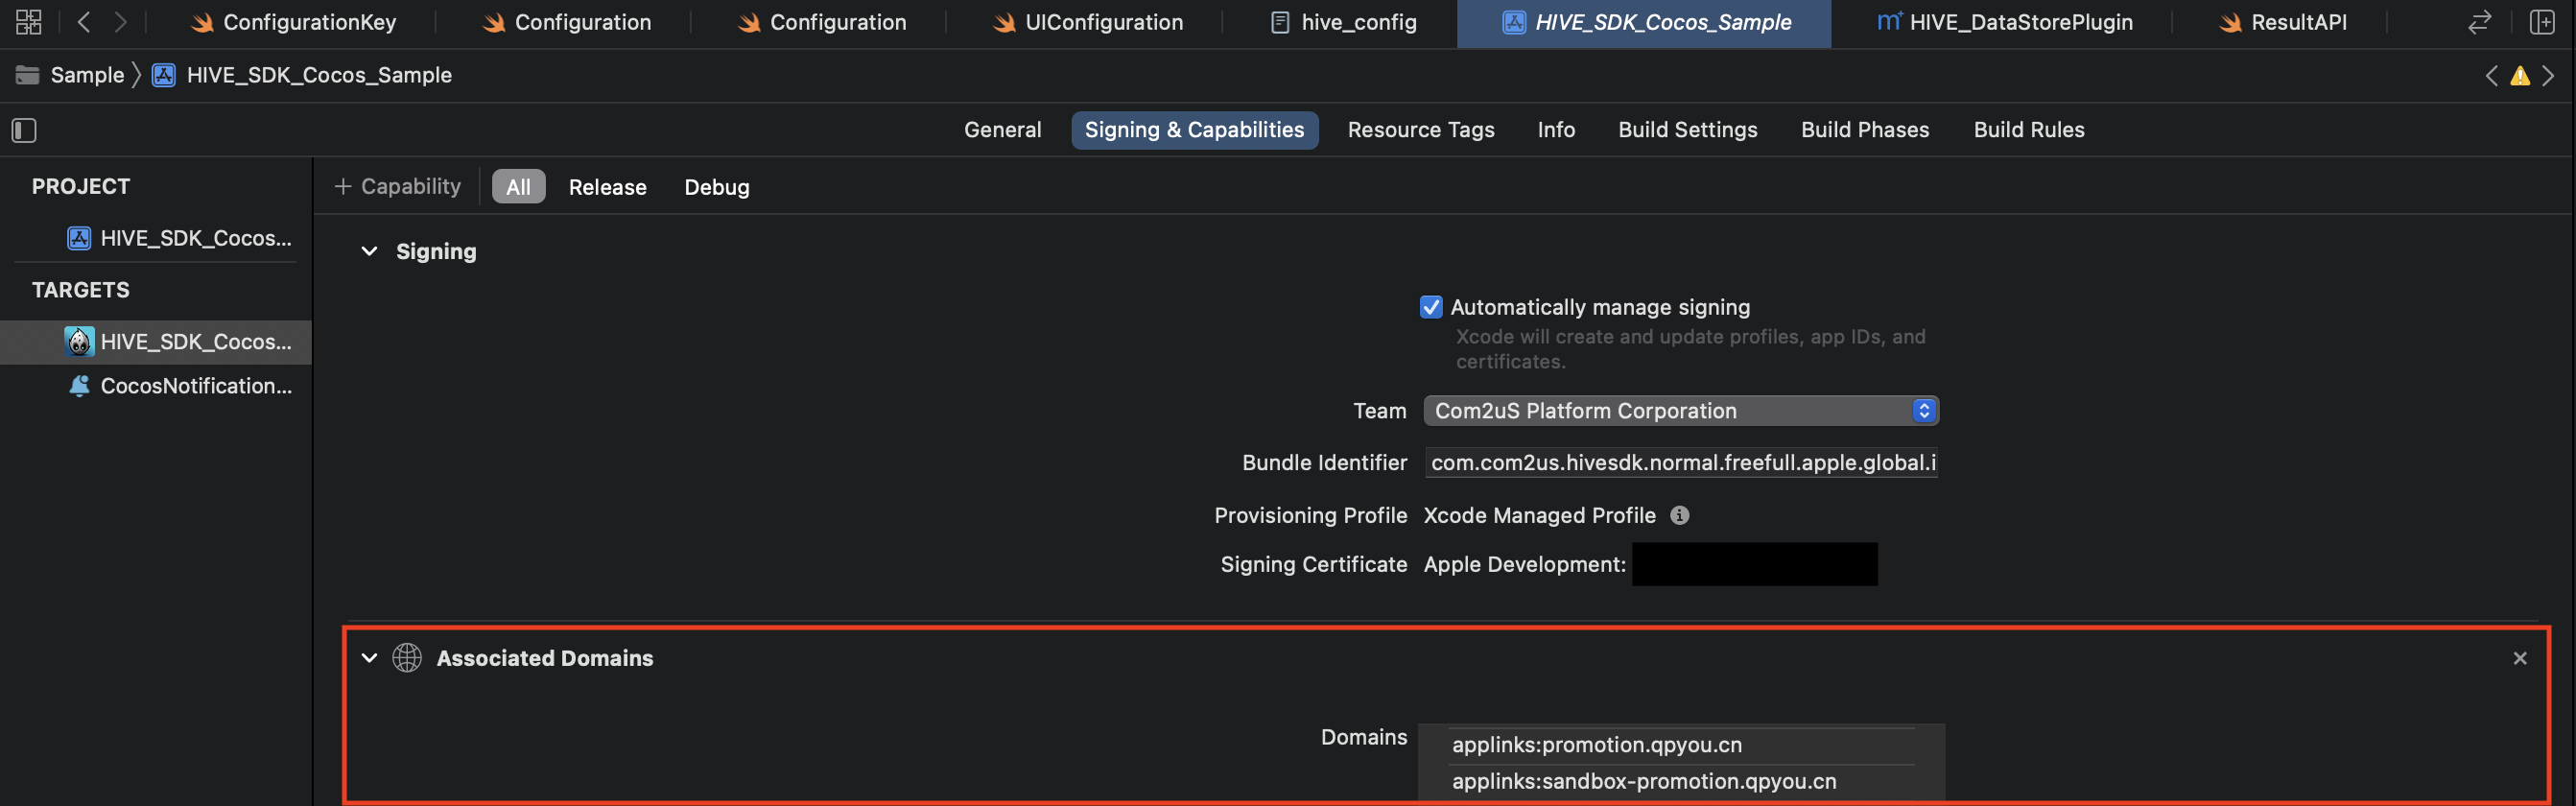
-
applinks:sandbox-promotion.qpyou.cn : Universal Link domain running in the Hive sandbox server environment* applinks:promotion.qpyou.cn : Setting up Universal Link domain server operating in Hive commercial server environment1. Change the values below to suit your environment and save them in the form of apple-app-site-association.
- TEAM ID: TEAM ID retrieved from Apple Developer Console Bundle Identifier: Bundle ID of the app you want to use Universal Links URL Path: HTTP URL2 to support Universal Links. Upload to the root of the web server or a subpath of .well-known.
- Note * The format of the apple-app-site-association file is json, but do not create a file extension (.json) to it.
1234567891011{"applinks": {"apps": [],"details": [{"appID": "--TEAM ID.--Bundle Identifier","paths": ["--URL Path"]}]}}- For more details, see the [Apple Official Guide]https://developer.apple.com/library/archive/documentation/General/Conceptual/AppSearch/UniversalLinks.html). The followings are the examples provided from Apple.
123456789101112131415{"applinks": {"apps": [],"details": [{"appID": "9JA89QQLNQ.com.apple.wwdc","paths": [ "/wwdc/news/", "/videos/wwdc/2015/*"]},{"appID": "ABCD1234.com.apple.wwdc","paths": [ "*" ]}]}} - TEAM ID: TEAM ID retrieved from Apple Developer Console Bundle Identifier: Bundle ID of the app you want to use Universal Links URL Path: HTTP URL2 to support Universal Links. Upload to the root of the web server or a subpath of .well-known.
Configure iOS App1. Select your project in the Project Navigator in the Xcode Project window.
- Select your app from the TARGETS list.
- Click Signing & Capabilities tab.
- Click + Capability button on the left top of the Signing & Capabilities tab.
- Add Associated Domains by selecting it from the list.
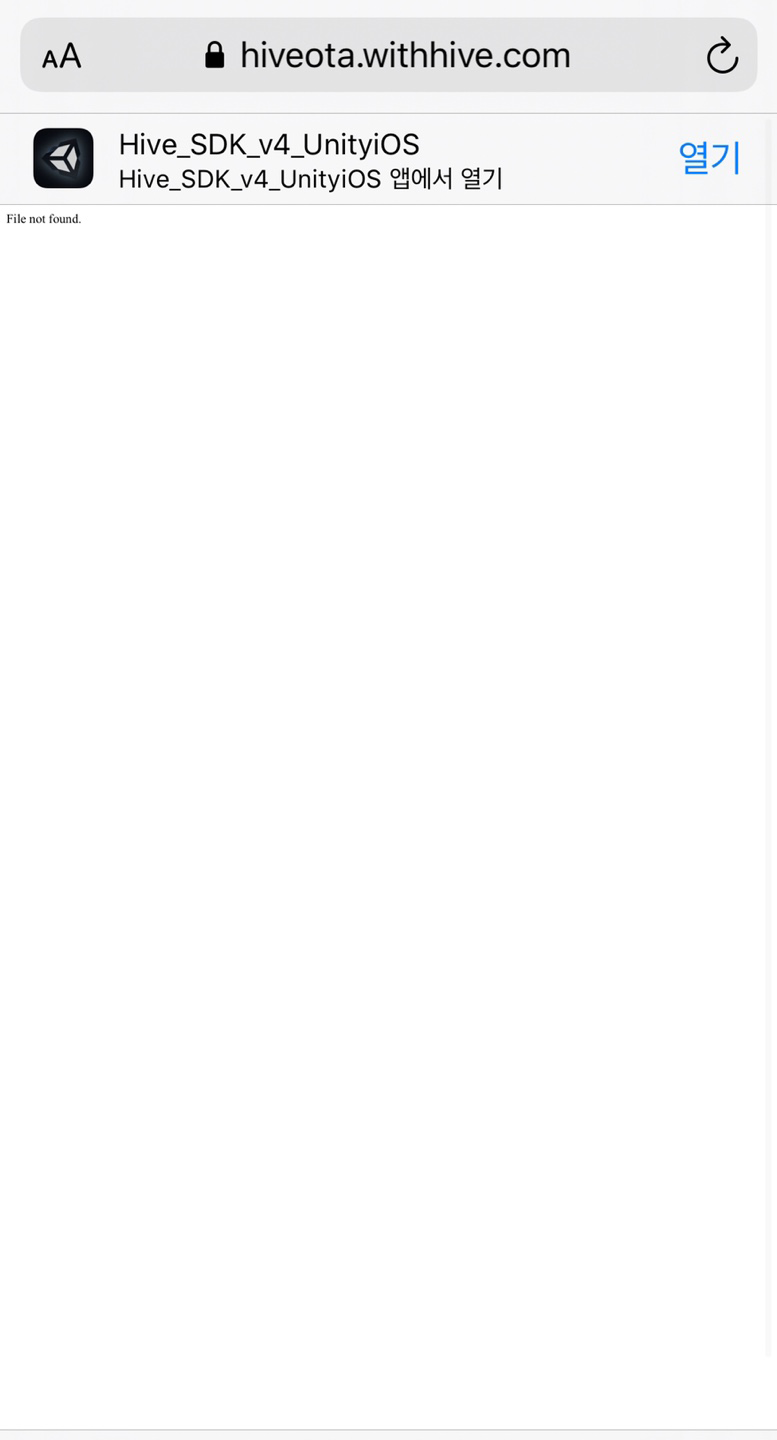
Example domain with applinks:[apple-app-site-association] uploaded. applinks:hive-ota.withhive.com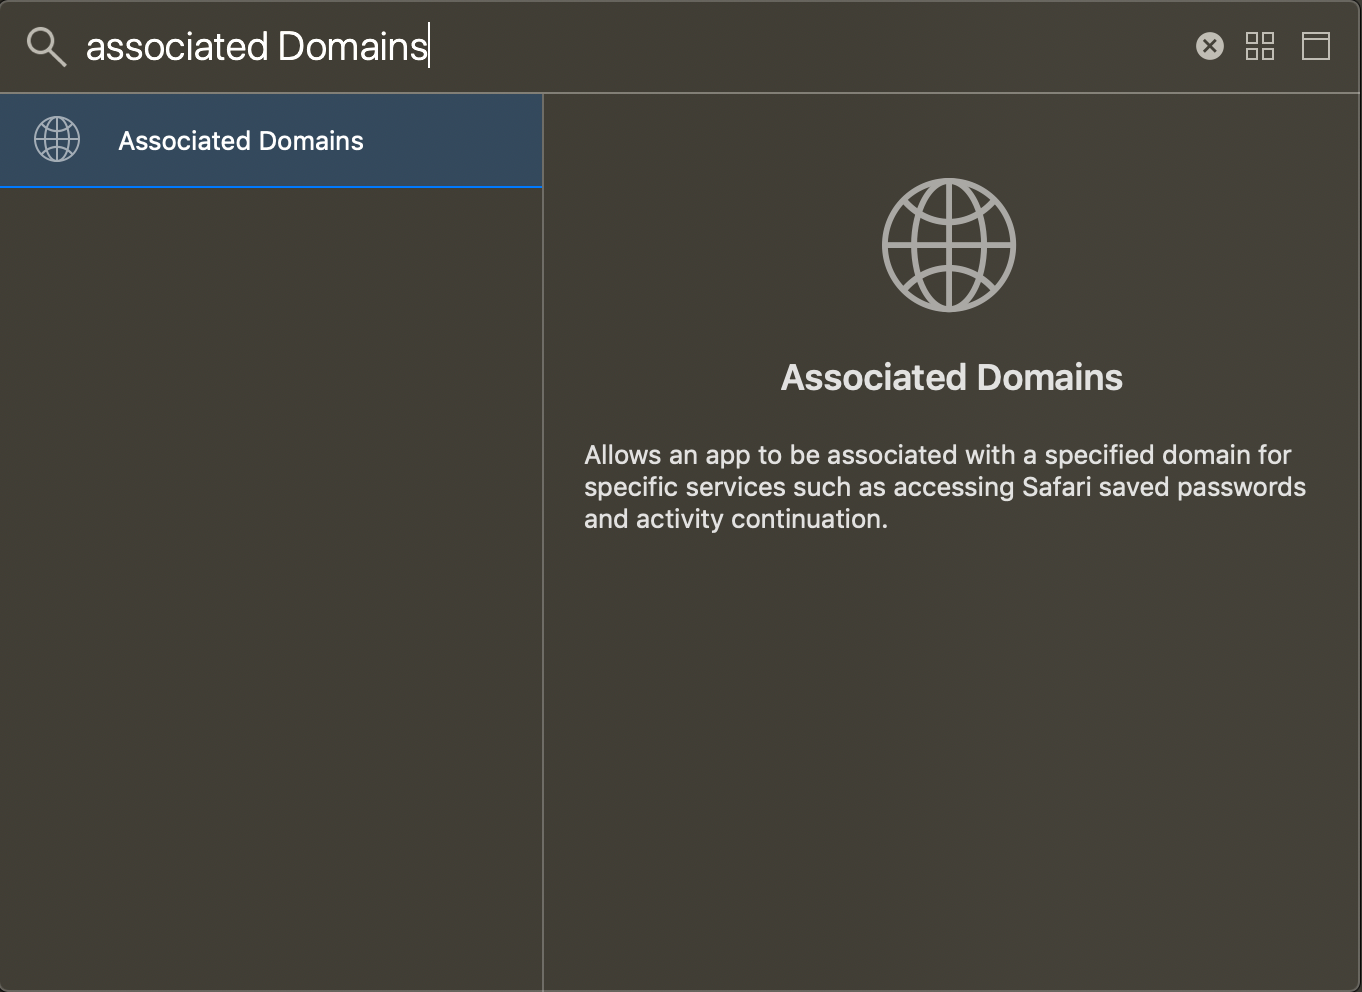 6. On the developer console[https://developers.apple.com]https://developers.apple.com)), activate Associated Domain on the app’s Capabilities.
Configure hive_config.xmlRead and follow the setting in case of using Hive SDK without Unity Inspector.
-
Edit or add the following line to the hive_config.xml file.
1<universalLink>Universal link address(Domain/Path) </universalLink>
Configure hive_config.xmlRead and follow the setting in case of using Hive SDK with Unity Inspector.
- Click Hive > Edit Config > Unity Inspector and access to iOS tab.
- Enter the universal link address (Domain/Path) in the Universal Link item.
- How to check the settings * Access the UniversalLink address via the iPhone/iPad Safari browser after the app is installed. It’s good to go if you see the app opening UI like the one below when you see the browser.
Hive Settings
There are two configuration tasks to use Hive: [Add hive_config.xml to the project]#configure-xml) and [Set configuration items in Xcode]#configure-ui). Follow the instructions below to set up Hive:
Add the hive_config.xml file.
Add the [hive_config.xml]../configuration/) file to the project, which is in the Hive SDK SDK package downloaded from the developer site.
Setting Hive values in Xcode.
To use [Facebook]#fb-configure), [deep link]#ue), you need to set the Hive value in Xcode. Follow the instructions below:
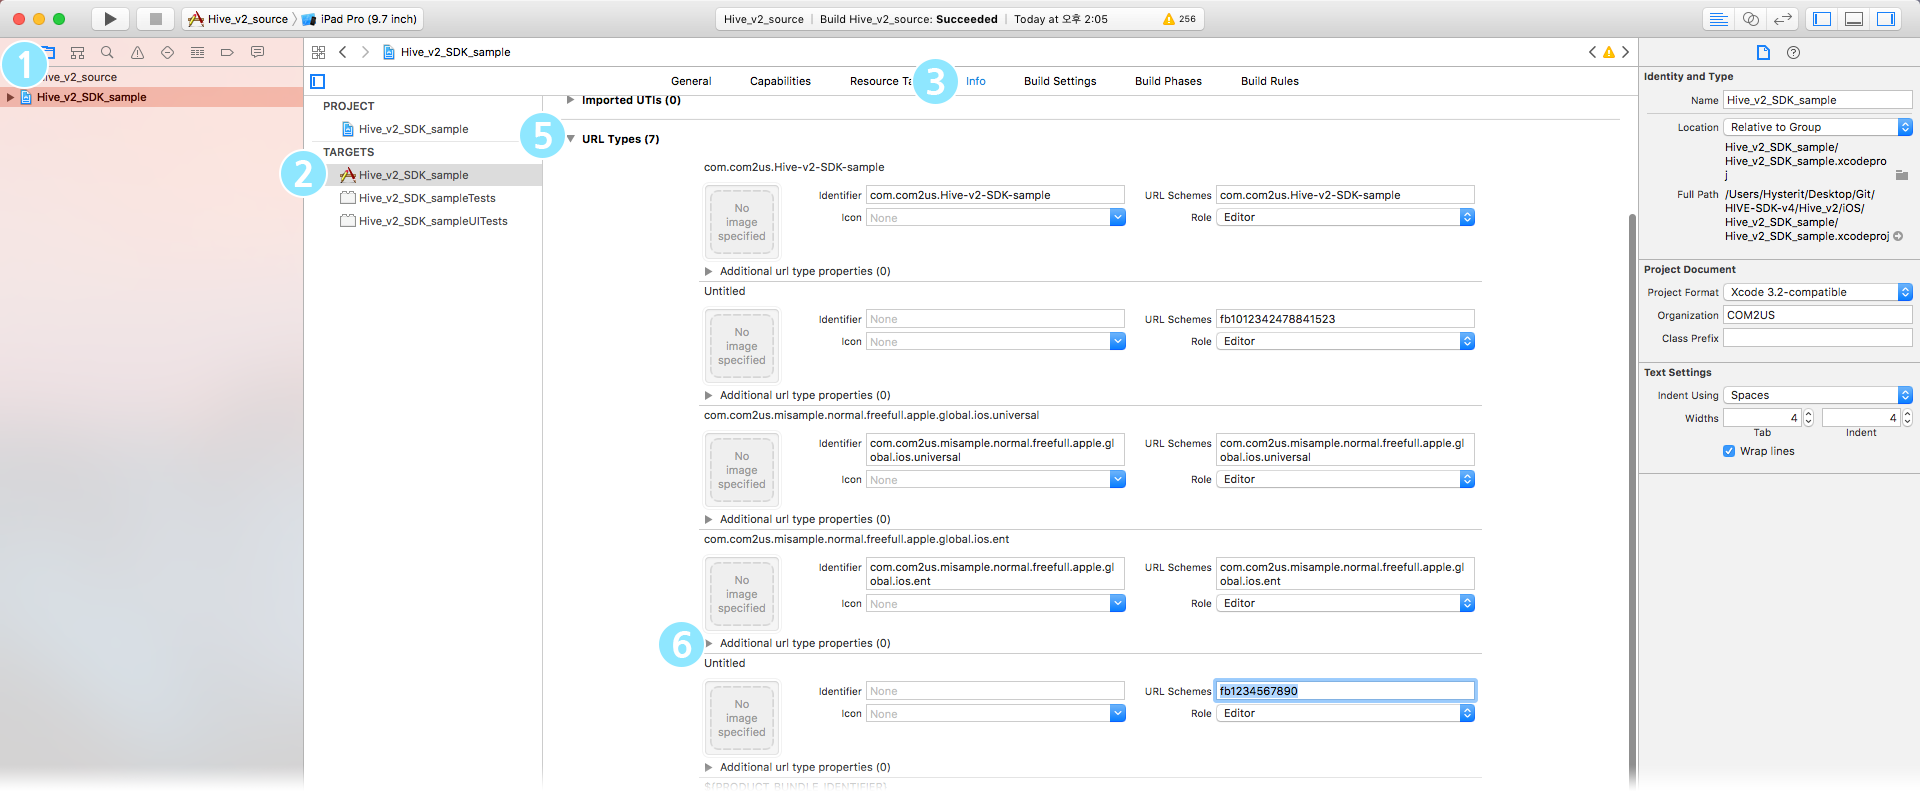
Set up Facebook1. Select your project in the Project Navigator in the Xcode Project window.
- Select your app from the TARGETS list.
- Click Info tab.
- In the Info tab, click Custom iOS Target Properties and enter your Facebook App ID in the FacebookAppID property.
- In the Dashboard, enter Settings > Advanced > Security > Client Token and enter your Facebook Client Token in the FacebookClientToken property. (Required when using Facebook 13 or higher) (Reference Guide)
 5. After clicking the URL Types item in the Info tab, click the + icon to create the Additional url type properties item.
- In the Dashboard, enter Settings > Advanced > Security > Client Token and enter your Facebook Client Token in the FacebookClientToken property. (Required when using Facebook 13 or higher) (Reference Guide)
- Enter the Facebook AppID with the prefix fb in the Additional url type properties item URL Schemes field. Example: fb012342478841523
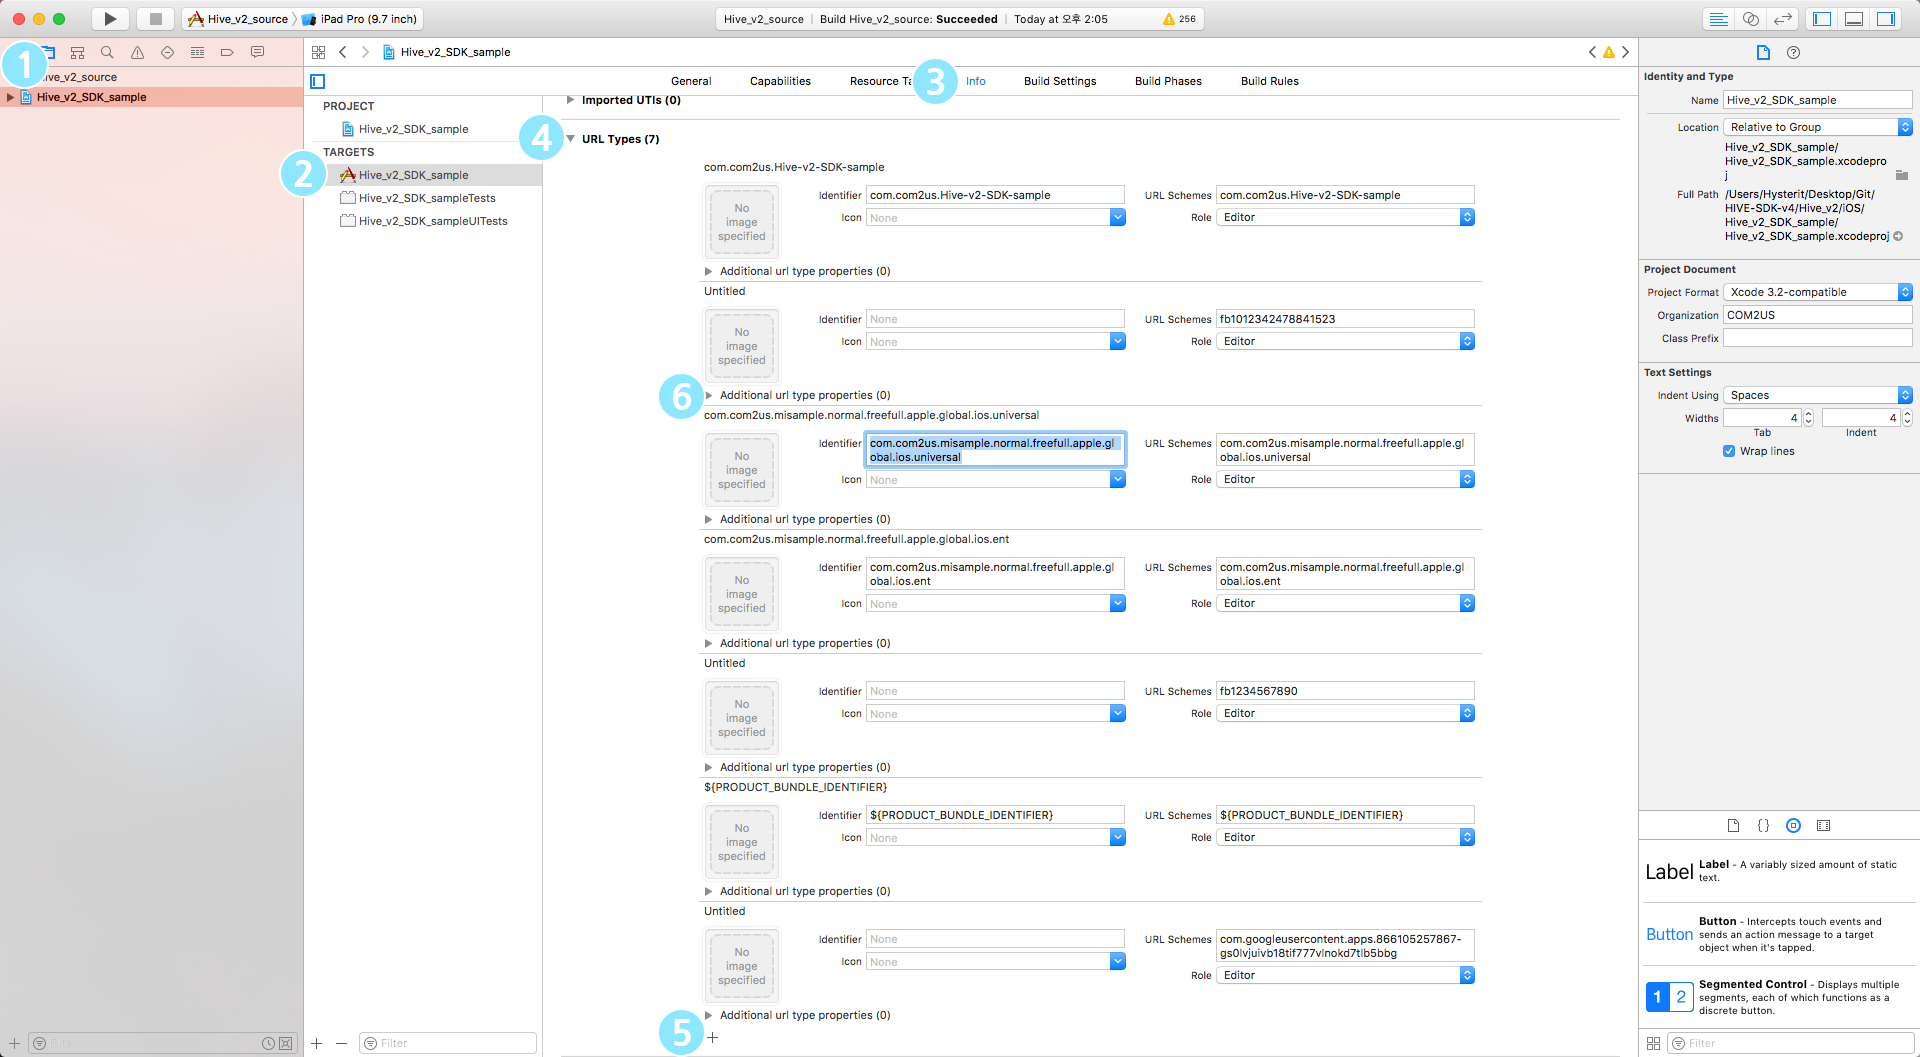
 VK settings1. Select your project in the Project Navigator in the Xcode Project window.
 - Select your app from the TARGETS list.
- Click Info tab.
- In the Info tab, click Custom iOS Target Properties and add VK data to LSApplicationQueriesShcemes. (vkauthorize, vk-share, vk)5. After clicking the URL Types item in the Info tab, click the + icon to create the Additional url type properties item.
- In the URL Schemes field under the Additional url type properties item, enter the VK AppID with the vk prefix added. Example: Vk1231234WeChat settings1. Select your project in the Project Navigator in the Xcode Project window.
- Select your app from the TARGETS list.
- Click Info tab.
- After clicking the URL Types item in the Info tab, click the + icon to create the Additional url type properties item.
- Enter Identifier: weixin, weixinULAPI, URL Schemes: APP_ID in the URL Schemes field under Additional url type properties.
- Since Hive SDK SDK v4.14.0, as WeChat SDK version changes, Universal Link must be applied. For details, see General Settings > Universal Link.
Google settings1. Select your project in the Project Navigator in the Xcode Project window.
- Select your app from the TARGETS list.
- Click Info tab.
- After clicking the URL Types item in the Info tab, click the + icon to create the Additional url type properties item.
- In the URL Schemes field under the Additional url type properties item, leave a blank for Identifier and enter reversed client ID for URL Schemes.
LINE settings1. Select your project in the Project Navigator in the Xcode Project window.
- Select your app from the TARGETS list.
- Click Info tab.
- Click the Custom iOS Target Properties item in the Info tab and add LINE data to LSApplicationQueriesShcemes. (lineauth2)5. After clicking the URL Types item in the Info tab, click the + icon to create the Additional url type properties item.
- In the URL Schemes field under the Additional url type properties entry, enter your app bundle ID with the line3rdp prefix added. Example: line3rdp.$(PRODUCT_BUNDLE_IDENTIFIER)
Setting up Deep Link1. Select your project in the Project Navigator in the Xcode Project window.
- Select your app from the TARGETS list.
- Click Info tab.
- Click the URL Types item in the Info tab.
- Click the + icon to create an Additional url type properties item.
- Enter your AppID in the Identifier field and the URL Schemes field under Additional url type properties.
Applying HIVEAppDelegate
Call application:didFinishLaunchingWithOptions: API of HIVEAppDelegate in application:didFinishLaunchingWithOptions: API of AppDelegate.m file as in the following code.
API Reference: didFinishLaunchingWithOptions
|
1 2 3 4 5 6 7 8 9 |
import HIVEService @UIApplicationMain class AppDelegate: UIResponder, UIApplicationDelegate { func application(_ application: UIApplication, didFinishLaunchingWithOptions launchOptions: [UIApplication.LaunchOptionsKey: Any]?) -> Bool { return HIVEAppDelegate.application(application, didFinishLaunchingWithOptions: launchOptions) } } |
API Reference: didFinishLaunchingWithOptions
|
1 2 3 4 5 6 7 8 9 10 11 12 |
#import <HIVEService/HIVEService-Swift.h> @interface AppDelegate () @end @implementation AppDelegate - (BOOL)application:(UIApplication *)application didFinishLaunchingWithOptions:(NSDictionary *)launchOptions { return [HIVEAppDelegate application:application didFinishLaunchingWithOptions:launchOptions]; } @end |
Building
Build Settings
- Select your project in the Project Navigator in Xcode‘s Project window.
- Select your app from the TARGETS list.
- Click the Build Settings tab.
- Click on the Linking item and enter –Objc in the Other Linker Flags field.
- Click the Search Paths item and drag-and-drop the Hive SDK framework folder of the onto the Framework Search Paths.
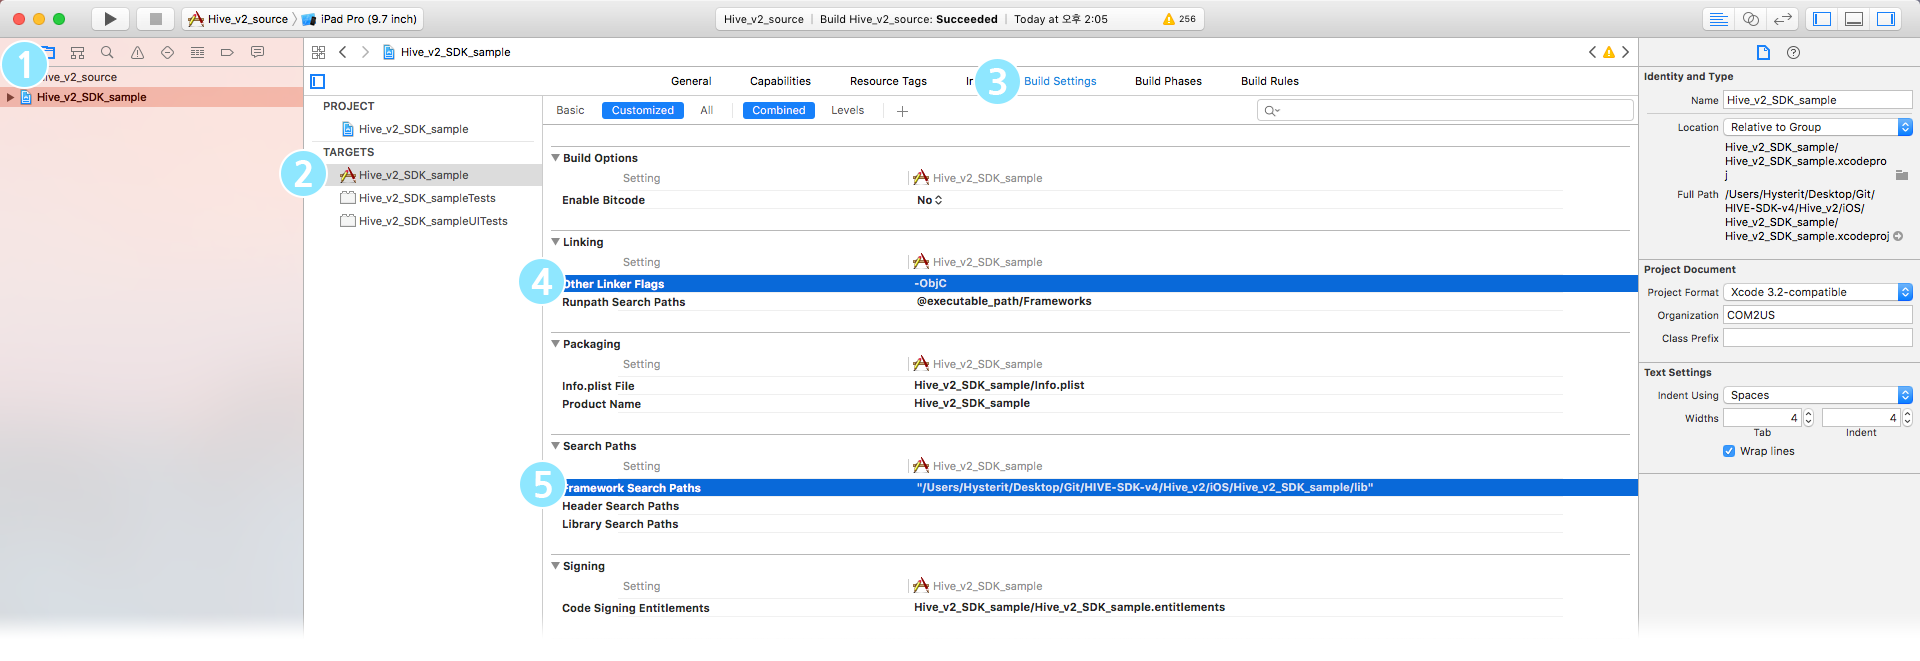
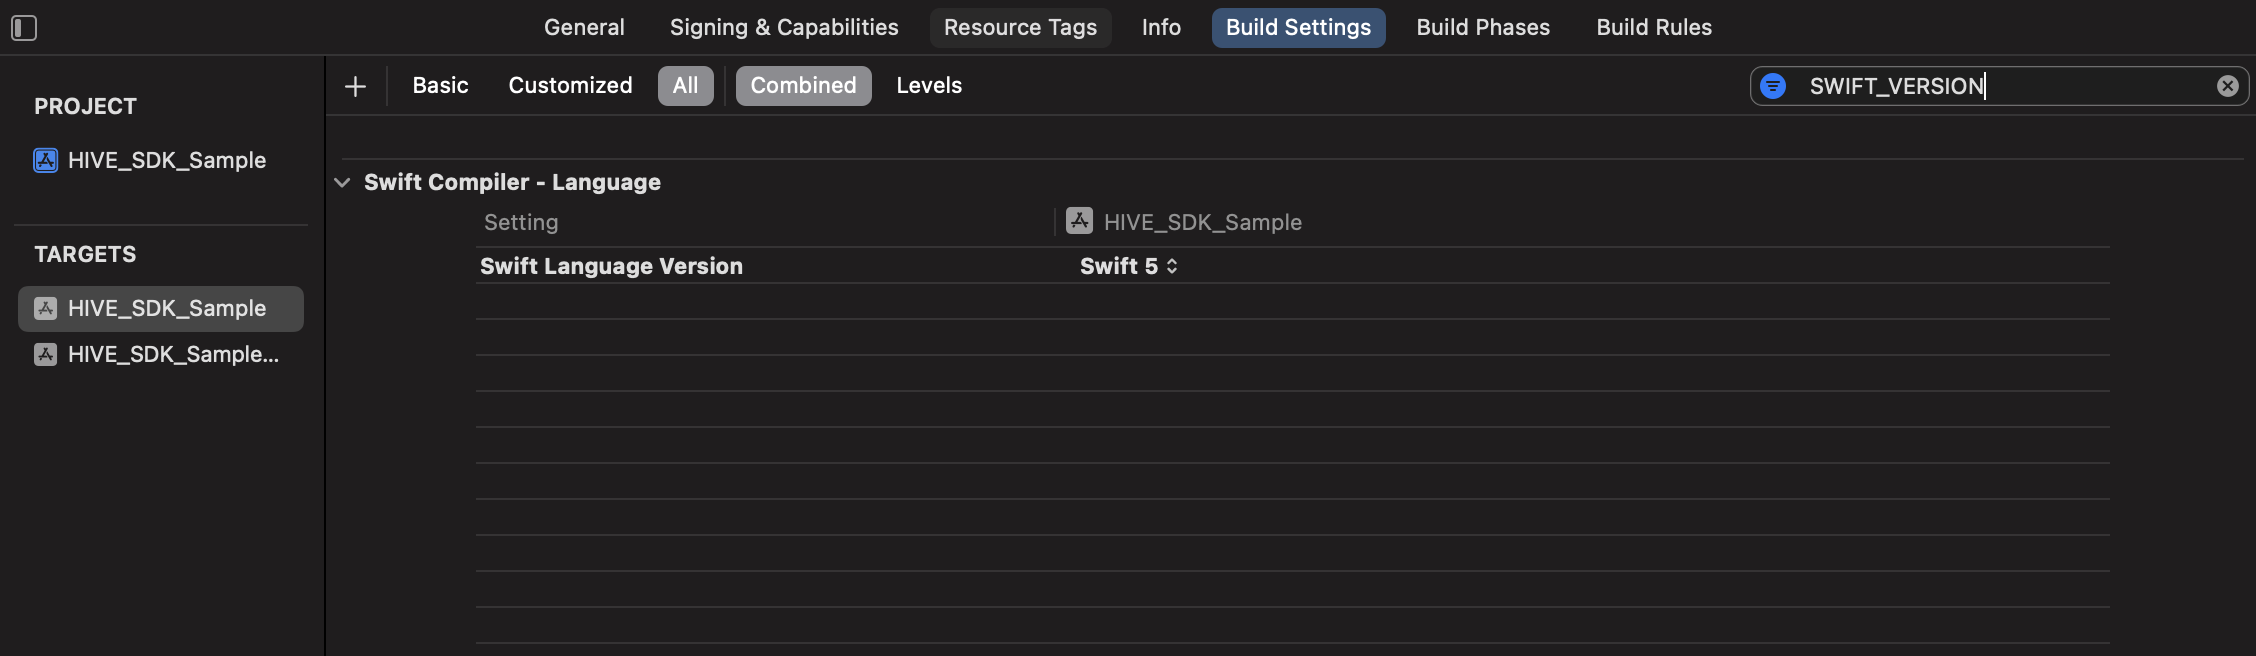
- In Swift Compiler – Language, if Swift Language Version is set to Unspecified, change it to 4 or higher. The external library dependencies will determine the option is whether to be exposed or not.
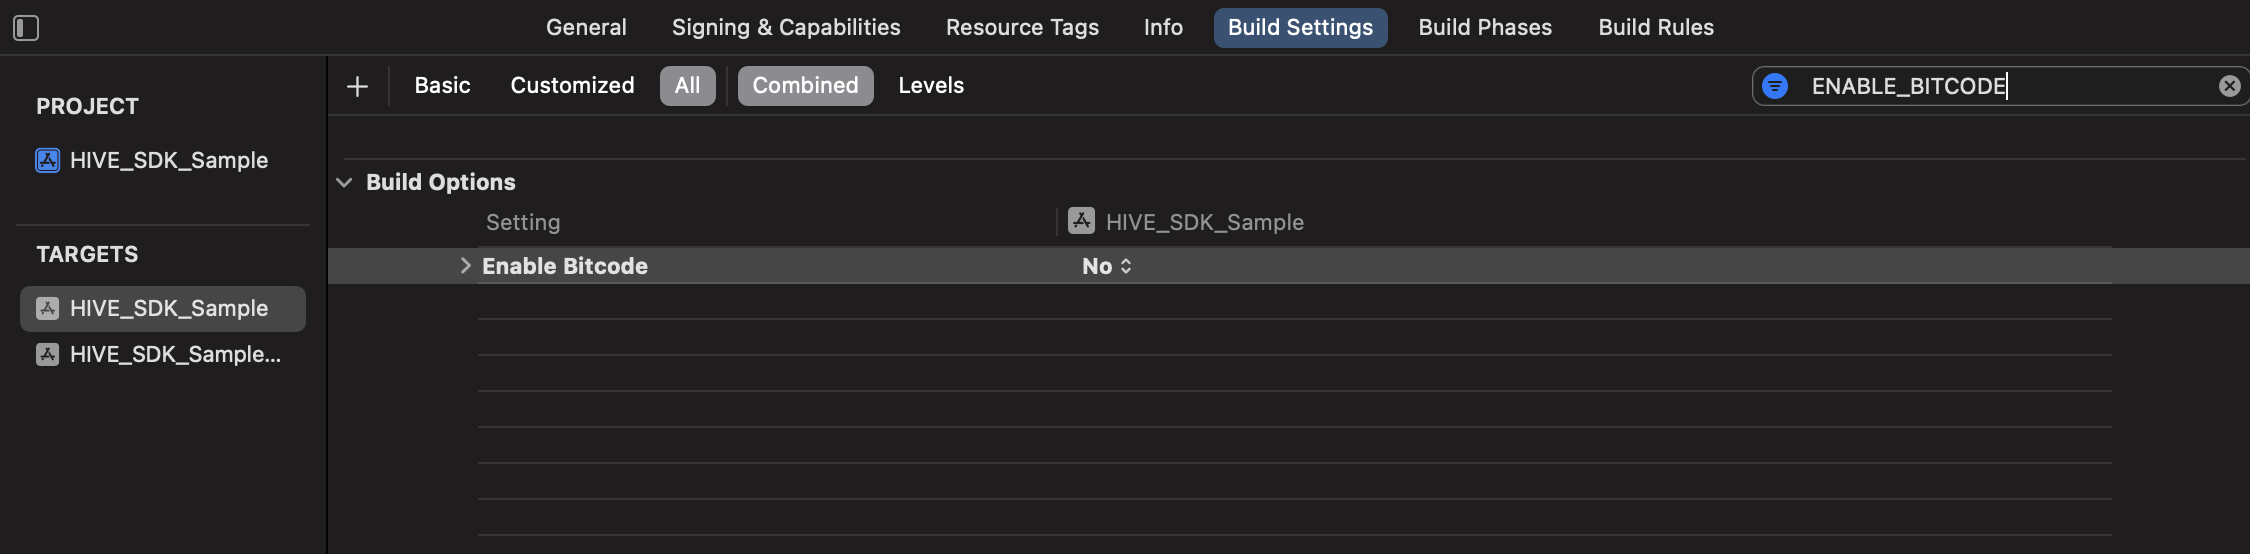
- Set the Enable Bitcode to NO.


Building
Build your app the as the usual way you build iOS apps.
Uploading app
Upload to the App Store
There are three ways to upload your app to Apple App Store Connect. You can upload the app directly in Xcode, run altool to upload it, or use Transporter.
Choose an upload tool
- Upload Directly from XcodeAs of Xcode 11, you can either upload the version for App Store or for Ad Hoc directly, or create an .ipa file to upload by clicking the Distribute App button after selecting the product app. This is the generally recommended way to use the GUI.
- altoolThe command line tool altool included with Xcode is located at /Applications/Xcode.app/Contents/Developer/usr/bin/altool. This is the recommended method when using an automated build system such as Jenkins. With the command line interface, the build artifacts can be validated, and directly uploaded. This altool uploading supports AppCenter (HockeyApp).
- TransporterThis is the easiest way to upload content to the iTunes Store or App Store. You can upload not only your app, but also the contents in your app, such as playable content like videos, e-books, and music.
Upload directly from Xcode
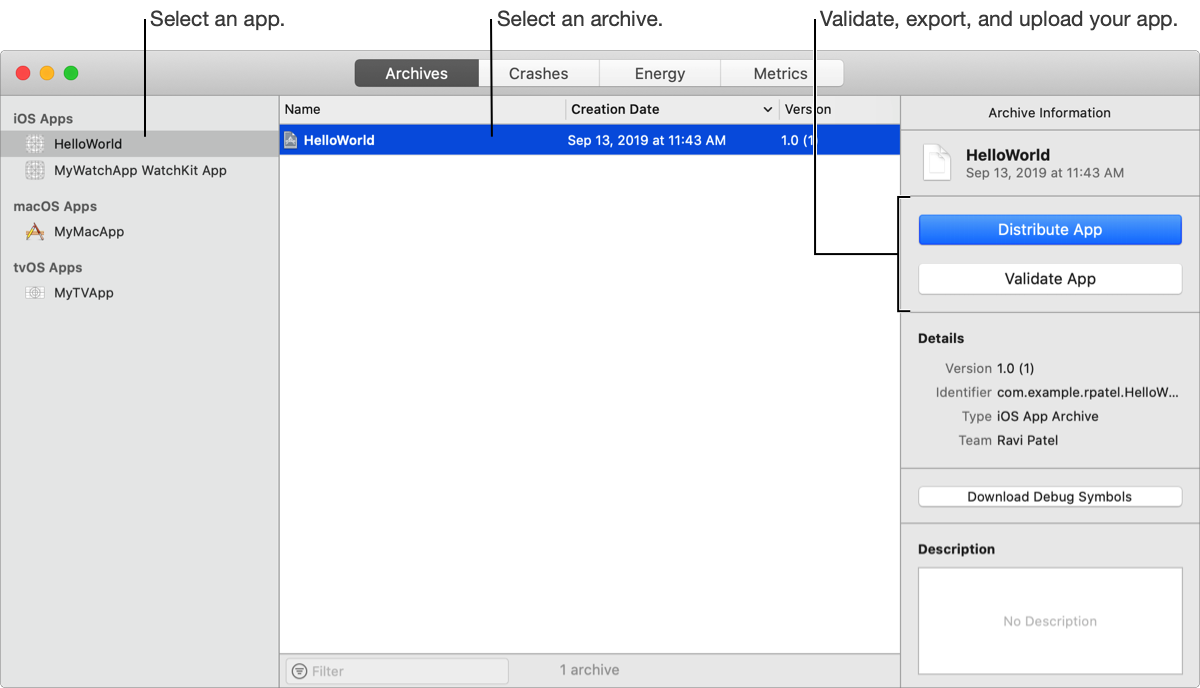
- Launch Xcode Organizer. Xcode Organizer is launched from the Xcode menu or it automatically pops up after running an archivie task.

- Prepare for upload by clicking the Distribute App button. Depending on the target of the distributed version, you can choose the distribution method.
- Choose a distribution method. You can choose between uploading directly to AppStore Connect using Xcode, or extracting a file and uploading it.
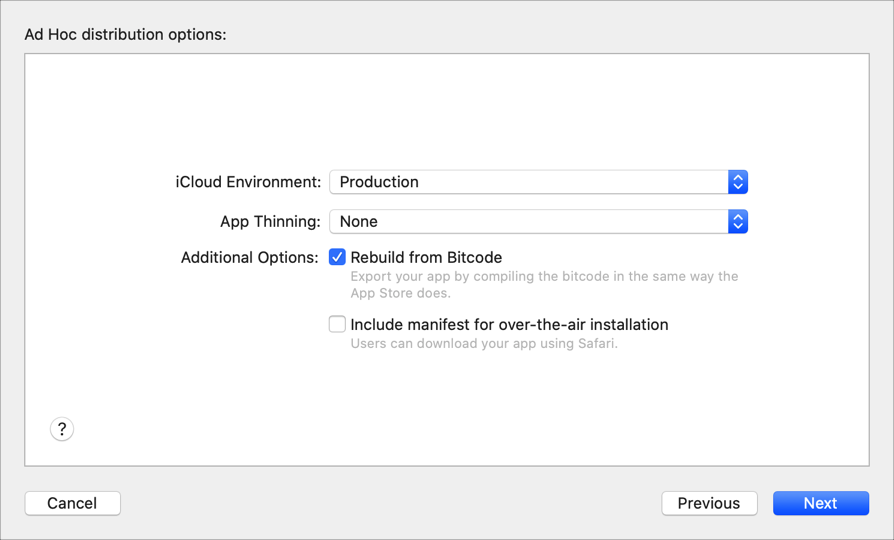
- Choose the distribution option. You can chooseoptions when creating a distribution.
- App Thinning: This function reduces the app size by separating resources by deployment target.
- Rebuild from Bitcode: This is a function that activates the Bitcode to minimize changes when updating the app.
- Include manifest for over-the-air installation: For Ad Hoc/Development builds, it is a function to attach a manifest file so that it can be downloaded/installed outside the App Store.
- Strip Swift symbols: This feature reduces app size by removing unused Swift symbol files.
- Upload your app’s symbols to receive symbolicated reports from Apple: After extracting and uploading the debug symbol, it supports receiving Apple’s symbolicated report.
- Add a signing certificate to your distribution build.
Signing certificate on distribution build guarantees the app hasn’t been modified since it was last signed. Ad Hoc, App Store, or Development is available to sign on the distribution build. Select a certificate needed for app build and then upload or save the extracted file. If you extracted the .ipa file, you could use Transporter app to upload.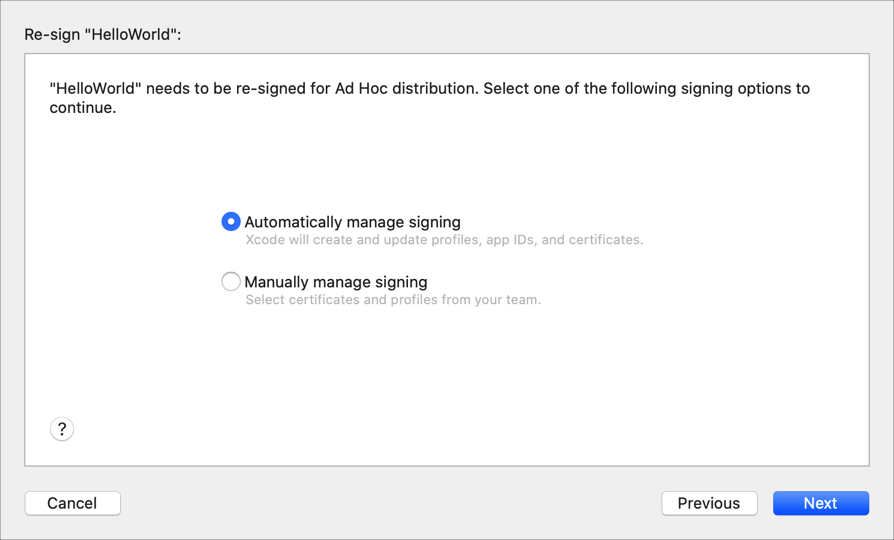
Upload with altool
Use command lines suitable for each situation to command your app upload. For more how-tos, see the linked guidelines below.
- App Upload
$ xcrun altool --upload-app -f file -t platform -u username [-p password] [—output-format xml] - Validate App
$ xcrun altool --validate-app -f file -t platform -u username [-p password] [--output-format xml] - Notarize
$ xcrun altool --notarize-app -f file --primary-bundle-id bundle_id -u username -p password
Upload with Transporter
The description for this method is not provided on this page. See the guide on Apple Developer.