This page informs you how to develop games based on Unreal Engine; porting Hive SDK, or building as Android, iOS, or Windows apps.
Prerequisites
This guide is based on the following environment.
Android
- Hive SDK v4 UE4 Android+iOS 24.0.0
- Unreal Engine 4.27 Plus
- commit hash: 0db0b74ff0822a57a5ce49a4cd10c8672fc57a4b
- JDK 8
- AndroidStudio 4.1
- Android NDK r21
- Android SDK min version 21
- Android SDK target version 34
iOS
- Hive SDK v4 UE4 Android+iOS 24.0.0
- Unreal Engine 4.27 Plus
- commit hash: 0db0b74ff0822a57a5ce49a4cd10c8672fc57a4b
- Xcode 15.1+
- iOS Version 12.0+
- macOS Ventura 14+
Windows
- Windows 10+
- Unreal Engine 4.27
Porting
To develop apps based on Unreal Engine, port Hive SDK as plugin type to Unreal Engine development environment. As following description, add Hive SDK to the development environment and execute necessary setup and coding.
- Build Unreal Engine
- Adding Hive SDK to Unreal Editor as Plugin Type
- Editing Unreal Engine File
- General Settings
- Hive Settings
Build Unreal Engine
Refer to Prerequisites and download Unreal Engine source codes and build it.
Activate the Rosetta emulator for macOS
You need to use the Rosetta emulator on the Apple Silicon CPU-installed macOS development machine. Check Product > Destination > Destination Architectures > Show Rosetta Destinations on Xcode.
Adding Hive SDK to Unreal Editor
Add the Hive SDK as a plugin to Unreal Editor. If you do not have the Hive SDK for Unreal Engine, download the Hive SDK for Unreal Engine from SDK download page.
If you already downloaded the Hive SDK for Unreal Engine, follow the instructions below to add the Hive SDK as a plugin to the Unreal Editor:
- Unzip the Hive SDK for Unreal Engine downloaded from Hive developers site, and copy all the items in the Plugin folder from the unpacked files to the Plugins folder under the root folder of your Unreal Engine game project.
- Add
"HIVESDK"to the parameter ofPublicDependencyModuleNames.AddRange()method, which is implemented within the <Project_route>;/Source/<Project_route>;/<Project_name>;build.cs file, as the following example code. Replace with your actual project name.
123456789public class <project_name>; : ModuleRules{public <project_name>;(TargetInfo Target){PublicDependencyModuleNames.AddRange(new string[] { "Core", "CoreUObject", "Engine", "InputCore" , "HIVESDK"});...}...}
Editing Unreal Engine File
If you use Unreal Engine 4.25.4 and later, delete or edit the Unreal Engine file as follows.
Android
When the screen orientation is set to both directions (both horizontal and vertical) in the game build, the code below needs to be modified for the screen auto-rotation.
-
Go to the /Engine/Build/Android/Java/src/com/epicgames/ue4/GameActivity.java.template.
-
Add the
HiveActivity.onConfigurationChanged()API.123456789101112131415@Overridepublic void onConfigurationChanged(Configuration newConfig){HiveActivity.onConfigurationChanged(this, newConfig); // Addsuper.onConfigurationChanged(newConfig);// forward the orientationboolean bPortrait = newConfig.orientation == Configuration.ORIENTATION_PORTRAIT;nativeOnConfigurationChanged(bPortrait);}
A compatibility issue exists between the Google Billing Library version 5 used by the Hive SDK and the Google Billing features built into Unreal Engine, causing the build to fail. Modify the code below to fix this issue.
-
Go to the /Engine/Plugins/Online/Android/OnlineSubsystemGooglePlay/Source/OnlineSubsystemGooglePlay.Build.cs
-
Comment out the following code
1234//string PluginPath = Utils.MakePathRelativeTo(ModuleDirectory, Target.RelativeEnginePath);//AdditionalPropertiesForReceipt.Add("AndroidPlugin", Path.Combine(PluginPath, "OnlineSubsystemGooglePlay_UPL.xml"));
To use the Singular external library included in the Hive SDK, the files below needs to be modified.
-
Go to the /Engine/Build/Android/Java/src/com/android/vending/licensing
-
Delete the following files.
- ILicensingService.aidl
- ILicenseResultListener. aidl
- Add the following code to /Engine/Source/Runtime/ApplicationCore/Private/IOS/IOSAppDelegate.cpp.
- From Hive SDK v4.15.8, Universal Link, not a URL scheme, enables you to install and run an app and reward invitees on the invite page.
- For more information about the additional console settings for creating invitee links based on Universal Link, see the Operation > Promotion guide from Hive Developers.
- Click Edit >; Project setting menu of Unreal Editor. Project setting screen will show up.
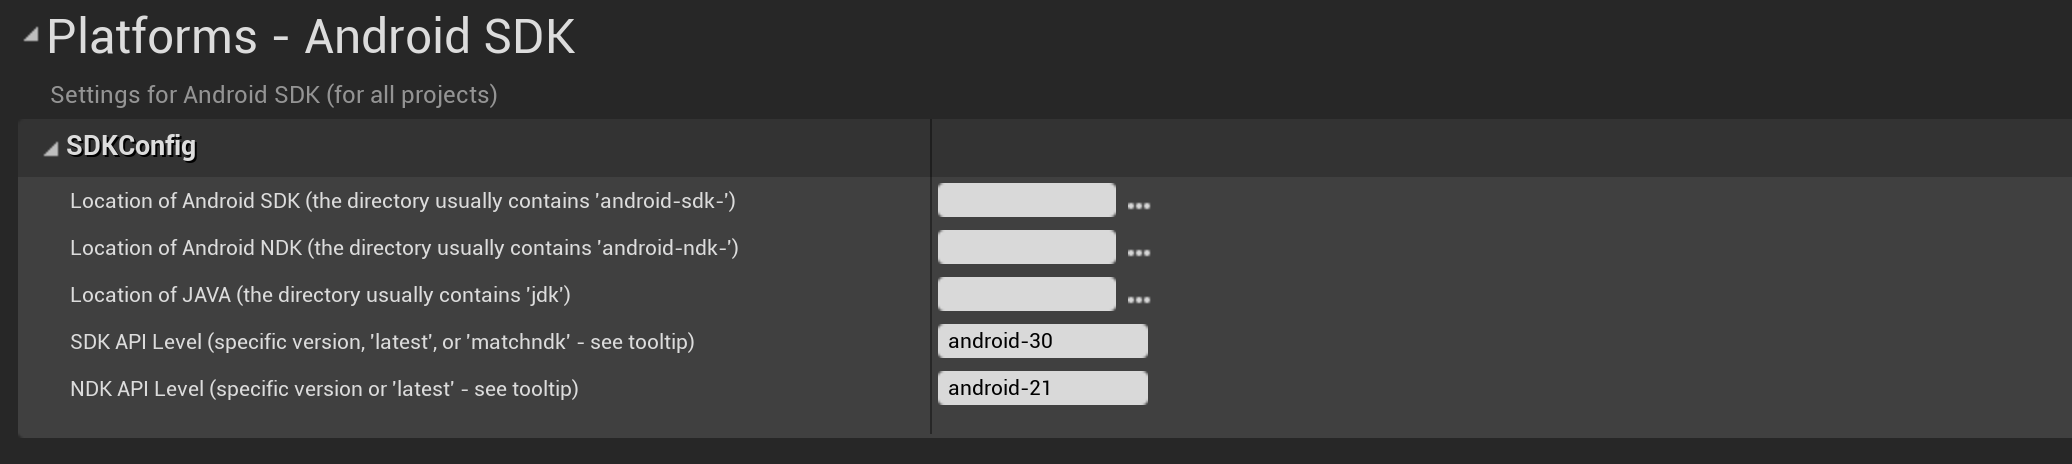
- Select Android SDK from the Platforms list. Then you can set the Android version on the Android SDK Setting screen as described below.
- Input android-30(Hive SDK v4.15.1+) and higher in the SDK API Level field.
- Input android-21 in the NDK API Level field.
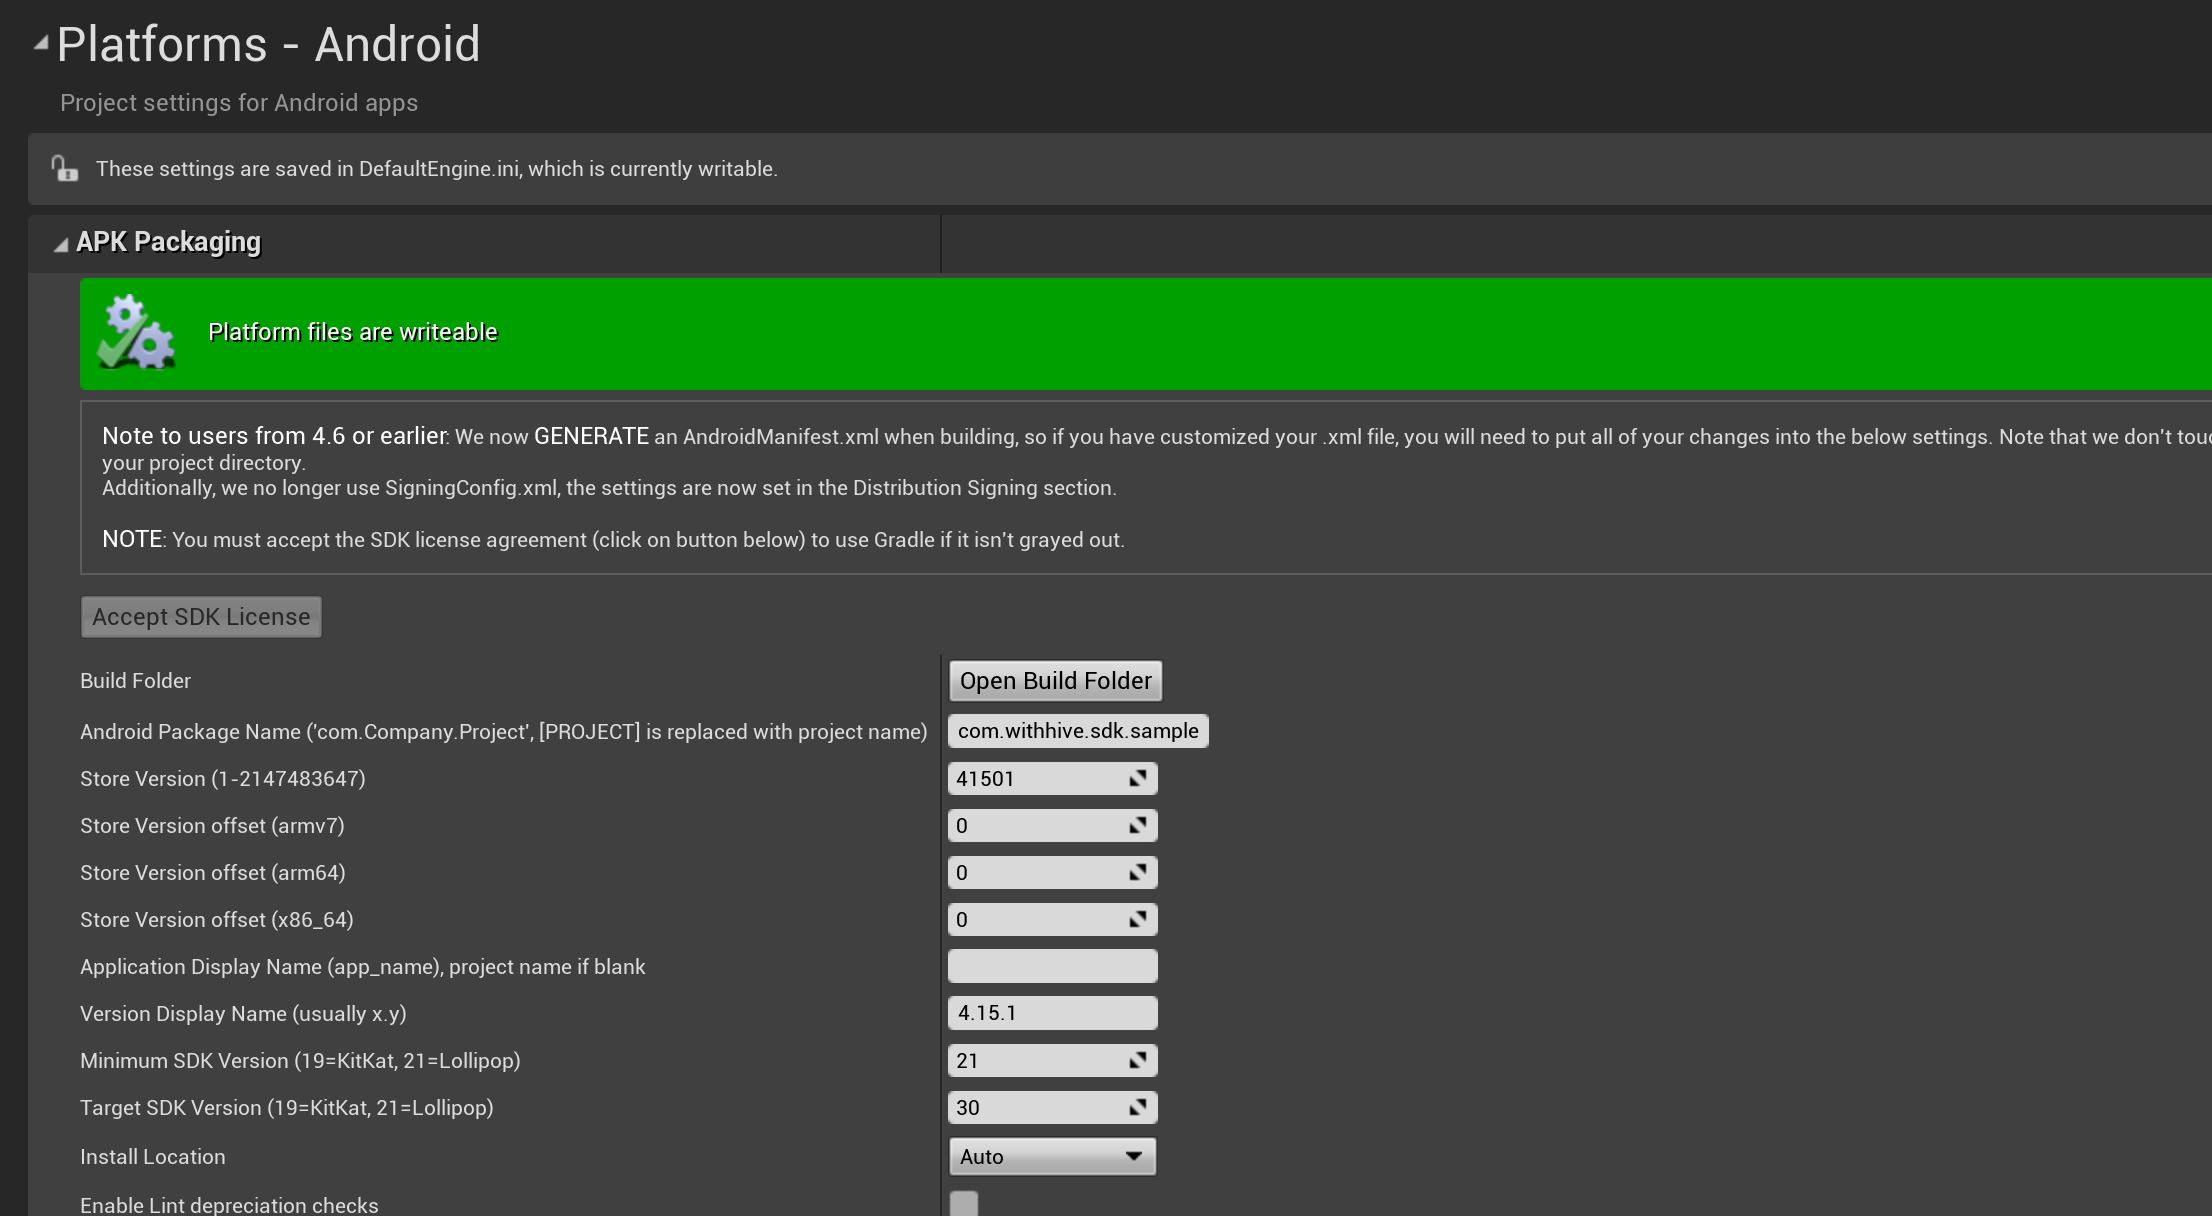
- Select Android from the Platforms list. Then, you can set the fields of APKPackaging section as described below.
- Input AppID of the game in the blank of Android Package Name field.
- Input the app version Store Version: Input the app version shown in Google Play Store. View more information about app version
- Set the Minimum SDK Version as 21 and higher. Even if you set it as under 21, it will be automatically changed as 21 by Unreal Engine operating.
- Set the Target SDK Version as 30(Hive SDK v4.15.1+) and higher.
- Open ./Engine/Build/Android/Java/src/com/epicgames/ue4/GameActivity.java.template.
- Remove the following line.
1import com.google.android.gms.games.Games; - Click Edit > Project setting on the Unreal Editor menu. Project setting window will show up.
- Select the iOS from the Platforms list. Then, you can set the fields as described below on the setting screen.
- Bundle Information group: Input AppID of the game in the blank of Bundle Identifier field.
- OS Info group: Unreal Engine 4.25 supports OS 11.0 and later. Set the value of Minimum OSVersion field as 11.0.
- Build group: Input -ObjC in the Additional Non-Shipping Linker Flags field and Additional Shipping Linker Flags field.
- Extra PList Data group: Input the following codes in the Additional PList Data field.
- Access permission request settings
- When using Facebook, QQ, VK, WeChat or Line, add the following codes to set Whitelist on the server:
- When using Facebook, utilize the following code to add a Facebook AppID and a ClientToken. Make sure to enter the Facebook AppID and ClientToken of your games.
- Set the URL Scheme.
- Following is an example entering all values above into the Additional PList Data field:


 123456<key>NSCameraUsageDescription</key><string>Approval required to take pictures.</string><key>NSPhotoLibraryUsageDescription</key><string>Approval required to upload image files.</string><key>NSUserTrackingUsageDescription</key><string>We need your permission to use the Advertising Identifiers (IDFA) for promotion targeting and tracking analysis.</string>12345678910111213141516171819<key>LSApplicationQueriesSchemes</key><array><string>weixin</string><string>vk-share</string><string>vkauthorize</string><string>vk</string><string>weixinULAPI</string><string>fbapi</string><string>fb-messenger-api</string><string>fbauth2</string><string>fbshareextension</string><string>mqqOpensdkSSoLogin</string><string>mqqopensdkapiV2</string><string>lineauth2</string><string>mqqopensdkapiV3</string><string>wtloginmqq2</string><string>mqq</string><string>mqqapi</string></array>12<key>FacebookAppID</key><string>926000000000000</string><key>FacebookClientToken</key><string>d123783h7sdfyh8031h23unf81h3</string>123456789101112131415161718192021222324252627<key>CFBundleURLTypes</key><array><!--For using Facebook. Input the Facebook App ID of your apps--><dict><key>CFBundleTypeRole</key><string>Editor</string><key>CFBundleURLSchemes</key><array><string>fb926000000000000</string></array></dict><!--For using Hive Deeplink. Input the Hive Deeplink key of your apps--><dict><key>CFBundleTypeRole</key><string>Editor</string><key>CFBundleURLSchemes</key><array><string>com.com2us.misample.normal.freefull.apple.global.ios.universal</string></array></dict><!--For using Google Sign-in. Input the Google Sign-in key of your apps--><dict><key>CFBundleTypeRole</key><string>Editor</string><key>CFBundleURLSchemes</key><array><string>com.googleusercontent.apps.270000000000-0m7r8tb2co1q00000000000000000000</string></array></dict><!--For using QQ Sign-in. Input the QQ key of your apps--><dict><key>CFBundleTypeRole</key><string>Editor</string><key>CFBundleURLName</key><string>tencent</string><key>CFBundleURLSchemes</key><array><string>tencent1106227203</string></array></dict><!--For using WeChat Sign-in. Input the WeChat key of your apps--><dict><key>CFBundleTypeRole</key><string>Editor</string><key>CFBundleURLName</key><string>weixin</string><key>CFBundleURLSchemes</key><array><string>wx78176cf0c698c0f9</string></array></dict><!--For using VK Sign-in. Input the VK key of your apps--><dict><key>CFBundleTypeRole</key><string>Editor</string><key>CFBundleURLName</key><string>vk6270065</string><key>CFBundleURLSchemes</key><array><string>vk6270065</string></array></dict><!--For using Line Sign-in. Input the Line key of your apps--><dict><key>CFBundleTypeRole</key><string>Editor</string><key>CFBundleURLSchemes</key><array><string>line3rdp.$(PRODUCT_BUNDLE_IDENTIFIER)</string></array></dict></array>123456789101112131415161718192021222324252627282930313233343536373839404142434445464748495051525354555657585960616263646566676869707172737475767778798081828384858687888990919293949596<key>NSCameraUsageDescription</key><string>Approval required to take pictures.</string><key>NSContactsUsageDescription</key><string>You must agree to add friends from your Contacts.</string><key>NSPhotoLibraryUsageDescription</key><string>Approval required to upload image files.</string><key>NSUserTrackingUsageDescription</key><string>We need your permission to use the Advertising Identifiers (IDFA) for promotion targeting and tracking analysis.</string><key>FacebookAppID</key><string>1809615065921877</string><key>FacebookClientToken</key><string>c41e47ba5512ea3fb5bfb29d5cfeb244</string><key>CFBundleURLTypes</key><array><dict><key>CFBundleTypeRole</key><string>Editor</string><key>CFBundleURLSchemes</key><array><string>line3rdp.$(PRODUCT_BUNDLE_IDENTIFIER)</string></array></dict><dict><key>CFBundleTypeRole</key><string>Editor</string><key>CFBundleURLSchemes</key><array><string>fb926000000000000</string></array></dict><dict><key>CFBundleTypeRole</key><string>Editor</string><key>CFBundleURLSchemes</key><array><string>com.com2us.hivesdk.normal.freefull.apple.global.ios.universal</string></array></dict><dict><key>CFBundleTypeRole</key><string>Editor</string><key>CFBundleURLSchemes</key><array><string>com.googleusercontent.apps.331526026701-s41n272jsv6c0f72kt5o7of0jns350gl</string></array></dict><dict><key>CFBundleTypeRole</key><string>Editor</string><key>CFBundleURLName</key><string>tencent</string><key>CFBundleURLSchemes</key><array><string>tencent1106227203</string></array></dict><dict><key>CFBundleTypeRole</key><string>Editor</string><key>CFBundleURLName</key><string>weixin</string><key>CFBundleURLSchemes</key><array><string>wx78176cf0c698c0f9</string></array></dict><dict><key>CFBundleTypeRole</key><string>Editor</string><key>CFBundleURLName</key><string>vk6270065</string><key>CFBundleURLSchemes</key><array><string>vk6270065</string></array></dict></array><key>LSApplicationQueriesSchemes</key><array><string>weixin</string><string>vk-share</string><string>vkauthorize</string><string>vk</string><string>weixinULAPI</string><string>fbapi</string><string>fb-messenger-api</string><string>fbauth2</string><string>fbshareextension</string><string>mqqOpensdkSSoLogin</string><string>mqqopensdkapiV2</string><string>lineauth2</string><string>mqqopensdkapiV3</string><string>wtloginmqq2</string><string>mqq</string><string>mqqapi</string></array>
 - Add the following codes to the DefaultEngine.ini file in the Project > Config directory to use Apple Sign-in.
- After registering the app in the Firebase console (https://firebase.google.com/), put the issued GoogleService-Info.plist file under the following path.
/Plugins/HIVESDK/Source/HIVESDK/ThirdParty/iOS/resource
- In order to apply multiple languages, you need to add a language configuration file.
- Please copy all the files in the localize folder of configuration file and paste them into the following path.
/Plugins/HIVESDK/Source/HIVESDK/ThirdParty/iOS/resource
- Please copy all the files in the localize folder of configuration file and paste them into the following path.
- For iOS builds, the AppDelegate method needs to be modified. In Unreal Engine environment, please use the Swizzling to access AppDelegate.
Add the code below at the initialization stage when starting the game.
12345678910111213141516171819202122232425262728293031323334/////////////////////////////////////////////// //////////////// Add IOSAppDelegate.h header#if PLATFORM_IOS#include "Runtime/ApplicationCore/Public/iOS/IOSAppDelegate.h"#endif/////////////////////////////////////////////// ///////////////////////////////////////////////////////////// //////////////// the added code body to modify AppDelegate#if PLATFORM_IOSUIApplication * dummyApplication = [UIApplication sharedApplication];Class clzHIVEAppDelegate = NSClassFromString(@"HIVEAppDelegate");SEL selApplicationDidFinishLaunchingWithOptions = NSSelectorFromString(@"application:didFinishLaunchingWithOptions:");if( clzHIVEAppDelegate != nil && [clzHIVEAppDelegate respondsToSelector:selApplicationDidFinishLaunchingWithOptions] ) {NSMethodSignature *method = [clzHIVEAppDelegate methodSignatureForSelector:selApplicationDidFinishLaunchingWithOptions];if (method != nil) {NSInvocation *invocation = [NSInvocation invocationWithMethodSignature:method];[invocation setSelector:selApplicationDidFinishLaunchingWithOptions];[invocation setTarget:clzHIVEAppDelegate];[invocation setArgument:(void*)&dummyApplication atIndex:2];NSDictionary *localLaunchOptions = [IOSAppDelegate GetDelegate].launchOptions;if( localLaunchOptions != nil ) {[invocation setArgument:(void*)&localLaunchOptions atIndex:3];}[invocation invoke];}}#endif/////////////////////////////////////////////// ////////////// - A replacement API call is required for some APIs because of crashes when calling the plugin interface applied an STL.
- The class and the array(such as std::vector) return to a string of the JSON object and array (respectively).
- The following is an example of calling the AuthV4::getPlayerInfo() API.
1234567891011121314151617181920212223242526272829303132#if PLATFORM_IOS || PLATFORM_ANDROIDPlayerInfo playerInfo = AuthV4::getPlayerInfo();#elseauto infoString = AuthV4GetPlayerInfo();std::string strInfo(infoString);//Char to JSonPlayerInfo playerInfo;picojson::value playerInfoJson;std::string err = picojson::parse(playerInfoJson, strInfo);playerInfo.playerId = playerInfoJson.get("playerId").get();playerInfo.did = playerInfoJson.get("did").get();playerInfo.playerImageUrl = playerInfoJson.get("playerImageUrl").get();playerInfo.playerName = playerInfoJson.get("playerName").get();playerInfo.playerToken = playerInfoJson.get("playerToken").get();picojson::object providerInfoData = playerInfoJson.get("providerInfoData").get();std::map<hive::ProviderType, hive::ProviderInfo>; mapProviderInfoData;for (picojson::value::object::const_iterator i = providerInfoData.begin();i != providerInfoData.end();++i) {auto value = i->;second;hive::ProviderInfo __proInfo;__proInfo.providerType = (hive::ProviderType)value.get("providerType").get();__proInfo.providerUserId = value.get("providerUserId").get();mapProviderInfoData[(hive::ProviderType)(stoi(i->;first))] = __proInfo;//std::cout << i->;first << ': ' << i->;second.to_str() << std::endl;}playerInfo.providerInfoData = mapProviderInfoData;#endif - The following is a list of added APIs:
123456789101112131415161718192021222324252627282930313233343536373839404142434445const char* AuthV4GetPlayerInfo();void AuthV4ShowChatbotInquiry(const char* additionalInfo, hive::AuthV4::onShowChatbotInquiry showChatbotInquiryListener);const char* AuthV4HelperGetIDPList();const char* ConfigurationGetConfigurationJsonString();void ConfigurationSetConfigurations(hive::HiveConfigType configType, const char* value);const char* ConfigurationGetCompany();const char* ConfigurationGetHIVECountry();void ConfigurationSetGameLanguage(const char* language);void ConfigurationUpdateGameLanguage(const char* newValue);const char* ConfigurationGetHIVESDKVersion();const char* ConfigurationGetReferenceSDKVersion();const char* ConfigurationGetAppId();void ConfigurationSetAppId(const char* appId);const char* ConfigurationGetServerId();void ConfigurationSetServerId(const char* serverId);void ConfigurationUpdateServerId(const char* serverId);const char* ConfigurationGetMarket();void IAPV4Purchase(const char* marketPid, const char* additionalInfo, hive::IAPV4::onPurchase listener);void IAPV4TransactionFinish(const char* marketPid, hive::IAPV4::onTransactionFinishWithChar listener);const char* PromotionSetEngagementReady(bool isReady);bool PromotionHIVEProcessURI(const char* URI);static void Promotion::setEngagementHandler(onEngagementString engagementHandler); // picoJson ->; std::string (json format)const char* ResultAPIToString(void* resultAPIPtr);//4.15.8 Addvoid AuthV4SignInWithAuthKey(const char* authKey, hive::AuthV4::onSignIn signInListener);typedef std::function<void(ResultAPI const& result, const char * value)>; onGetMetaDataChar; // the replacement of std::stringvoid ConfigurationGetMetaData(const char* key, bool forceReload, hive::Configuration::onGetMetaDataChar listener);void AnalyticsSendAnalyticsLog(const char* logDataJsonString);void AnalyticsSendUserEntryFunnelsLogs(const char* funnelTrack, const char* optionTag);//4.16.2 Addvoid AuthV4ConnectWithAuthKey(const char* authKey, hive::AuthV4::onConnect connectListener);void AuthV4DisconnectWithName(const char* providerName, hive::AuthV4::onDisconnect disconnectListener);//4.16.4 Addconst char* ConfigurationGetChannel();void ConfigurationSetChannel(const char* channel); - See the HIVESDKSampleUtility.cpp file to learn about a sample code for bypassing crashes when calling the
toString()method of the class that includes in Promotion.h. - In the AppInvitationCampaign class,
follow the sample code below for the change above.12public:std::string itemJsonString; // Replace the picojson::value item
12345#if PLATFORM_IOS || PLATFORM_ANDROID* FString(stageCampaign.item.serialize().c_str()),#else* FString(stageCampaign.itemJsonString.c_str()),#endif - Add HiveStore = 15 to
hive::IAPV4Type. - Add ErroCode:IAPSUCCESS = 90 and Code:IAPV4HiveStoreSuccess = -6110000 to Result API.
- In the ConflictSingleViewInfo class,
12public:void SetCharValue(const char* key, const char* playerData); // the replacement of std::string - In the ConflictViewInfo class,
12public:void SetCharValue(const char* key, const char* currentPlayerData, const char* conflictPlayerData); // the replacement of std::string - Refer to the sample project, PlayerTestView.cpp, and learn about the Activate/Deactivate the IME(Input Method Editor) of the calling the API above when calling the
AuthV4::showInquiry,AuthV4::showMyInquiry,AuthV4::showDeviceManagement,AuthV4ShowChatbotInquiry, andAuthV4::showProfileAPI(for Windows).- The code below should be added before and after calling the SDK API.
123456#include....HIVESDKIMEEnable();AuthV4::showInquiry([=](ResultAPI const & result){HIVESDKIMEDisable();});
HIVESDKIMEEnableandHIVESDKIMEDisablerun on applying the engine modification(deactivating the TSF input method).- From Hive SDK 4.15.7,
HIVESDKCEFImeEnableandHIVESDKCEFImeDisablerun without modifying an engine.
- The code below should be added before and after calling the SDK API.
- Enum code of ResultAPI class in the HIVE_ResultAPI.h file
1AuthV4LastProviderCantDisconnect = -1200063, ///< [AuthV4-Common] AuthV4 Last Provider Cant Disconnect. // Unable to disconnect the IdP sync when only one IdP is connected - Refer to here to avoid duplicate running. You can also apply another method corresponding to your project.
- You need to modify an engine to the SDK functions normally (fix bootstrappakage).
Modify the Unreal Engine source code and build.- The game name parameter is removed when running the executable file located in binaries among the executable files of the bootstrappakage.
- After:
Before modification swprintf(ChildCmdLine, ChildCmdLineLength, L”\”%s\\%s\” %s %s”, BaseDirectory, ExecFile, BaseArgs, CmdLine); - After:
After modification swprintf(ChildCmdLine, ChildCmdLineLength, L”\”%s\\%s\” %s”, BaseDirectory, ExecFile, CmdLine);
- After:
- Build the BootstrapPackagedGame project in your UE4 solution after modification
- The game name parameter is removed when running the executable file located in binaries among the executable files of the bootstrappakage.
- Modify appid, zone, and provider id to be matched with your project on the hive_config.xml file located Plugins/HIVESDK/Source/HIVESDK/ThirdParty/windows/config/.
- Android:
<Project_Root folder>;/Plugins/HIVESDK/Source/HIVESDK/ThirdParty/android/resource/res/raw
- iOS:
<Project_Root folder>;/Plugins/HIVESDK/Source/HIVESDK/ThirdParty/iOS/resource/
- Click Edit >; Project Settings in the menu on Unreal Editor. Project Settings screen will show up.
- On the left panel of the project settings page, click HIVEConfig XML menu below the title, Plugin. Then HIVEConfig XML settings screen will show up.

- Replace the setting items as following instruction in the HIVEConfig XML screen.:
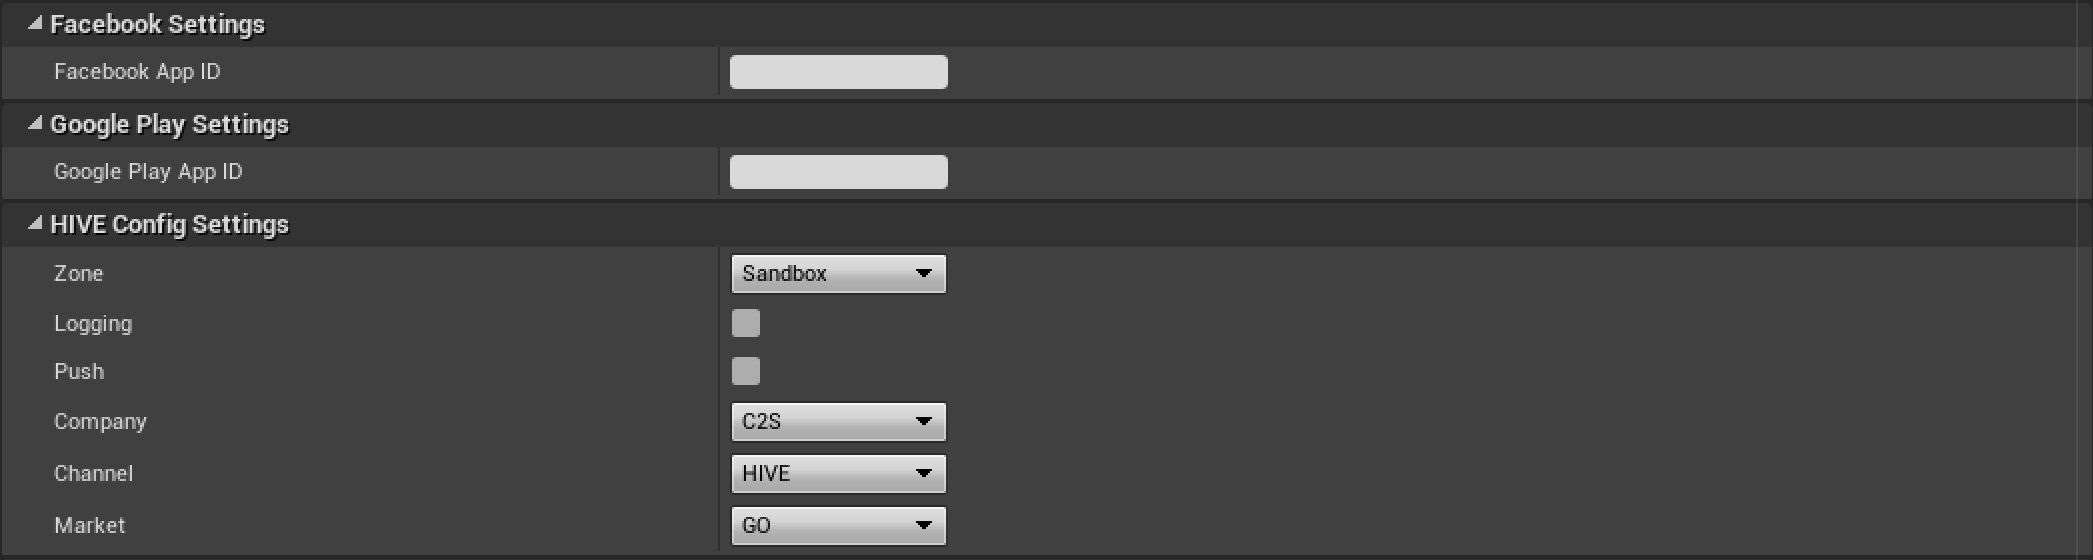
- Input Facebook AppID of the game in the blank of Facebook App ID field in the Facebook Settings group. If you do not know the Facebook AppID, read Prerequisites.
- Input Google Play Game Service AppID received from GAMEVIL or Com2uS in the blank of Google Play App ID field in the Google Play Settings group.
- HiveConfig Settings group: Among setting values in the hive_config.xml file, followings are available to configure.
- HiveConfig Mobile App Tracking Settings: Input the setting value for the marketing attribution to be used. Input the value of AppID, key or token issued from the marketing attribution dashboard.
View the Marketing Attribution Settings Guide - WriteExternalStoragePermission: The value required by Android to request a permission to access external storage to users or not. If checked, Hive Client requests access permission to external storage to users when initializing Hive SDK.
- Select Unreal Editor > Edit > Project Settings.
-
In the Project Settings left panel, choose Hive SDK > Dependency – Android/iOS.
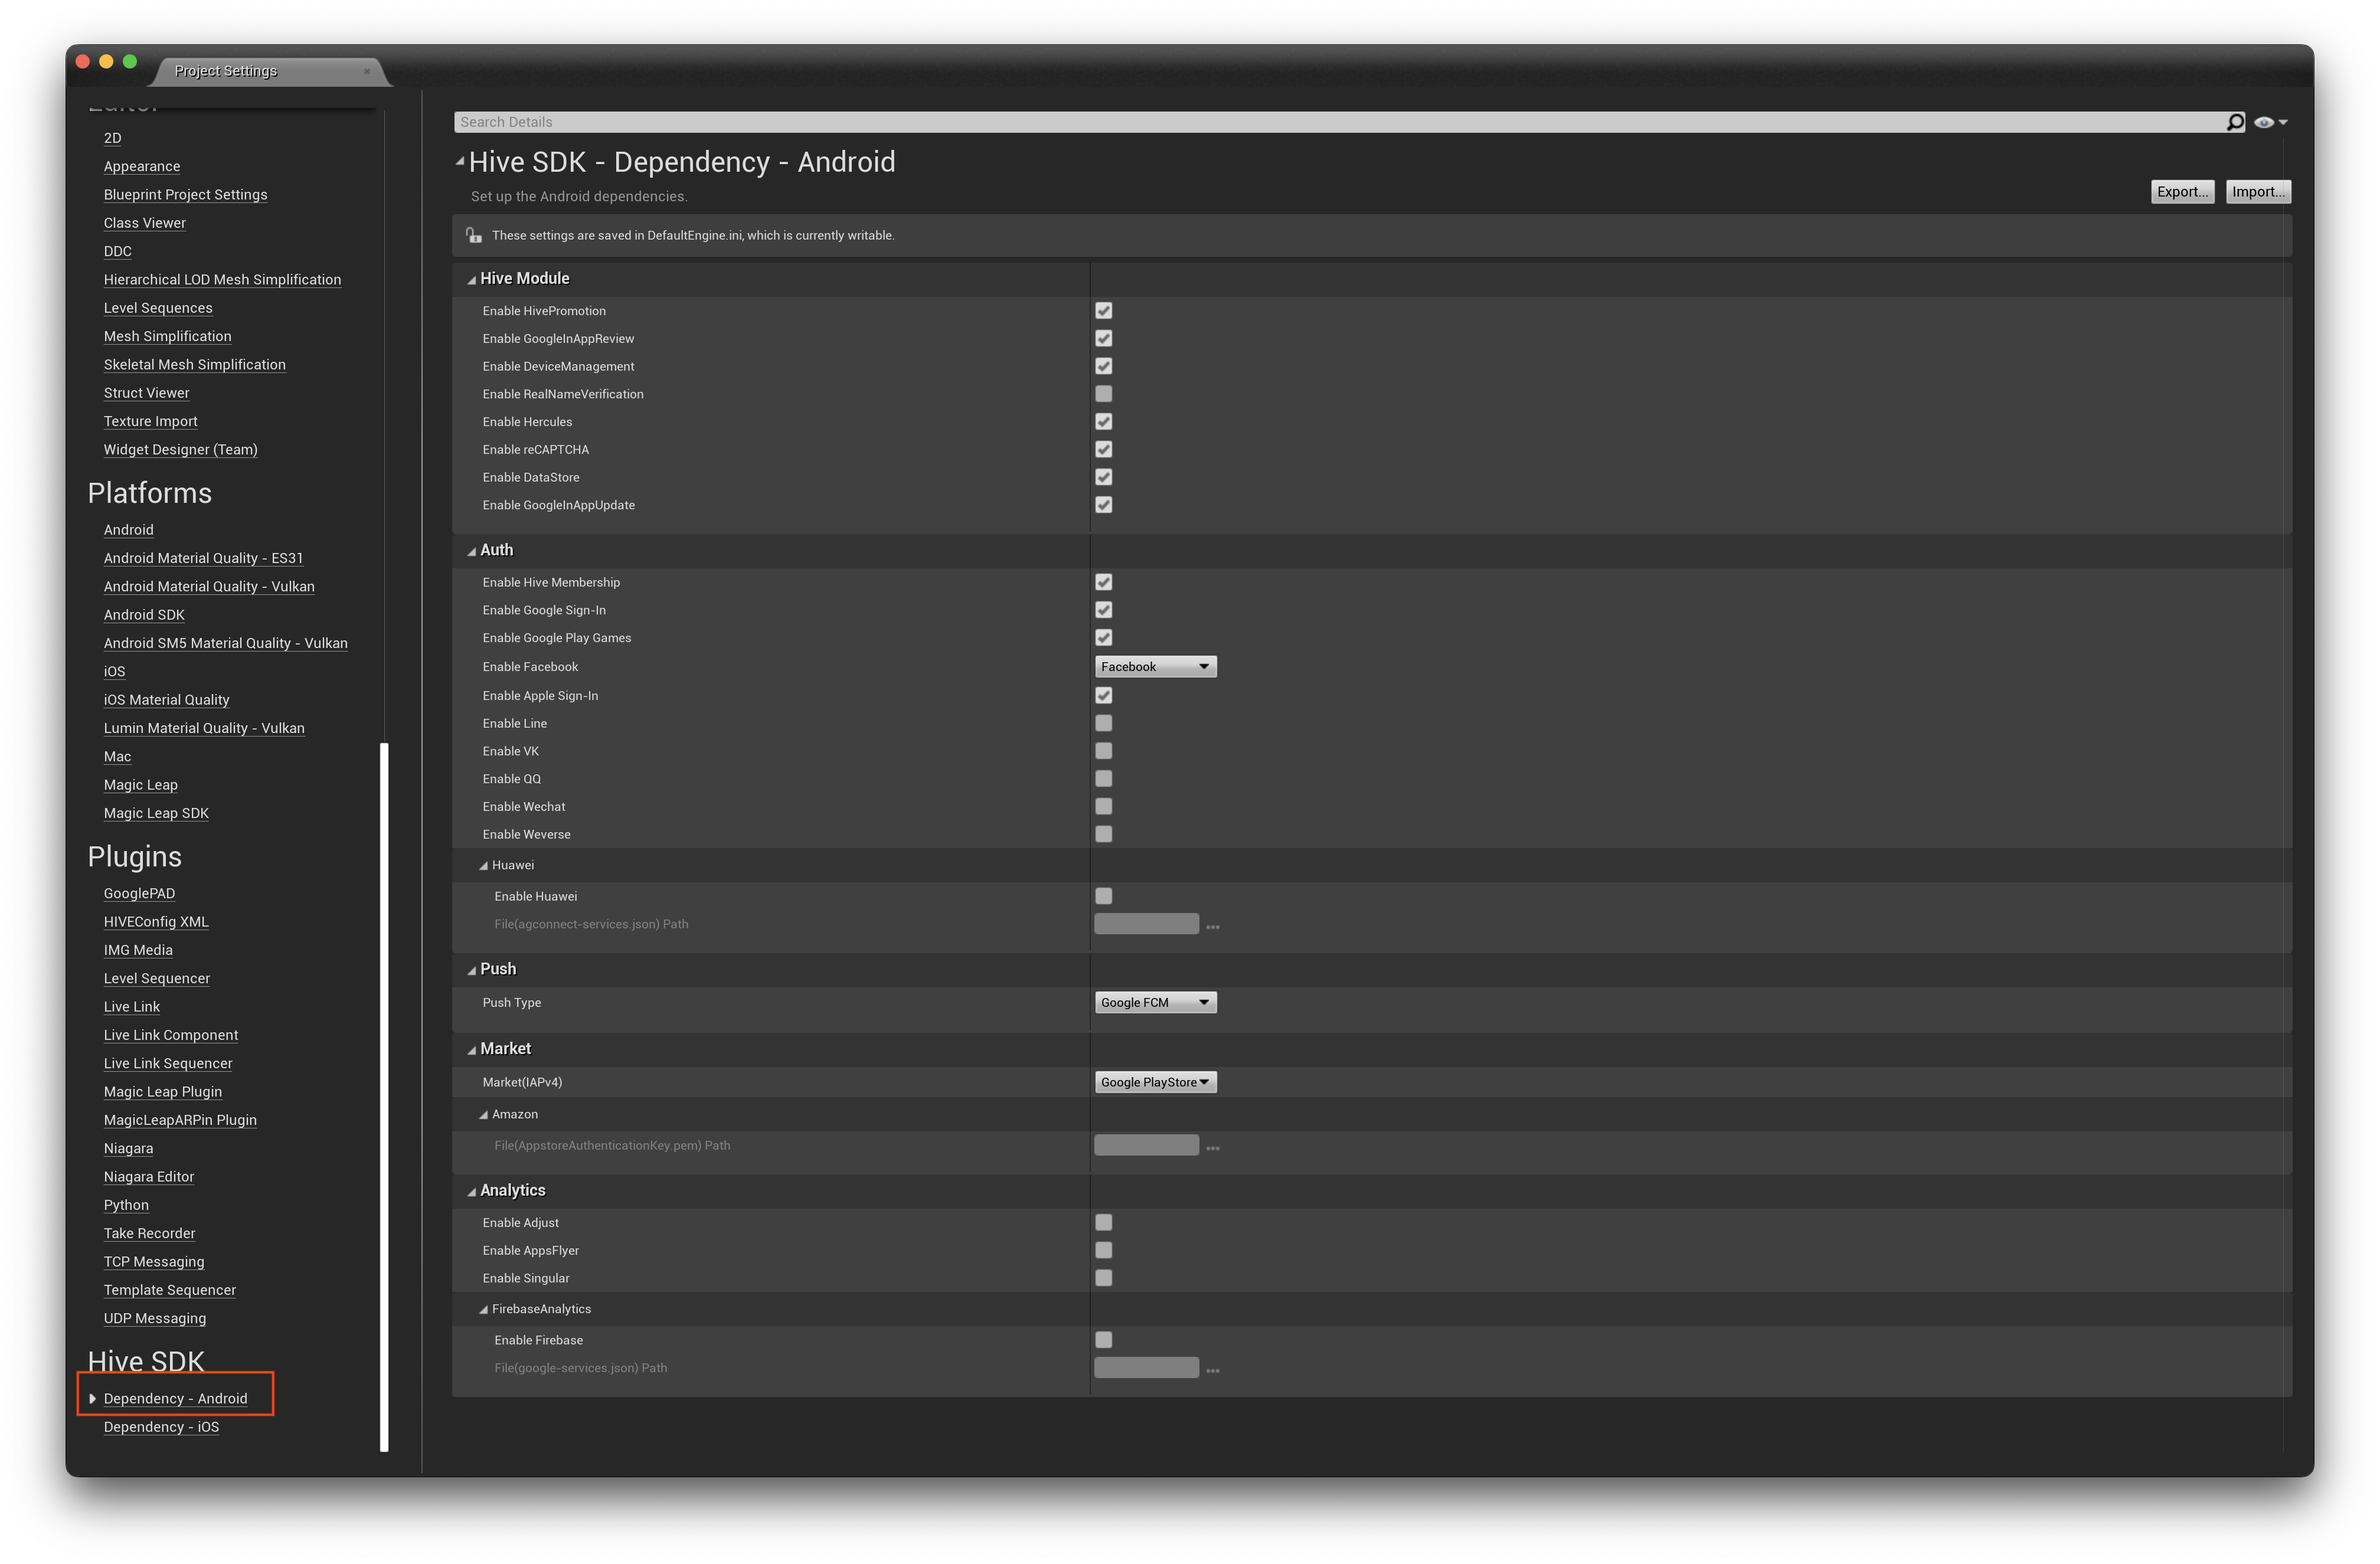
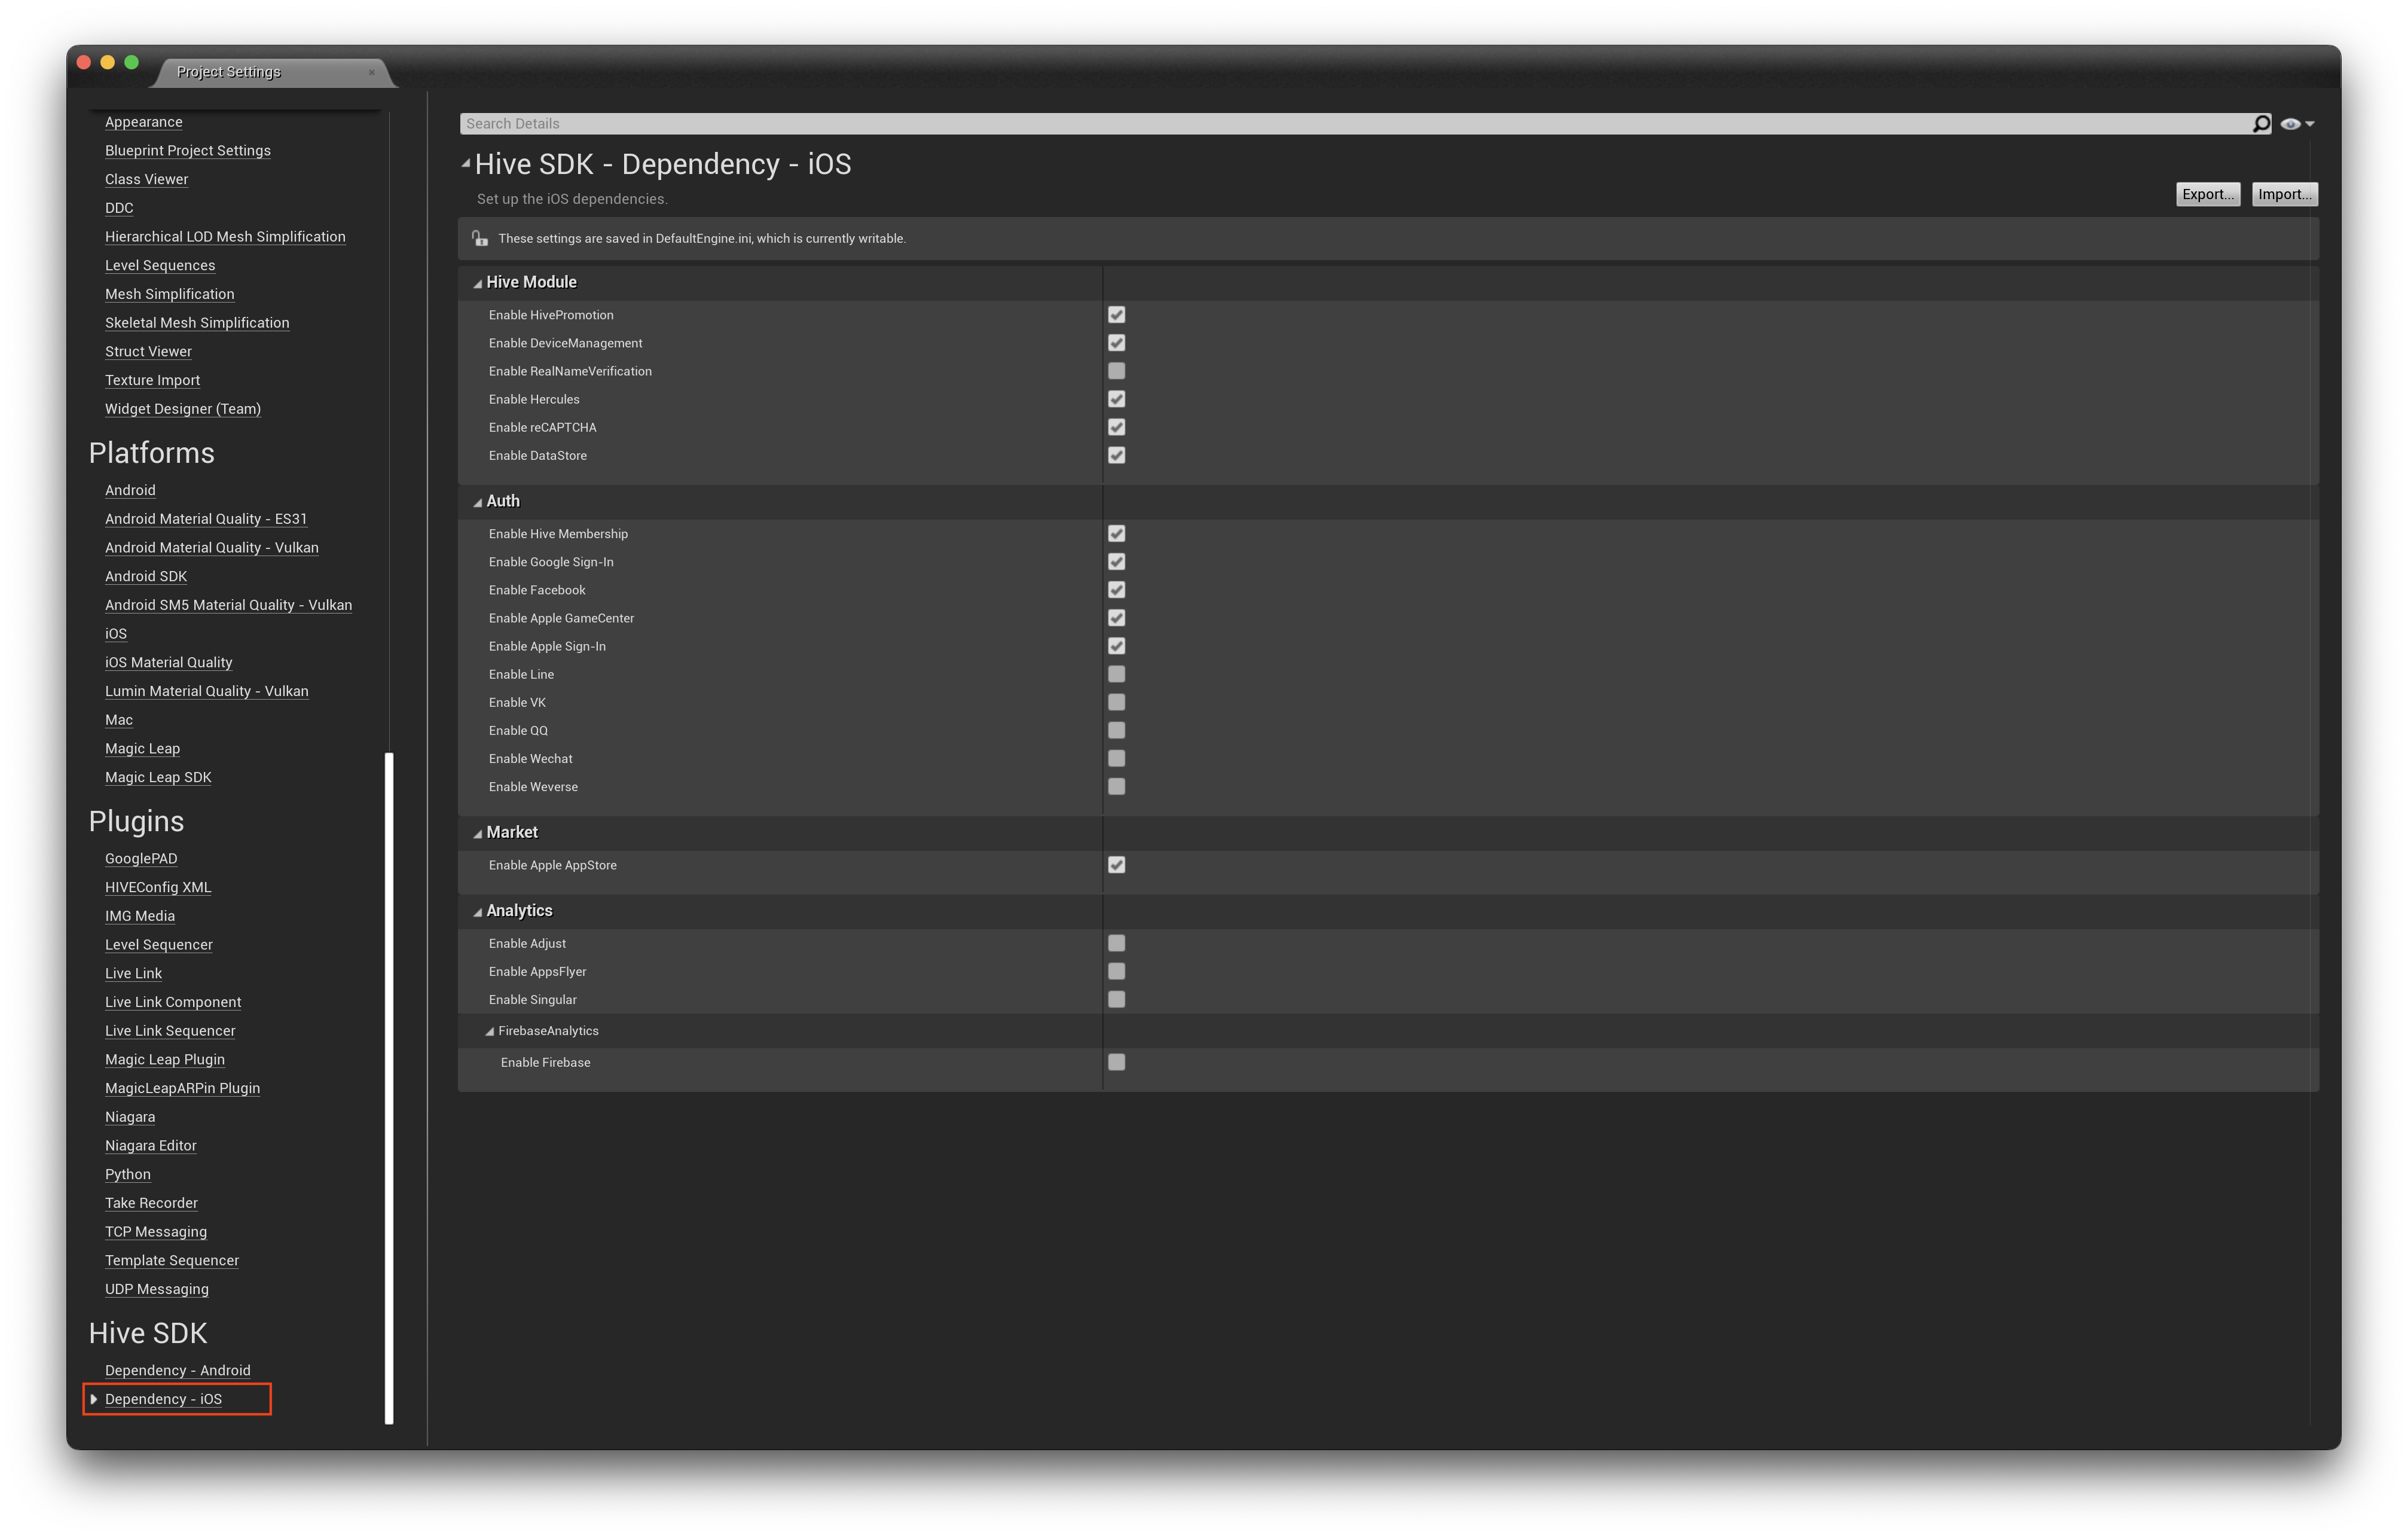
- Choose the desired features in the Hive SDK Dependency screen.
Some features may conflict with Unreal Engine settings, so refer to Modify Unreal Engine Files and General Settings for guidance on selecting the features to use.
- Setting Signing Key:
-
- Click Edit >; Project Settings in the menu on Unreal Editor. Project Settings screen will show up.
- On the left panel of the project settings page, click Android menu below the title, Platform. Then Android settings screen will show up.
- Input the Signing Key data in the field of Distribution Signing group on Android settings screen.

-
- Packaging settings:
-
- On the left panel of the project settings page, click Packaging menu, below Project title. Then Packaging settings screen will show up.
- Check the For Distribution field of Project group in the packaging settings screen.

-
- When packaging your project on the Unreal engine editor, select Windows (64-bit).
- Retry to build even when occurs an error as below on the first build, then the project builds as expected.
UATHelper: Packaging (Windows (64-bit)): Exception: ‘Access to the path ‘\Binaries\Win64\OpenImageIO_Util.dll‘ is denied.
UATHelper: Packaging (Windows (64-bit)): ERROR: Exhausted all retries!
iOS
Since the Hive SDK for iOS is developed in Swift, some modifications are required for the compatibility between Unreal Engine and Swift, and the modification of Unreal Engine is also required to use the notification feature provided by the Hive SDK.
In the files below, add the lines marked with 'Add' comment.
Engine/Source/Runtime/ApplicationCore/Public/IOS/IOSAppDelegate.h
|
1 2 3 4 5 6 7 8 9 |
DECLARE_MULTICAST_DELEGATE_FourParams(FOnOpenURL, UIApplication*, NSURL*, NSString*, id); static FOnOpenURL OnOpenURL; // Add DECLARE_MULTICAST_DELEGATE_ThreeParams(FOnOpenURLwithOptions, UIApplication*, NSURL*, NSDictionary* ); static FOnOpenURLwithOptions OnOpenURLwithOptions; // End |
|
1 2 3 4 5 |
// parameters passed from openURL @property (nonatomic, retain) NSMutableArray* savedOpenUrlParameters; @property (nonatomic, retain) NSMutableArray* savedOpenUrlWithOptionsParameters; // Add |
Engine/Source/Runtime/ApplicationCore/Private/IOS/IOSAppDelegate.cpp
|
1 2 3 4 5 6 7 8 9 |
extern bool GShowSplashScreen; FIOSCoreDelegates::FOnOpenURL FIOSCoreDelegates::OnOpenURL; FIOSCoreDelegates::FOnOpenURLwithOptions FIOSCoreDelegates::OnOpenURLwithOptions; // Add FIOSCoreDelegates::FOnWillResignActive FIOSCoreDelegates::OnWillResignActive; FIOSCoreDelegates::FOnDidBecomeActive FIOSCoreDelegates::OnDidBecomeActive; TArray<FIOSCoreDelegates::FFilterDelegateAndHandle> FIOSCoreDelegates::PushNotificationFilters; |
|
1 2 3 4 5 6 7 |
@synthesize AccessibilityCacheTimer; #endif @synthesize savedOpenUrlParameters; @synthesize savedOpenUrlWithOptionsParameters; // Add @synthesize BackgroundSessionEventCompleteDelegate; |
|
1 2 3 4 5 6 7 8 9 10 11 12 13 14 15 16 17 18 19 20 |
GShowSplashScreen = false; }, TStatId(), NULL, ENamedThreads::ActualRenderingThread); } // Add for (NSDictionary* openUrlParameter in self.savedOpenUrlWithOptionsParameters) { UIApplication* application = [openUrlParameter valueForKey : @"application"]; NSURL* url = [openUrlParameter valueForKey : @"url"]; NSDictionary<NSString*, id> * options = [openUrlParameter valueForKey : @"options"]; FIOSCoreDelegates::OnOpenURLwithOptions.Broadcast(application, url, options); } self.savedOpenUrlWithOptionsParameters = nil; // clear after saved openurl delegate running // End for (NSDictionary* openUrlParameter in self.savedOpenUrlParameters) { UIApplication* application = [openUrlParameter valueForKey : @"application"]; |
|
1 2 3 4 5 6 7 8 9 10 11 12 13 14 15 16 17 18 19 20 21 22 23 24 25 26 27 |
- (BOOL)application:(UIApplication *)application didFinishLaunchingWithOptions:(NSDictionary*)launchOptions { // save launch options self.launchOptions = launchOptions; #if PLATFORM_TVOS self.bDeviceInPortraitMode = false; #else // use the status bar orientation to properly determine landscape vs portrait self.bDeviceInPortraitMode = UIInterfaceOrientationIsPortrait([[UIApplication sharedApplication] statusBarOrientation]); printf("========= This app is in %s mode\n", self.bDeviceInPortraitMode ? "PORTRAIT" : "LANDSCAPE"); #endif // check OS version to make sure we have the API OSVersion = [[[UIDevice currentDevice] systemVersion] floatValue]; if (!FPlatformMisc::IsDebuggerPresent() || GAlwaysReportCrash) { // InstallSignalHandlers(); } self.savedOpenUrlParameters = [[NSMutableArray alloc] init]; self.savedOpenUrlWithOptionsParameters = [[NSMutableArray alloc] init]; // Add self.PeakMemoryTimer = [NSTimer scheduledTimerWithTimeInterval:0.1f target:self selector:@selector(RecordPeakMemory) userInfo:nil repeats:YES]; #if !BUILD_EMBEDDED_APP |
|
1 2 3 4 5 6 7 8 9 10 11 12 13 14 15 16 17 18 19 20 21 22 23 24 25 26 27 28 29 30 31 32 33 34 35 36 37 38 39 40 41 42 43 44 45 46 47 48 49 50 51 52 53 54 55 56 57 58 59 60 |
return YES; } // Add //### use option - (BOOL)application:(UIApplication *)app openURL:(NSURL *)url options:(NSDictionary<NSString*, id> *)options { #if !NO_LOGGING NSLog(@"%s", "IOSAppDelegate openURL options\n"); #endif NSString* EncdodedURLString = [url absoluteString]; NSString* URLString = [EncdodedURLString stringByRemovingPercentEncoding]; FString CommandLineParameters(URLString); // Strip the "URL" part of the URL before treating this like args. It comes in looking like so: // "MyGame://arg1 arg2 arg3 ..." // So, we're going to make it look like: // "arg1 arg2 arg3 ..." int32 URLTerminator = CommandLineParameters.Find( TEXT("://"), ESearchCase::CaseSensitive); if ( URLTerminator > -1 ) { CommandLineParameters.RightChopInline(URLTerminator + 3, false); } FIOSCommandLineHelper::InitCommandArgs(CommandLineParameters); self.bCommandLineReady = true; [self.CommandLineParseTimer invalidate]; self.CommandLineParseTimer = nil; // Save openurl infomation before engine initialize. // When engine is done ready, running like previous. ( if OnOpenUrl is bound on game source. ) if (bEngineInit) { FIOSCoreDelegates::OnOpenURLwithOptions.Broadcast(app, url, options); } else { #if !NO_LOGGING NSLog(@"%s", "Before Engine Init receive IOSAppDelegate openURL\n"); #endif NSDictionary* openUrlParameter = [NSDictionary dictionaryWithObjectsAndKeys : app , @"application", url, @"url", options, @"options", nil]; [savedOpenUrlWithOptionsParameters addObject : openUrlParameter]; } return YES; } // End FCriticalSection RenderSuspend; - (void)applicationWillResignActive:(UIApplication *)application { |
- When applying Hive SDK v4.15.2.2 or higher, implement
application(_:supportedInterfaceOrientationsFor:) method in the IOSAppDelegate.cpp file from Unreal Engine to activate the Configuration of Screen Orientation feature on iOS. This method returns UIInterfaceOrientationMask value for using on the game. It returns landscape in landscape-only game, portrait in portrait-only game, and landscape as well as portrait in all-type-supported game.
|
1 2 3 4 5 6 7 8 9 |
- (UIInterfaceOrientationMask)application:(UIApplication *)application supportedInterfaceOrientationsForWindow:(UIWindow *)window { // TODO: For landscape only return UIInterfaceOrientationMaskLandscape; // TODO: For portrait only return UIInterfaceOrientationMaskPortrait; // TODO: For both landscape and portrait return UIInterfaceOrientationMaskAll; } |
If you are using Unreal Engine 4.27 Plus and Hive SDK v4.16.3 (Xcode 14.1 or higher) version, add the 'Add' commented line in the files below.
Engine/Source/Programs/UnrealBuildTool/ProjectFiles/Xcode/XcodeProject.cs
|
1 2 3 4 5 6 7 8 9 10 11 12 13 14 15 |
{ Content.Append("\t\t\t\t\"PRODUCT_BUNDLE_IDENTIFIER[sdk=iphoneos*]\" = " + IOS_BUNDLE + ";" + ProjectFileGenerator.NewLine); } // Add if (ProjectFile != null) { Content.Append("\t\t\t\tSWIFT_VERSION = 5.0;" + ProjectFileGenerator.NewLine); Content.Append("\t\t\t\tSWIFT_OBJC_BRIDGING_HEADER = \"" + GamePath + "/dummy-Bridging-Header.h\";" + ProjectFileGenerator.NewLine); } // End } if (TVOSRunTimeVersion != null) { |
|
1 2 3 4 5 6 7 8 |
if (XcodeProjectFileGenerator.bGeneratingRunIOSProject) { Content.Append("\t\t\t\tALWAYS_EMBED_SWIFT_STANDARD_LIBRARIES = YES;"+ ProjectFileGenerator.NewLine); // Add Content.Append("\t\t\t\tINFOPLIST_FILE = \"" + IOSInfoPlistPath + "\";" + ProjectFileGenerator.NewLine); Content.Append("\t\t\t\tCODE_SIGN_ENTITLEMENTS = \"" + IOSEntitlementPath + "\";" + ProjectFileGenerator.NewLine); } |
|
1 2 3 4 5 6 7 8 9 |
Content.Append("\t\t\t\t\"INFOPLIST_FILE[sdk=macosx*]\" = \"" + MacInfoPlistPath + "\";" + ProjectFileGenerator.NewLine); if (IOSRunTimeVersion != null) { Content.Append("\t\t\t\tALWAYS_EMBED_SWIFT_STANDARD_LIBRARIES = YES;"+ ProjectFileGenerator.NewLine); // Add Content.Append("\t\t\t\t\"INFOPLIST_FILE[sdk=iphoneos*]\" = \"" + IOSInfoPlistPath + "\";" + ProjectFileGenerator.NewLine); Content.Append("\t\t\t\t\"CODE_SIGN_ENTITLEMENTS[sdk=iphoneos*]\" = \"" + IOSEntitlementPath + "\";" + ProjectFileGenerator.NewLine); } |
Engine/Source/Programs/UnrealBuildTool/Platform/IOS/IOSToolChain.cs
|
1 2 3 4 5 6 7 8 9 |
Result += " -Xlinker \\\"" + Path.GetDirectoryName(OutputFile.AbsolutePath) + "\\\""; } Result += " -Xlinker -rpath -Xlinker /usr/lib/swift"; // Add Result += " -dead_strip"; Result += " -m" + GetXcodeMinVersionParam() + "=" + ProjectSettings.RuntimeVersion; Result += " -Wl"; |
Universal Link Settings
In the files below, add the line commented with 'Add'.
Engine/Source/Programs/UnrealBuildTool/Platform/IOS/IOSExport.cs
|
1 2 3 4 5 6 7 8 9 10 11 12 13 14 15 16 17 18 19 20 21 22 23 24 25 26 27 28 29 30 |
Text.AppendLine("<dict>")) Text.AppendLine( "\t<key>get-task-allow</key>")) Text.AppendLine(string.Format( "\t<{0}/>", bForDistribution ? "false": "true")); // Add Text.AppendLine( "\t<key>com.apple.developer.associated-domains</key>")) Text. AppendLine( "\t<array>")) Text.AppendLine( "\t\t<string>Add the inviter link which is based on the universal link (ex.applinks:hiveota.withhive.com)</string>")) /* Below is an example used in the Hive SDK sample app. Text.AppendLine("\t\t<string>applinks:hiveota.withhive.com</string>"); Text.AppendLine("\t\t<string>applinks:dev-promotion.qpyou.cn</string>"); Text.AppendLine("\t\t<string>applinks:promotion.qpyou.cn</string>"); Text.AppendLine("\t\t<string>applinks:sandbox-promotion.qpyou.cn</string>"); Text.AppendLine("\t\t<string>applinks:test-promotion.qpyou.cn</string>"); */ Text.AppendLine( "\t</array>")) /* These are the required ones to log in to Game Center on iOS versions 17 or above. Text.AppendLine("\t<key>com.apple.developer.game-center</key>"); Text.AppendLine("\t<true/>"); */ // End if (bCloudKitSupported) { if (iCloudContainerIdentifiersXML != "") |
General Settings
Android
Google and Google Play Games Sign-in support
Hive SDK supports both Google sign-in (iOS, Android) and Google Play Games sign-in (Android). To use Google Play Games sign-in, you first need to modify the Unreal Engine codes as below.
To use Google or Google Play Games sign-in, select “GOOGLE” or “GOOGLE_PLAY_GAMES” ProviderType and call AuthV4.SignIn().
iOS
|
1 |
bEnableSignInWithAppleSupport=True |
Add Firebase Analytics
Apply language configuration file
Apply HIVEAppDelegate
Configure iOS FMallocAnsi
FMallocAnsi settings are required for proper compatibility between the Unreal Engine iOS environment and the C++ standard template library.
Add the following codes to the {YourProject}.Target.cs file in your game project.
|
1 2 3 4 5 |
public class YourProjectTarget : TargetRules { public YourProjectTarget(TargetInfo Target) : base(Target) { // Force to execute ANSI allocator for the game client if(Target.Platform == UnrealTargetPlatform.IOS) { GlobalDefinitions.Add("FORCE_ANSI_ALLOCATOR=1"); } }} |
Windows
Plugin Configuration
Overwrite the contents of Plugin/HIVESDK to an existing Hive SDK project applied Unreal Engine plugin.
Apply updated C++ interface
Call SDK Plugin API
Changed classes
API for Windows build
|
1 2 3 4 5 6 7 8 9 |
#include // Request the engine modification HIVESDKIMEEnable(); HIVESDKIMEDisable(); // No need the engine modification HIVESDKCEFImeEnable(); HIVESDKCEFImeDisable(); |
The followings are added to the Result API error code (Hive SDK v4.15.7+):
Pre-build Setup
Hive Settings
Configure the setting items to utilize Hive in accordance with the following instructions. If you change the settings, the values of Unreal Editor is automatically saved, and the files saving setting values (hive_config.xml, etc_string.xml and GooglePlayAppID.xml) save the changes automatically. If the file of setting value does not exist, Hive SDK automatically generate it and save at the following route:
Follow the instructions below to set the values necessary for Hive:
Applying Hive Features Selectively (Android, iOS)
To selectively apply the Hive features needed for authentication, analytics, and more, follow these instructions:
Building
Follow the rules by OS below to utilize Unreal Engine development environment.
Building Android Apps
Build Settings
If the version of Unreal Engine you use is 4.0 and later, set the items necessary to distribute your apps on Google Play Store as following instructions:
Building
How to build Hive-porting games for Android is the same with how to build general game apps for Android. Utilize File >; Project Packaging >; Android menu in the Unreal Editor.
For more information about how to build, see Unreal Engine Guidelines.
Building iOS Apps
How to build Hive-porting games for iOS is the same with how to build general game apps for iOS. Utilize File >; Project Packaging >; iOS menu in the Unreal Editor.
For more information about how to build, see Unreal Guidelines.
Build for Windows
After the build is completed, you need to modify the ProductVersion and FileVersion of the executable by using the Plugins/HIVESDK/Source/HIVESDK/ThirdParty/windows/util/rcedit.exe file or with another method.
The following image shows the example of the script file that the versions are modified.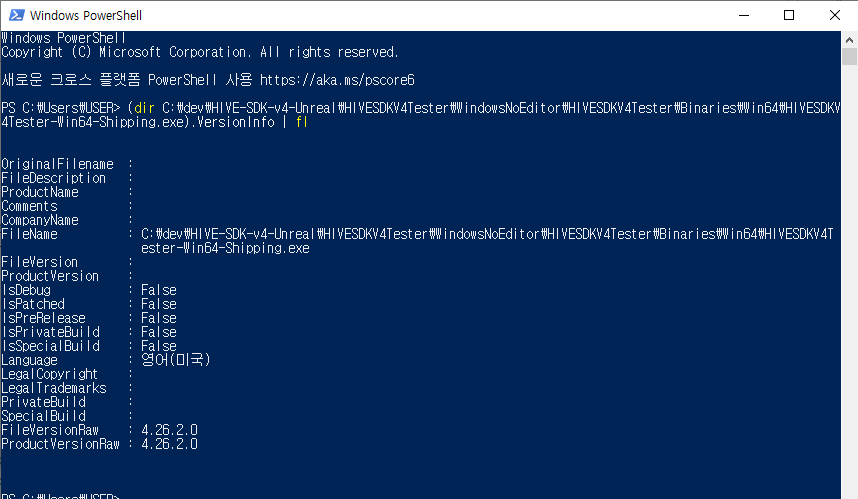
In an environment other than the developer PC, you need a Redistributable package.
(See Latest Supported Visual C++ Redistributable Downloads)