Segment(Old Version)
- Segment is a feature where you can classify users according to the specific condition.
- Backoffice route: Analytics > Segment
Segment List
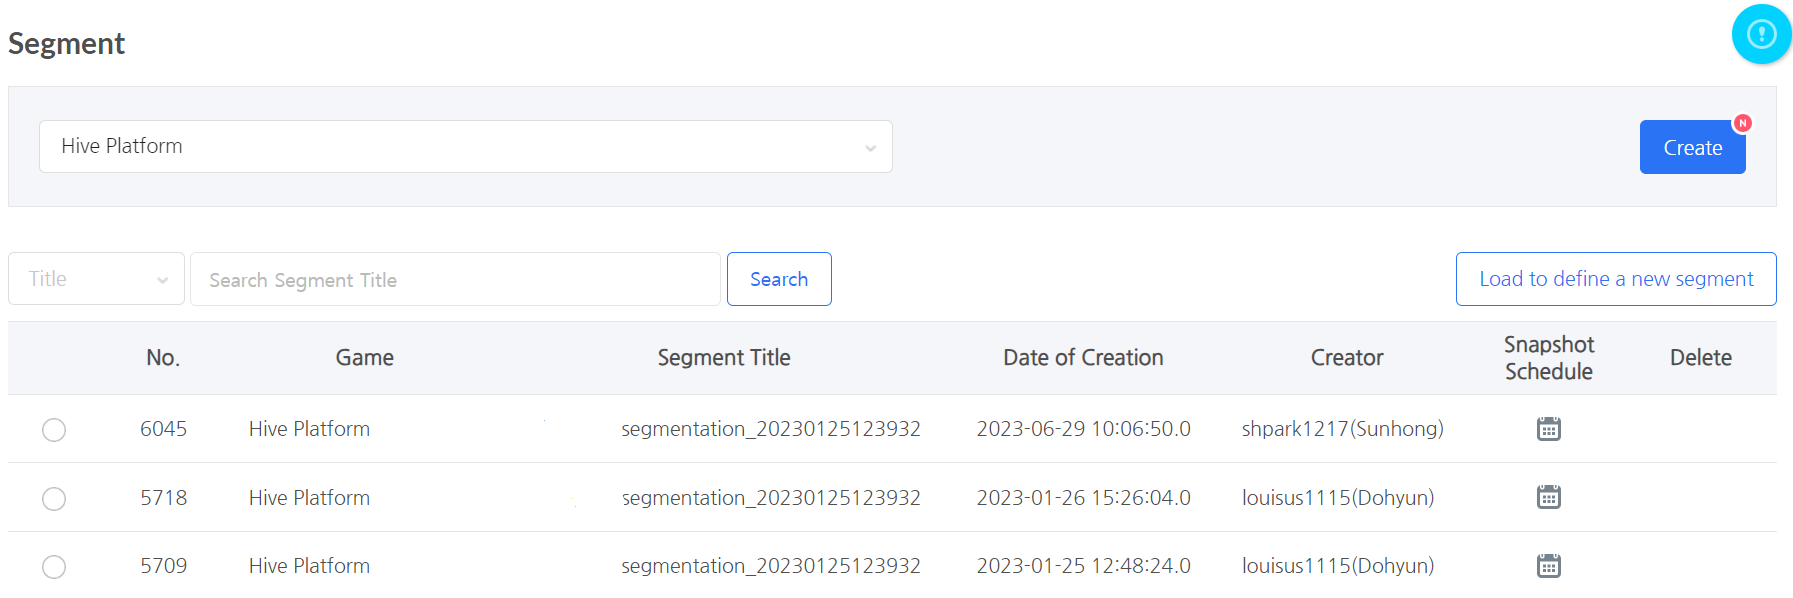
- If you don’t select a game, all segments in the game that you have permission for will be exposed from the segment that’s been created most recently. If you select a game, only the segment for the selected game will be exposed.
- Move your cursor over the segment title to check the details of the segment and click on the segment title to move to the detail page.
- Segments can only be deleted by the creator. Targeting campaigns that are being held will be maintained but new snapshots or targeting campaigns can’t be created with the corresponding segment.
Creating a Segment
- There are two ways to create a segment.
- The first method is to create a new segment via the [Create] Button.
- The second method can be used when you want to create a segment that’s similar to the previously created segment. Click on the radio button of the segment of your choice and click on the [Load to define a new segment] Button.
Segment Information

- Select Target Games: Select a game you wish to segment. If you’ve already selected a game from the segment list, you’ll see the corresponding game already being selected automatically.
- Enter the segment title and details that describe the corresponding segment.
- Upload CSV File: If you possess a specific user list, upload it as a CSV file to create the list as a segment.
- How to upload a CSV file: Vid(or PlayerID), uid, did and appid are required at the very top column of the CSV file. If the game doesn’t have vid, leave it as blank and upload.
- Values for game user identifier (vid or uid) and appid are required. If there’s no did value, you can use the Hive promotion targeting, but you won’t be able to use the Hive notification targeting.
- CSV File Example

Hive Basic Information [Optional]
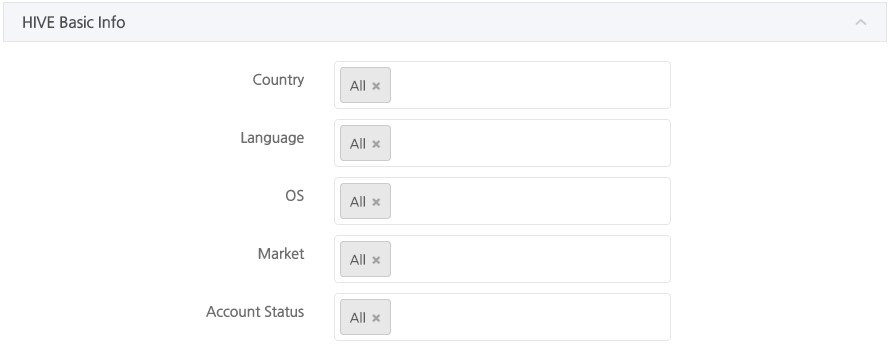
- For Hive Basic Information, you can specify conditions with user’s default values.
- All conditions are optional and if you specify a condition as a whole, the corresponding condition won’t be searched.
- The criteria for these conditions is the status value of the login period. If you’ve logged in from Korea and U.S during the login period, the user will be subject for both when you extract Korean users and U.S users.
- Country: The country information will be extracted based on the country that has the corresponding IP that the user accesses. Multiple countries can be selected.
- Language: The language information will be extracted based on the game language. Multiple languages can be selected.
- OS: Select user’s device OS (Android or iOS).
- Market: Select a market type from which the user downloaded the game.
- Account Status: Selects the user’s account type (Guest or Member).
- Server ID: Selects user’s server. (* Only available on games with Hive SDK v4 or above)
- New user: Selects whether to extract users joined for the first time during the login period at the login info. (* Only available on VID games)
Login Information [Required]
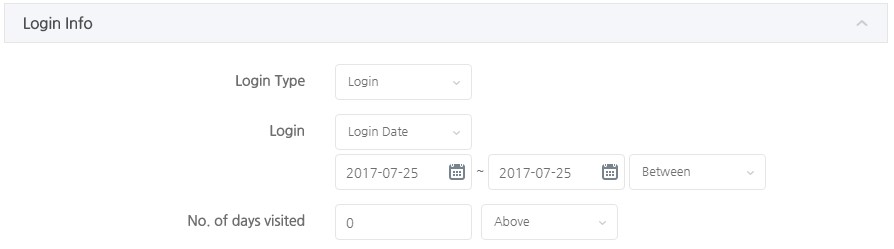
- You can designate the condition for the login information with user’s login record.
-
- Login Type: Select a login type.
- Login: Specify the user’s login date of login or the number of days that the user logged in.
- Dormant: Specify the number of days that the user didn’t login.
- Login
- Login is a required field that is the basis for extracting the existing information on Hive. Ex) If a user logs in from Korea and U.S during the login period, the user’s country information will be both Korea and U.S. In contrast, if you designated a different login period and the user only accessed from Japan during that time period, the user will only be included for Japan though he or she has had accessed from Korea and U.S previously.
-
- Login Date: Select the absolute time period in which the user logged in on the calendar. If the user has logged in during the selected time period, the user will be included in the corresponding condition.
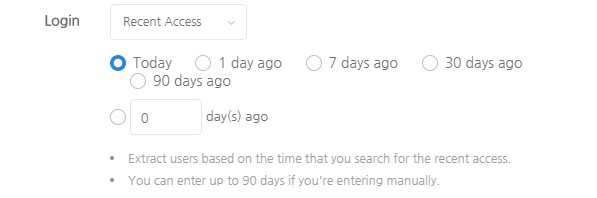
- Last Login: Specify the relative number of days and not the absolute time period. Select “Today” and the user who logged in on the day will be included when you extract snapshots with the segment or when the targeting campaign starts. In the same way, if you select “30 days ago”, users who logged in 30 days before the segment is used will be included.
-
- No. of days visited: Specify the number of days the user logged in during the set login period. If you enter 5 or more, only those who visited at least 5 days during the login period will be included.
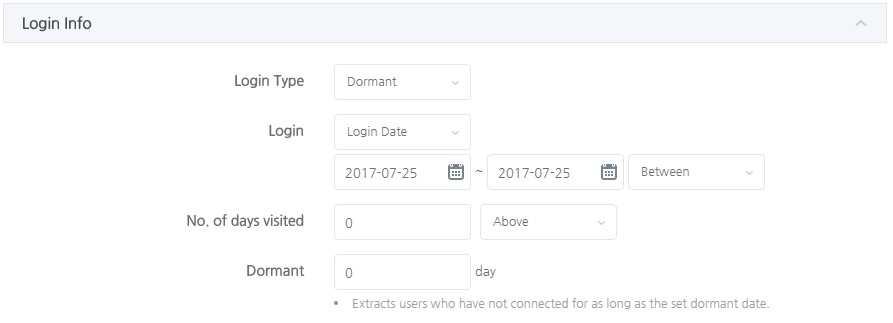
- Dormant
- Specify the number of days that the user has not logged in. If you enter 30 days, users that didn’t login even once, starting 30 days prior to the most recent day will be included.
- The target date changes depending on when the segment is used since the Dormant Date is relative.
- Example: Enter 30 for dormant
- Start a targeting campaign or add a snapshot on Jul. 31st and users that didn’t login during Jul. 2nd – Jul. 31st will be extracted.
- Start a targeting campaign or add a snapshot on Aug. 15th, users who didn’t login during Jul. 17th – Aug. 15th will be extracted.
- Login Type: Select a login type.
Purchase Information [Optional]
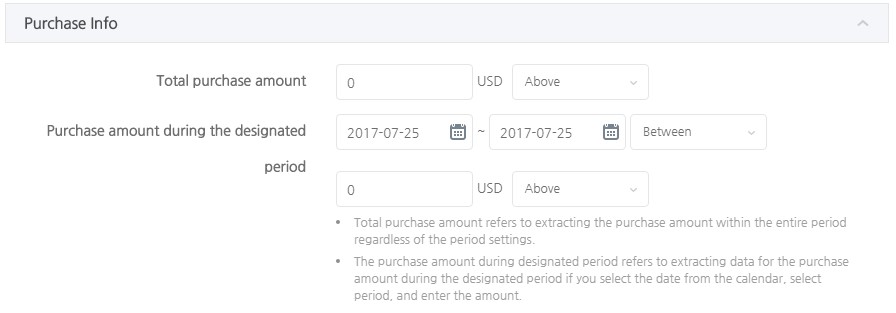
- Total purchase amount: Enter the total purchase amount of the corresponding game.
- Purchase amount during the designated period: Specify a period and enter the purchase amount during the designated period.
Game Information [Optional]

- You can designate the game information as segment once the game information is completely sent to Analytics v2 via log definition
- Add: Only the Add Button exists as above before the condition for the game information is added. Tap the Add Button to add more conditions

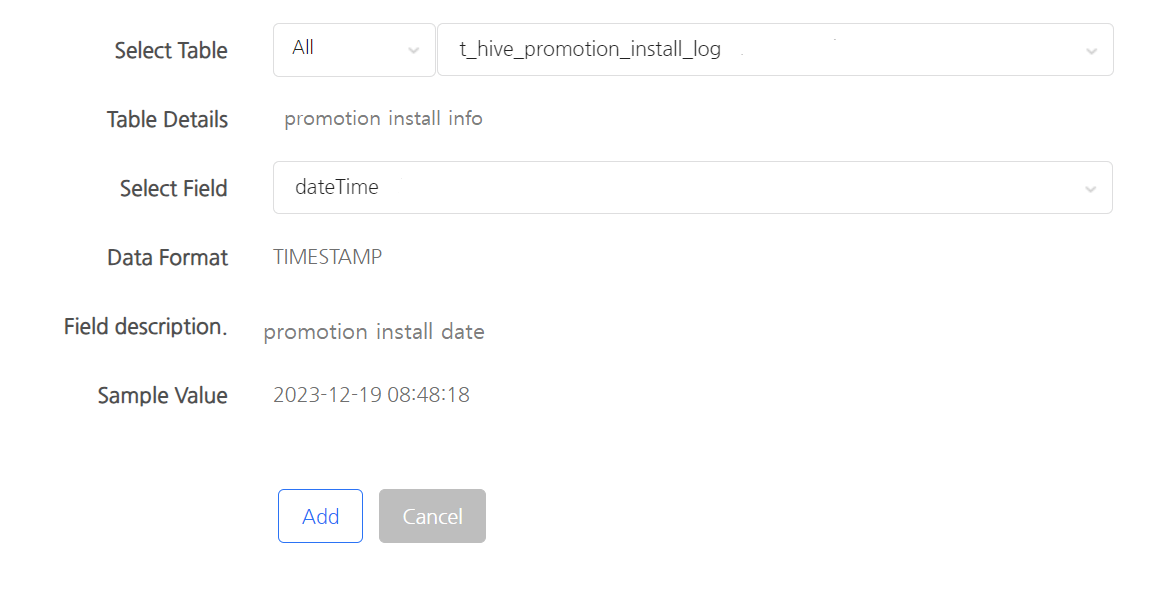
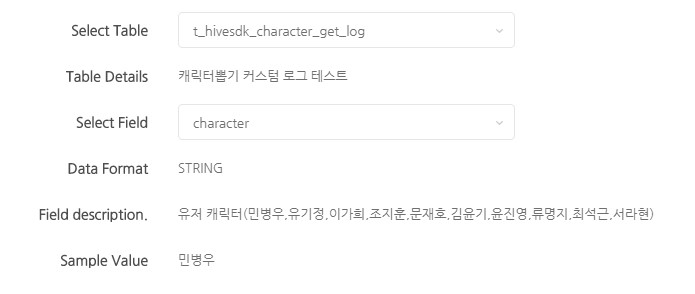
- Select Table: Table is the name of information. Select a table and details of the corresponding table will be displayed at the bottom.
- Select Field: Field refers to the actual condition to assign as a value. Select a field and you’ll be able to see the corresponding field’s data format, field details, and a sample value.
- Data Format: Data Format exposes the type of the selected data format. Letters will be shown as STRING, numbers will be shown as INTEGER, and numbers with decimal points will be shown as FLOAT.
- Sample Value: A sample value of the selected field will be exposed. Check the description and sample value and click on the Add Button to add the corresponding condition.
- For the Table/Field Details, descriptions that you enter when defining a log will be exposed so it’s important to enter the description correctly so that anyone that reads the description can understand what the corresponding table and field are.
- Example of a page where the table and field regarding the user level are selected.

- Information of a game added as a condition
- Move your cursor over [?] and you’ll be able to view the description of the table and field of the corresponding condition again.
- If the data format is in INTEGER format, a select box where you can specify the condition and range of the numbers will be exposed.
- If the data format is in STRING format, only the input exists and you must enter the exact value. (Ex: If you select Archangel, you need to enter Archangel correctly without a typo.)
Select Box Details
- A select box where you can specify the date range.
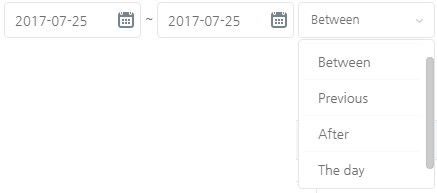
- Between: Designate the time period between before – after date
- Previous: Select a specific day and designate the period before that day
- After: Select a specific day and designate the period after that day
- Today: Select a specific day and designate only that day
- A select box where you can specify the range of number.

- Above: Designate the entered number or above
- Below: Designate the entered number or below
- Between: Enter two values and designate values in between (Ex: 1~5 Refers to numbers from 1 to 5)
- Include: Designate so that only the entered number counts
- Don’t Include: Desginate so that only the entered number doesn’t count (Ex: If you enter 5, numbers from 1-4 and number 6 or above will be designated.)
- A select box where you can designate the state of a numeric value.
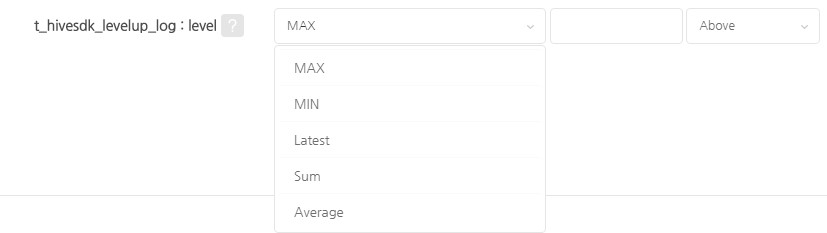
- MAX: Set the value as the highest value that the user reached so far. (Ex: If a user possess 100 game money currently and the highest amount of game money the user possessed was 200, set the value as 199 or below and the user won’t be included.).
- MIN: Set the value as the lowest value that the user had..
- Latest: Set the value as user’s latest value. (Appropriate when designating user’s level as a condition).
- Sum: Set the value as the sum of all of user’s corresponding values..
- Average: Set the value as the average of user’s corresponding values. .
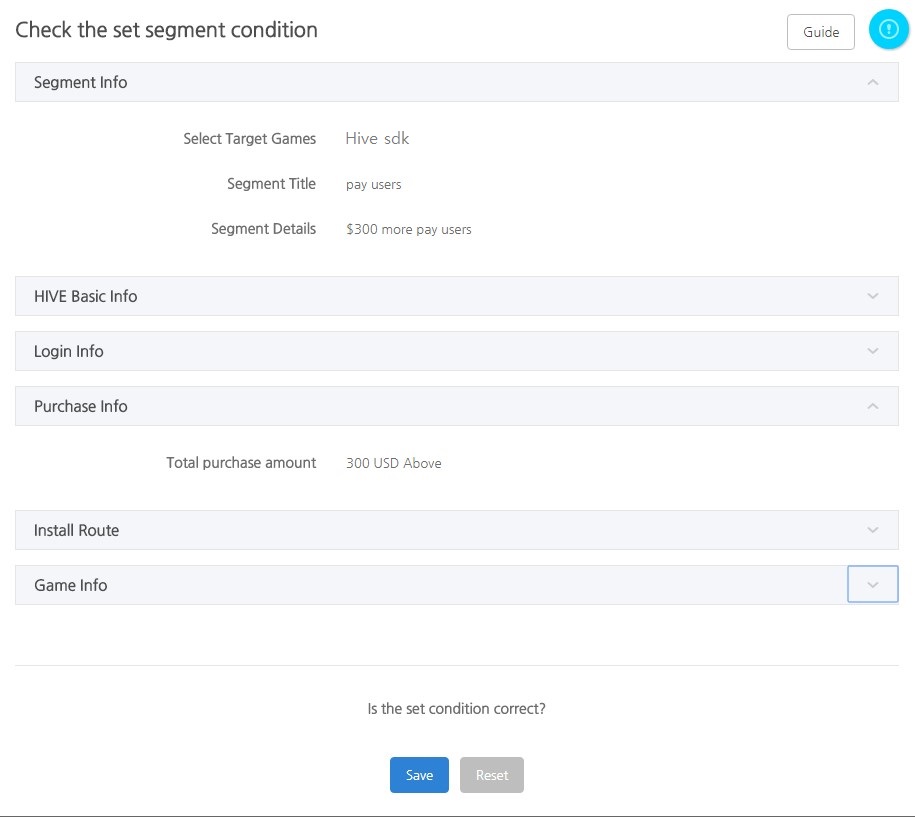
- Designate all conditions and click on the Save Button to expose a page as follows.
- You can modify the condition by clicking on the Reset Button if there’s any incorrect condition. Click on the Save Button to create a segment if all conditions are correct.
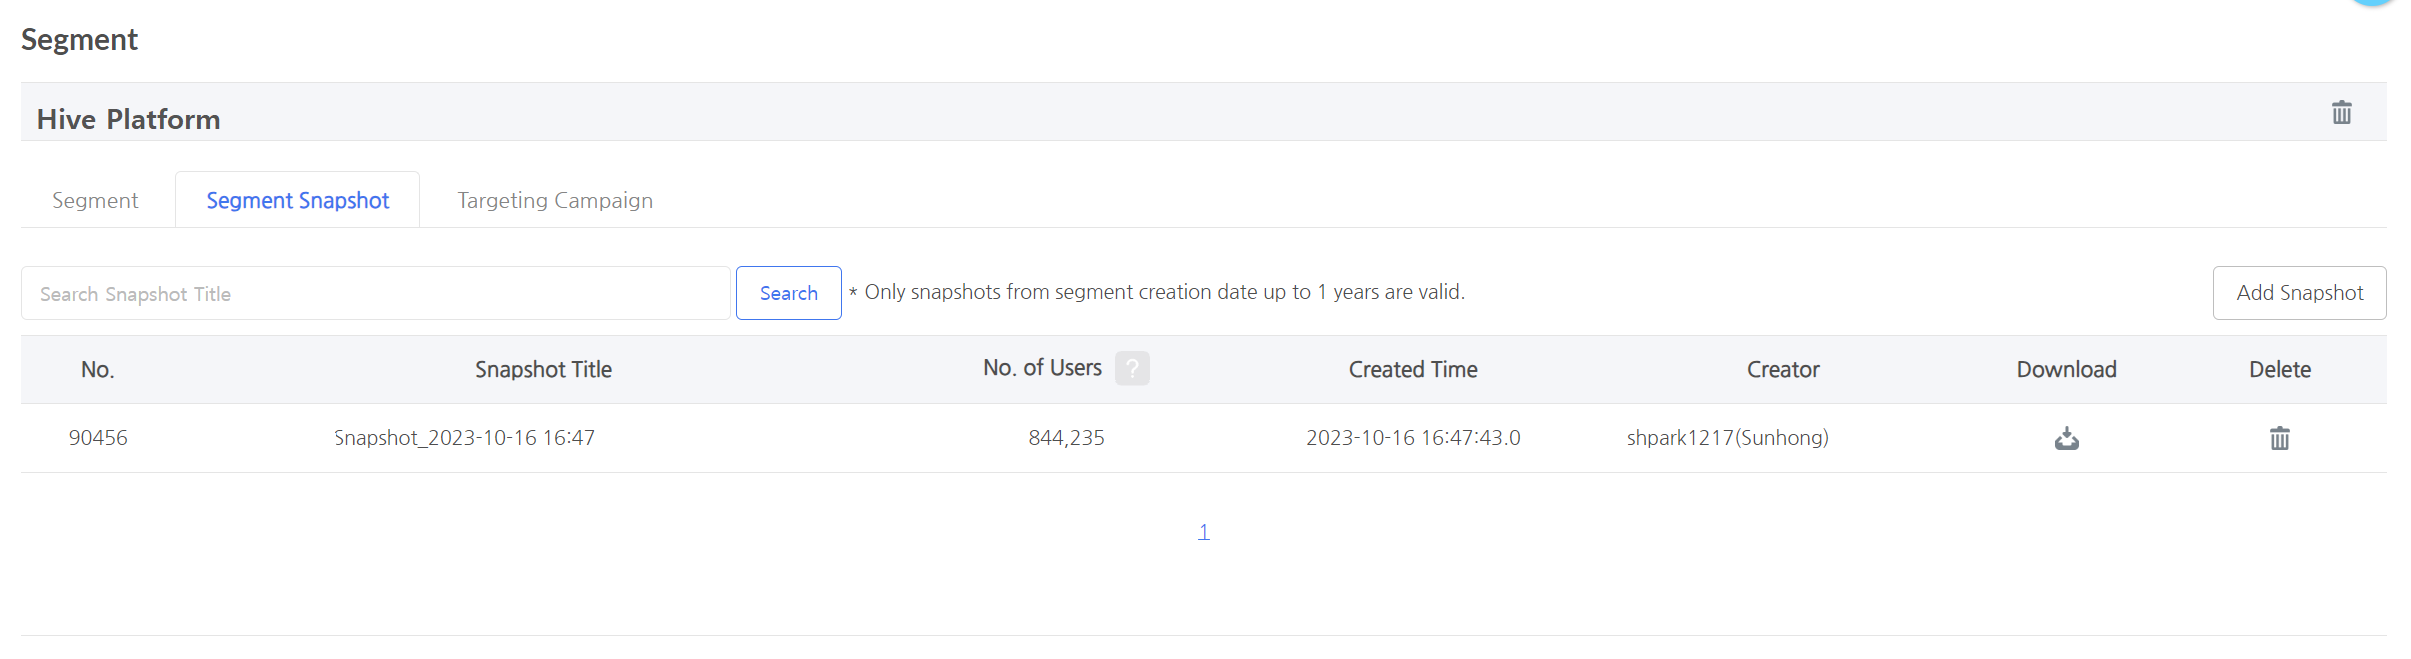
Snapshot
- A snapshot refers to the list of users that have been actually extracted according to the condition of the segment.
- Both the snapshot added via the Add Snapshot Button and the snapshot automatically created with the targeting campaign will be exposed on the list.
- The created snapshots can be downloaded as a CSV file. Downloaded snapshots will include vid, uid, did and appid info.
- Backoffice Route: Analytics > Segment > Select Game > Select Segment Title > Segment Snapshot Tab
Creating a Snapshot
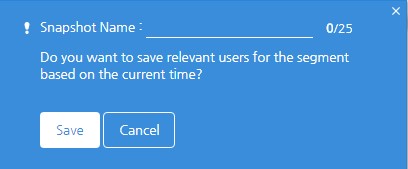
- You’ll see a pop-up window as follows when you click on the Add Snapshot Button from the Snapshot List; and you can enter the title and add it to the Snapshot List.
- Added snapshot will extract automatically in real-time and the number of extracted users will be displayed on the list once the extraction is complete.
- Snapshots created with targeting campaigns will also be saved to the snapshot list.
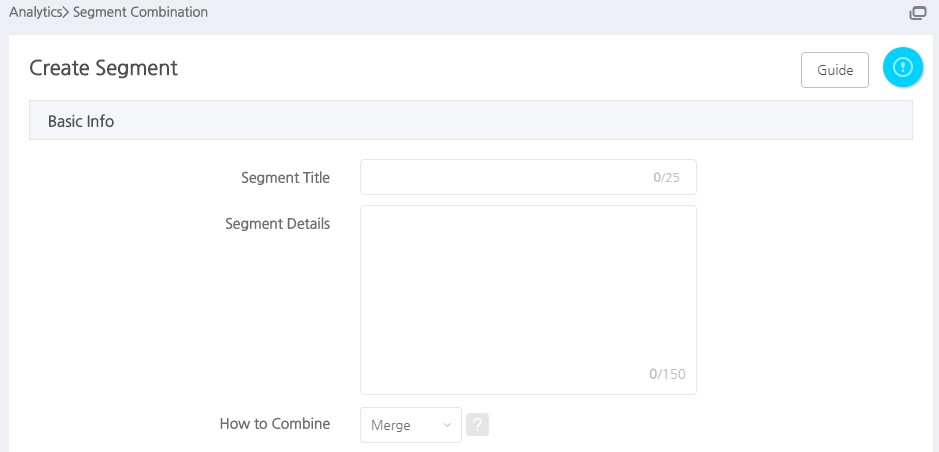
Segment Combination
- Segment combination is a feature where you can combine two segments or snapshots to create a new snapshot.
- You can use the new snapshot created via combination to proceed with the targeting campaign or download it as a CSV file.
- When proceeding with the targeting campaign with the new snapshot, the targeting campaign will be held with the game that corresponds to A (base game).
- Combination Mechanism: Snapshots that correspond to two segments (A, B) are extracted and combined. Therefore, the segment created via combination doesn’t have a condition and only a snapshot created from the segment exists.
- Backoffice Route: Analytics > Segment Combination
Combining a Segment
- How to Combine
- Ways of combination: Click on the [?] Button and the details will be exposed on a separate pop-up window.
- Segment combination within the same game: Combine segment users with the user identifier (uid or vid) that the corresponding game uses.
- Segment combination between different games: Combination will proceed according to uid. Thus, guest users of “B” won’t be included for combinations proceeded in “merge” or “cross” methods.
- Select a standard for combining segments. Base game is required to proceed with combination and the base game will be set as a target game when proceeding with the targeting campaign.
- Merge: The two segments, A and B, will be summed together to be extracted.
- Cross: Only the common users of both segments will be extracted.
- Subtract: Exclude users from B from the base game, A, and extract.
- 2) Creating a Segment
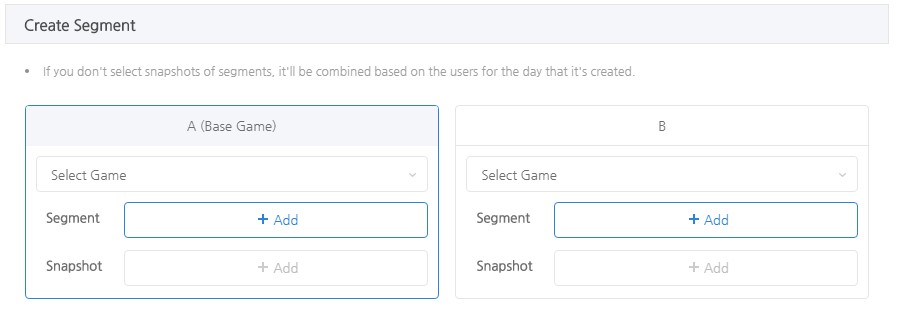
- Select Game: Select a game you want to combine. Only the games you have permission for will be exposed.
- Select Segment: Click on this button and the segment created in the corresponding game will be exposed. Select a segment of your choice.
- Select Snapshot (Optional): If you select a snapshot, combination will proceed based on the corresponding snapshot’s users. It’s not a requirement and combination will start by creating a snapshot corresponding to the segment selected at the time of executing the combination.
- Select both A (Base Game) and B, click the Create Button and the combination will be completed.