Funnel analysis is a function that determines how many users progress or exit from the start section of each funnel to the destination section. Using funnel analysis, you may determine which section of the game has the most users leaving and whether the target section has been met.
- Console path: Analytics > Funnel > New Version
Differences from previous funnels
- Custom section provided
- The user custom selects the identifier used between sections
- Existing identifiers: vid, uid, did, analyticsId > Limited provision
- New identifiers: vid, uid, did, playerId, analyticsId, user-defined custom fields
- Provides section setting value conditions
- Existing conditions: same
- New conditions: equal, different, more than, less than, between, included, not included
- Apply segments or snapshots to each section
- Existing: 1 Section
- Currently: Up to 15 Section (maximum number of sections created)
- The user custom selects the identifier used between sections
- Expand funnel graph types
- Existing: table chart
- New: Tables, Lines, Funnels, Bar Charts
- Usability improvements
- Previously, only new users or segments were provided as reference users, but in the new version, the first section serves as the reference user, allowing users to custom apply the reference user.
- Enhanced design through UI improvements
- Provides previous step comparison/first step comparison options
- Funnel copy function
- Fewer page conversions
Funnel Analysis Screen Guide
Funnel List
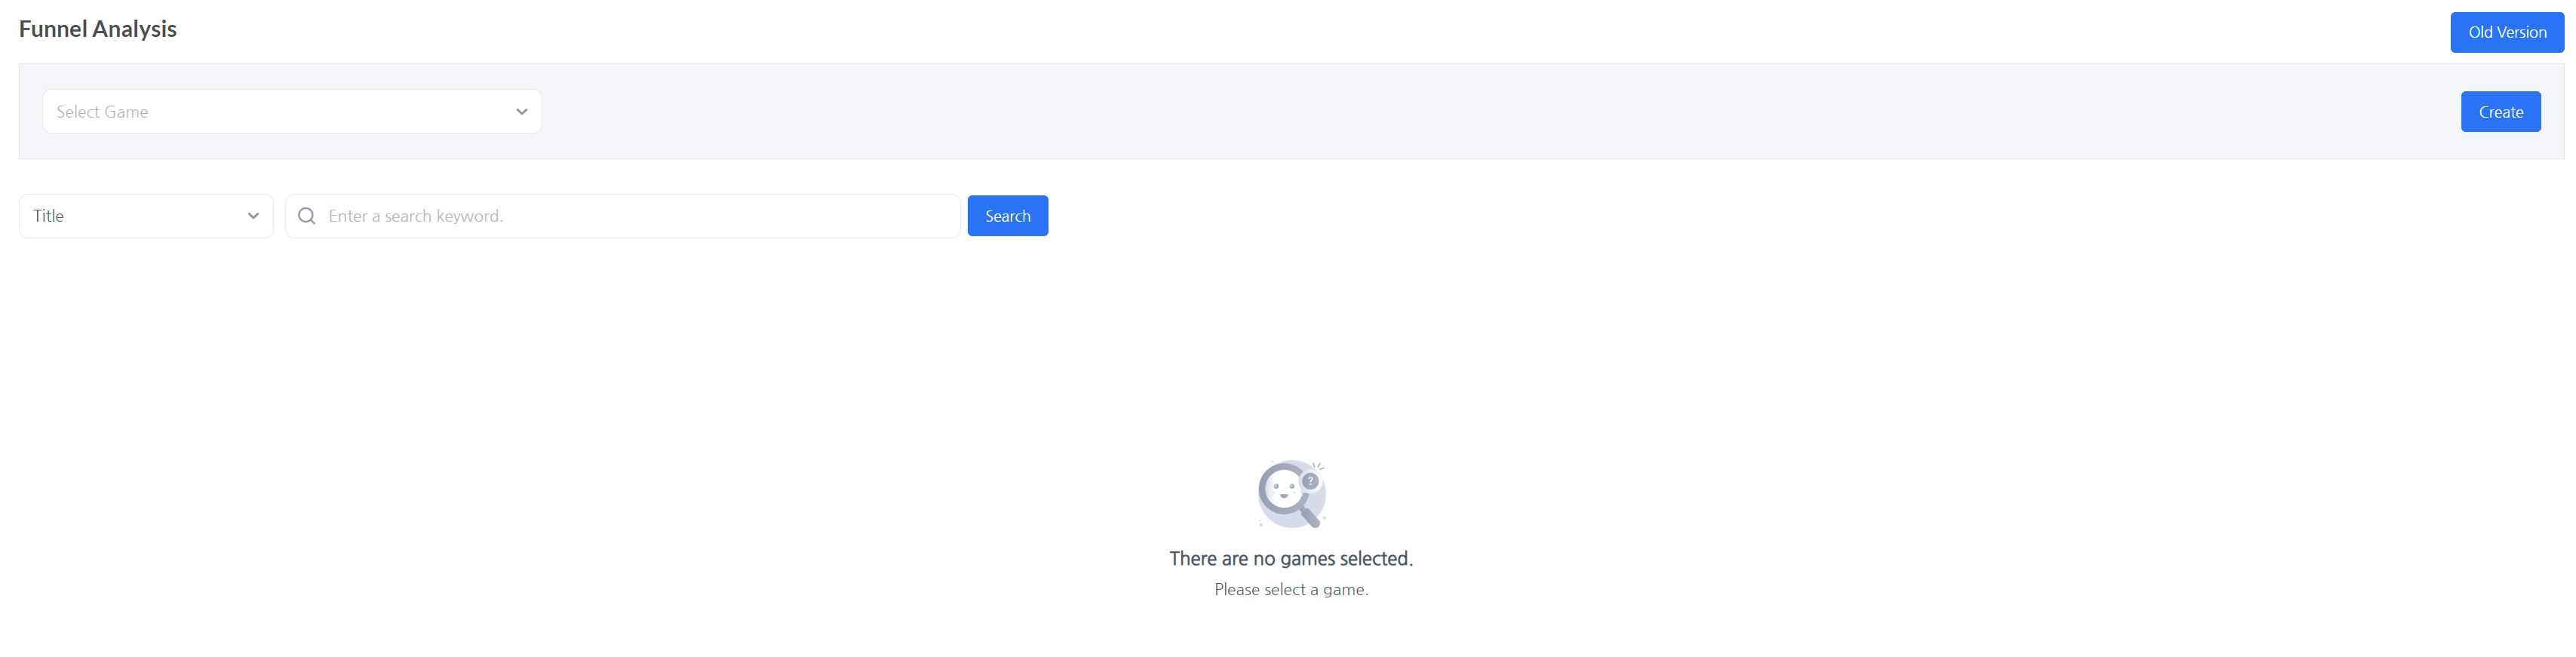
The above image shows the screen you first see when you enter the funnel.
-
To view or create a funnel, you must first select a game. Select a game to view and create funnels for that game.
-
You can only view games for which you have console permissions. You must first request permission to access a game that is not displayed.
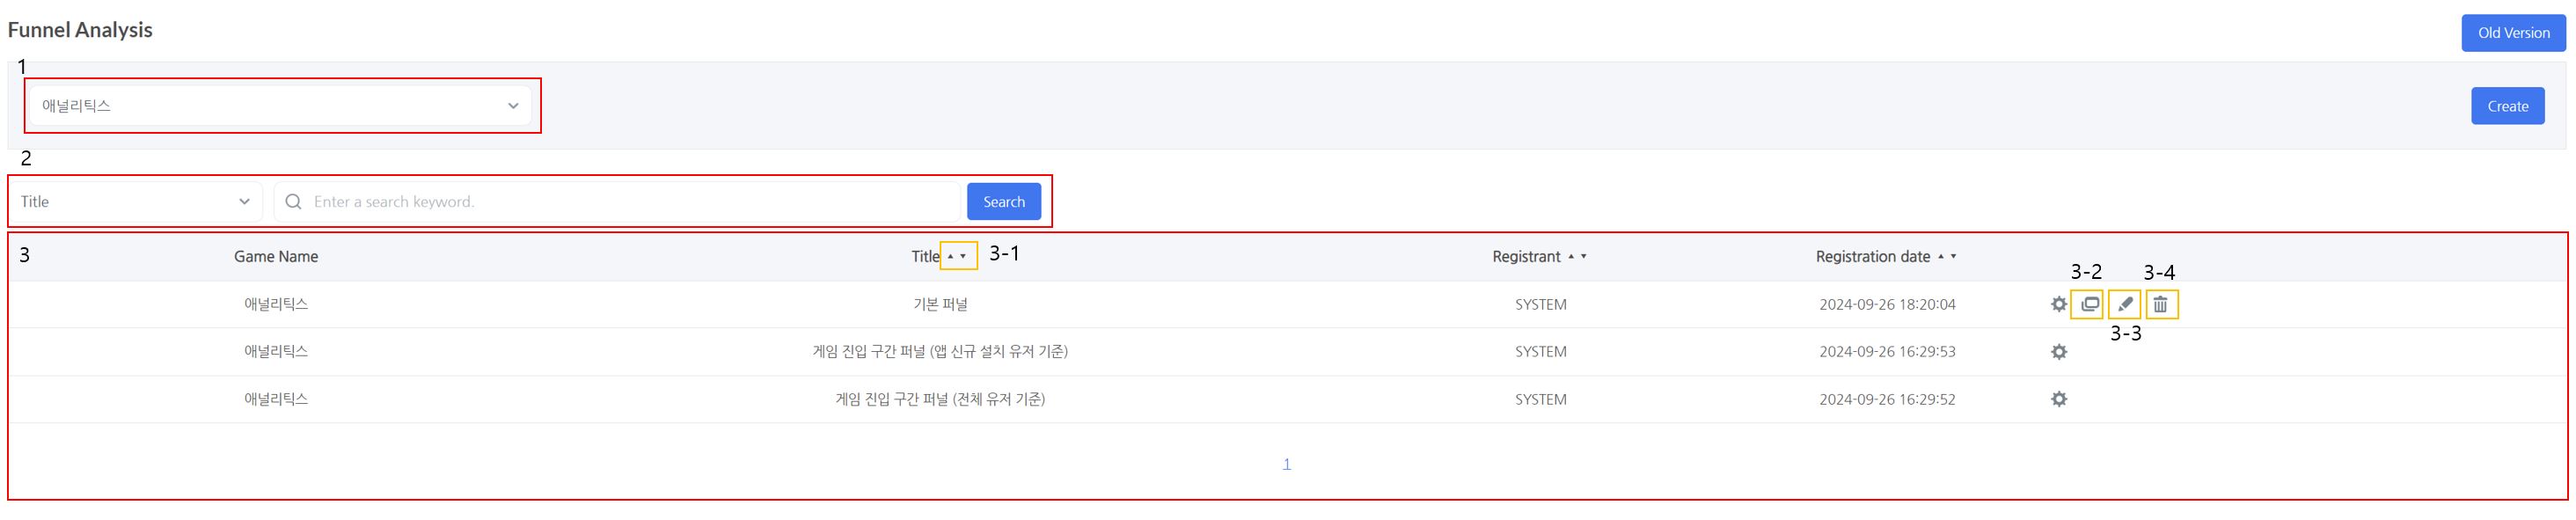
This is the screen when you select a game.
- The selected game is displayed.
- You can search for funnels by searching for the funnel title and registrant.
- This is a list of searched funnels.
-
Sort by clicking the icons next to the title, registrant, and creation date. Default sorting order: Sorted in descending order by creation date. Funnels marked as favorites are displayed first.
-
Copy: This is a function that copies the target funnel.
-
Modify: You will be directed to a page where you may alter the target funnel. This function is only available to funnel registrants and users with owner/admin permissions.
(Only users with owner/admin access are permitted to modify the game entry section funnel. To change the game entry section funnel, use the copy function.)
-
-
Delete: This function deletes the target funnel. It is only available to funnel registrants and users with owner/admin permissions.
(The game entry section funnel cannot be deleted.)
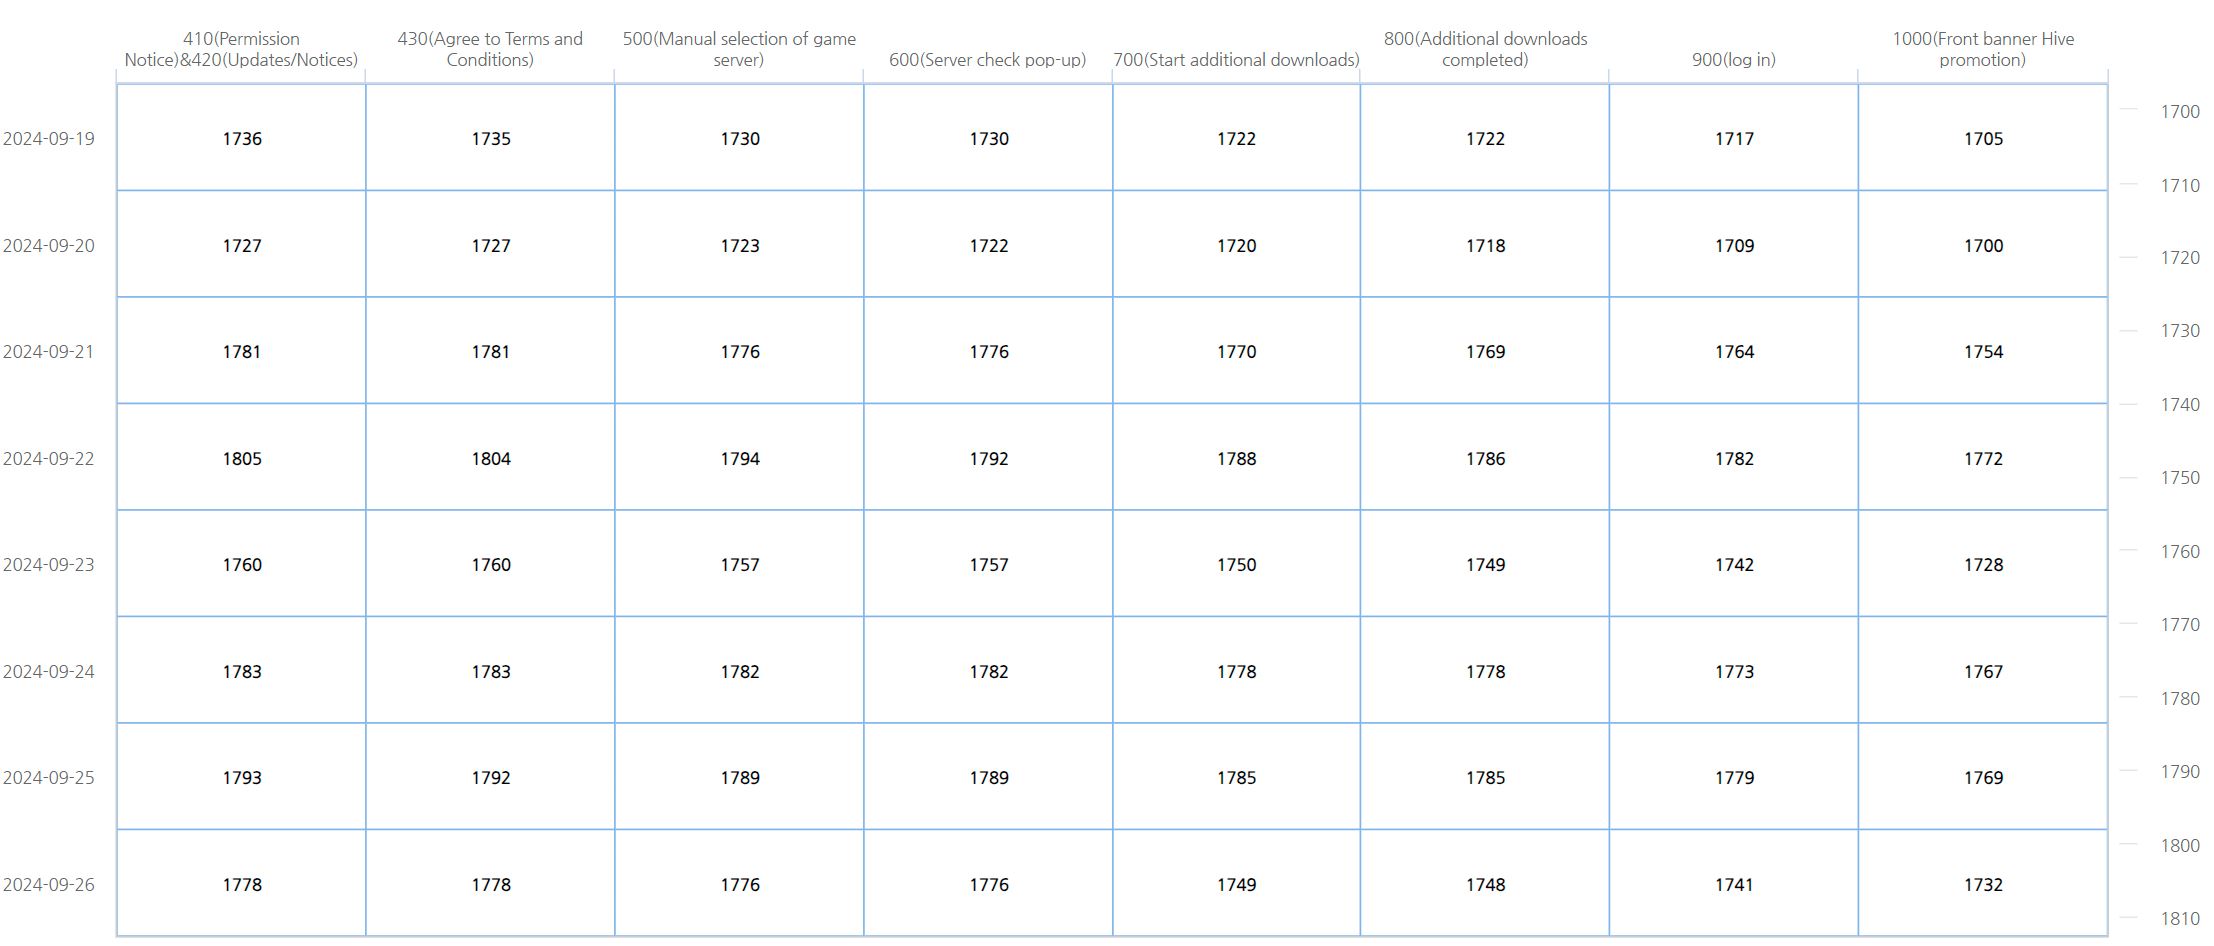
Game entry section funnel: Game execution – up to the lobby
-
The game entry section funnel displays the retention rate for the section from the moment the user runs the game until they arrive at the game lobby.
-
If you use SDK version 4.11.0 or later, the funnel up to the Hive front banner promotion (1000) is included by default.
-
You can check the retention rate for sections other than those specified by sending them from 10000 to 19999 via the client log transmission function, copying the game entry section funnel, and adding the section.
-
-
The created funnel’s section order can be changed using the edit button on the funnel list page or the viewing page.

-
Entry Section Value List
-
It is defined in accordance with the Hive linkage guidelines. Since the entry order varies for each game, you must adjust the section order in the Hive console to match the game.
-
The Hive SDK automatically collects values from the game entry section value list and applies them to the funnel.
-
Sections with no data in the search period are automatically processed as invisible.
-
To send logs for additional downloads started (700) or completed (800) and user-defined sections (10000 – 19999), the game requires a log transmission job via the client log transmission function.
-
|
Category
|
Entry Section Value
|
Explain
|
|
Predefined Section
|
400 |
A new app installation user. When the app is first installed or reinstalled after removing it.
|
| 401 |
Hive SDK Reset Starting Point
|
|
| 420 |
Update/Notice Popup
|
|
| 430 |
Terms of service agreement
|
|
| 500 |
Select game server (manually)
|
|
| 600 |
Server maintenace pop-up
|
|
| 700 |
Additional download start
|
|
| 800 |
Additional download complete
|
|
| 900 |
Login
|
|
| 1000 |
Interstitial banner Hive Promotion
|
|
|
User-defined Section
|
10000 – 19999
|
Game-defined Section
|
Funnel Creation
Funnel creation is possible by utilizing the default logs, the logs sent from the game, and the created segments. If you want to create a funnel using logs sent from the game, prior preparation for defining and sending logs is required. For more information on log definition and transmission, click here.
Funnel Creation Notes
-
When setting up a funnel section, logs must be organized in the order in which they were generated. For example, if section 1 occurs at 10 o’clock on 9/10, section 2 does not include logs before 10 o’clock on 9/10, but only logs that occur after 10 o’clock on 9/10 are included.
-
You can configure a maximum of 15 stages for the funnel.
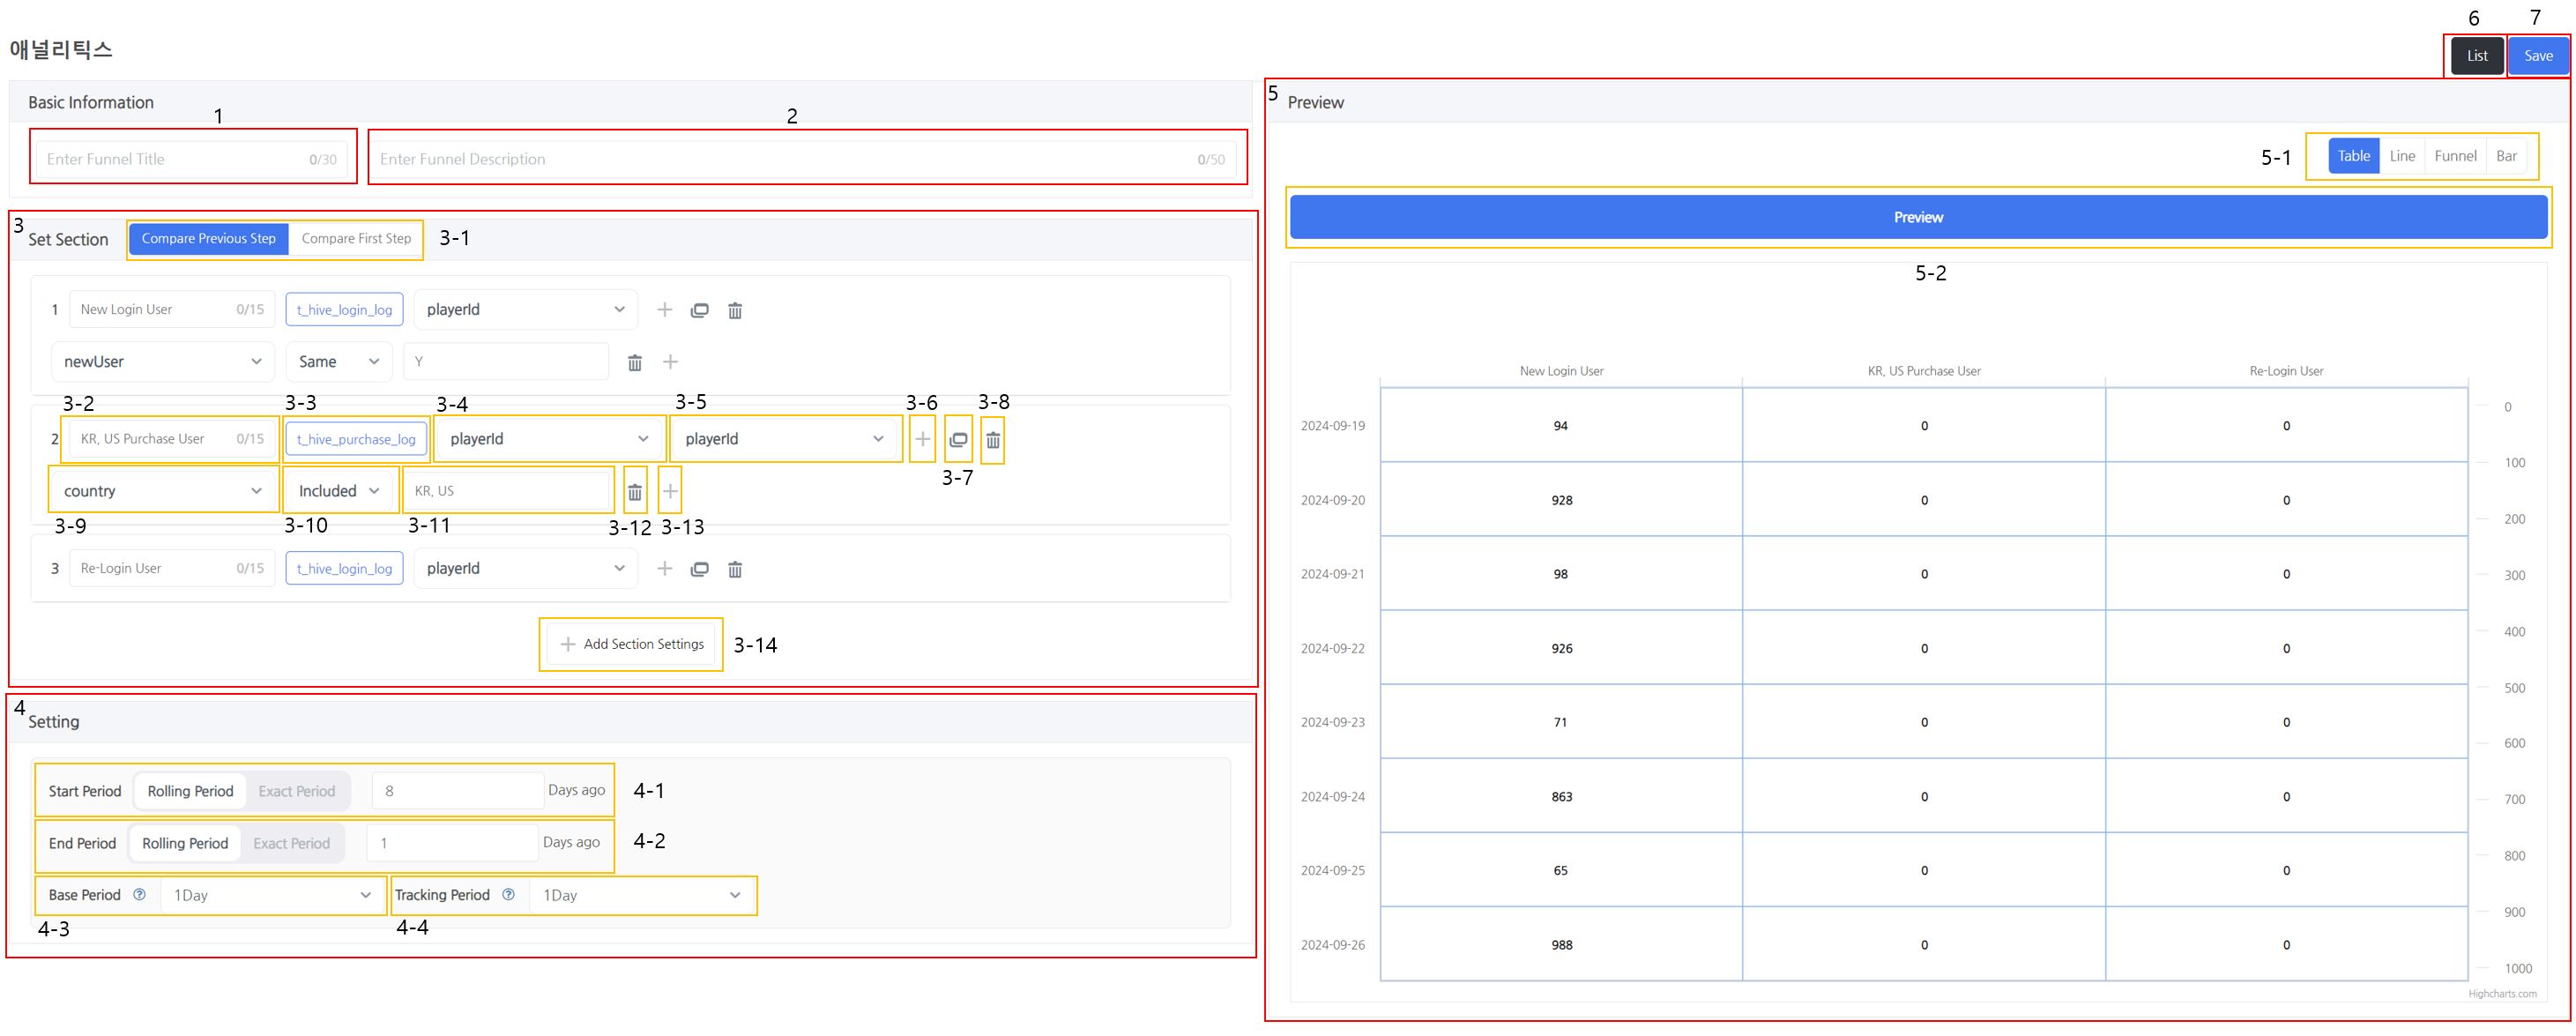
- Enter the funnel’s title. This field is required.
- Enter the funnel’s description. This field is required.
- This is the area where the funnel sections are set.
- Determines the comparative relationship between sections.
- Previous step comparison: This is a comparison method that displays the ratio of users who arrived at the present section depending on the previous step in the section. It is helpful to check the entire user retention or churn rate from the beginning to the conclusion.
- First-step comparison: This method compares each section based on the first step. This is useful for separating users who have reached numerous sections into a single reference section.
- Set up the section’s title.
- Select a log or segment from the selected game.
- Log: Refers to the table defined under Console > Analytics > Log Definition, or the platform’s common table.
- Segment: You can select a segment that has been generated using Console > Analytics > Segment and set it as a segment. You can select a snapshot that was created while selecting a section.
- Select the first/previous segment comparison identifier.
- Comparative table identification item
- If a table was selected in step 3.3, you can use the related table’s field item as an identification. Items are displayed for playerId, did, uid, and analyticsId, as well as table-included and user-defined fields.
- If a segment was selected in step 3.3, you can use vid, uid, or did as identifiers.
- If the prior step comparison was set in step 3.1, this is where you can select the identification to use when comparing to the previous section.
- If the first step comparison was set in step 3.1, this section allows you to select the identification to compare to the first section.
- Comparative table identification item
- Choose an identifier to compare to the next section
- This is only displayed if the previous step comparison method is used to compare the intervals selected in step 3.1.
- Select the identifier to use when comparing to the intervals listed below in this section.
- Create a place for inserting section conditions. However, if a segment is selected in step 3.3, fields cannot be added. If interval requirements are not required, they should not be added.
- Copy the information entered in the corresponding interval and create a new interval in the last section.
- Delete this section.
- Select the field to be used as a condition for the related section. The field items from the table selected in step 3.3 are displayed.
- Select a conditional phrase for the selected field item.
- Equal: Only when the value matches the section value entered is the item selected as the field considered to be a section.
- Different: Only when the value differs from the section value entered is the item selected as the field considered to be a section.
- Or Above: The item selected as the field is only considered a section if its value is greater than the section value entered. However, this option is only available if the object selected as the field is of the numeric type.
- Or Less: The item selected as the field is only considered a section if its value is less than the section value entered. However, this option is only available if the object selected as the field is of the numeric type.
- Between: Two section-value input fields appear. Only when the value falls between the entered section values does the item selected as the field qualify as a section. However, this option is only available if the object selected as the field is of the numeric type.
- Included: The value of the item selected as the field is only considered a section if it is the same as at least one of the section values entered. You must enter section values separated by ‘,’.
- Not Included: Only when the value does not correlate to any of the entered section values is the item selected as the field judged as a section. This is essential. Please enter section values separated by ‘,’.
- Delete the area where you enter the conditions for the section.
- Add an area where you enter the conditions for the section.
- Add a section input area with no input values.
- Determines the comparative relationship between sections.
- Configure the start, end, reference, and tracking periods for the funnel.
- Start Period: Sets the start date of the period for funnel viewing. The start date cannot be set later than the end date.
- Dynamic Period: Sets the start period by converting the specified number of days prior to the current date when viewing the funnel.
- Fixed Period: Sets the start date selected from the calendar as a fixed start period.
- End Period: Sets the end date of the period for funnel viewing. The end date cannot be set earlier than the start date.
- Dynamic Period: Sets the end period by converting the specified number of days prior to the current date when viewing the funnel.
- Fixed Period: Sets the end date selected from the calendar as a fixed end period.
-
Reference Period: Only displayed when specified for a table or line graph. Groups the viewing period by the reference period, allowing comparison of each segment.Set the period to extract the users for the reference. If you select 1 day, the reference users are set on a daily basis. If you select 2 days, the reference users are set for two-day intervals. If the last segment of the reference period exceeds the end date of the viewing period, the reference users for that segment will only include users until the end of the viewing period. (Example: If the viewing period is January 1st to January 5th and the reference period is set to 3 days, the first reference segment will be from January 1st to January 3rd, and the second reference segment will be from January 4th to January 5th (since January 6th exceeds the viewing period), displaying the reference user numbers for those periods.)
-
Tracking Period: Only displayed when specified for a table or line graph. Compares the segments of the groups divided by the reference period based on the tracking period.Sets the period to track the time it takes to reach a goal. If you select 1 day, the data for the first day new users entered is displayed. If you select 2 days, data up to the following day is displayed. If the set tracking period is in the future, only the data up to the current time will be shown. The time zone is KST. (Example: If the viewing period is from January 1st to January 5th and the tracking period is set to 10 days, data for new users from January 1st will be shown up to January 10th, and for new users from January 2nd, data will be shown up to January 11th.)
- Start Period: Sets the start date of the period for funnel viewing. The start date cannot be set later than the end date.
- This area allows you to preview the funnel chart.
- Funnel Preview Graph Options
- Table: Displays the achievement/non-achievement status for each tracking period segment in numbers and percentages based on the reference period groups.
- Line: Displays the achievement/non-achievement status of all segments as a percentage over time.
- Funnel: Displays the achievement/non-achievement status by segment as a vertical percentage graph.
- Bar: Displays the achievement/non-achievement status by segment as a horizontal percentage graph.
- You can preview the funnel based on the entered segment settings and the generated funnel.
- Funnel Preview Graph Options
- Moves to the funnel list page with the currently selected game displayed.
- Saves the funnel and moves to the funnel viewing page.
Reference
-
Recommended Funnels
-
Level Funnel : Creates a funnel based on user levels. You can create a funnel that increases sequentially from level 2, helping to identify which levels new users reach and where the most drop-offs occur.
-
Stage Funnel : By creating a funnel for each stage, you can easily check if the balance is appropriate for each stage. After analyzing where most users drop off, you can adjust the difficulty level or introduce other growth elements to retain users.
-
Tutorial Funnel: The tutorial, being the game’s first impression, is crucial content. If many users drop off during the tutorial, it might need to be revised.
-
Besides these, if the logs are properly defined, funnels can be created for various content such as acquiring specific items or characters, obtaining runes with +10 enhancement, etc. You can also combine various content, like setting both user level and stage in one funnel.
-
Edit Funnel
The funnel creation screen and its functions are the same, allowing you to modify previously created settings.
Funnel Views
You can view the created funnel, and settings changed on the view page will not be saved.
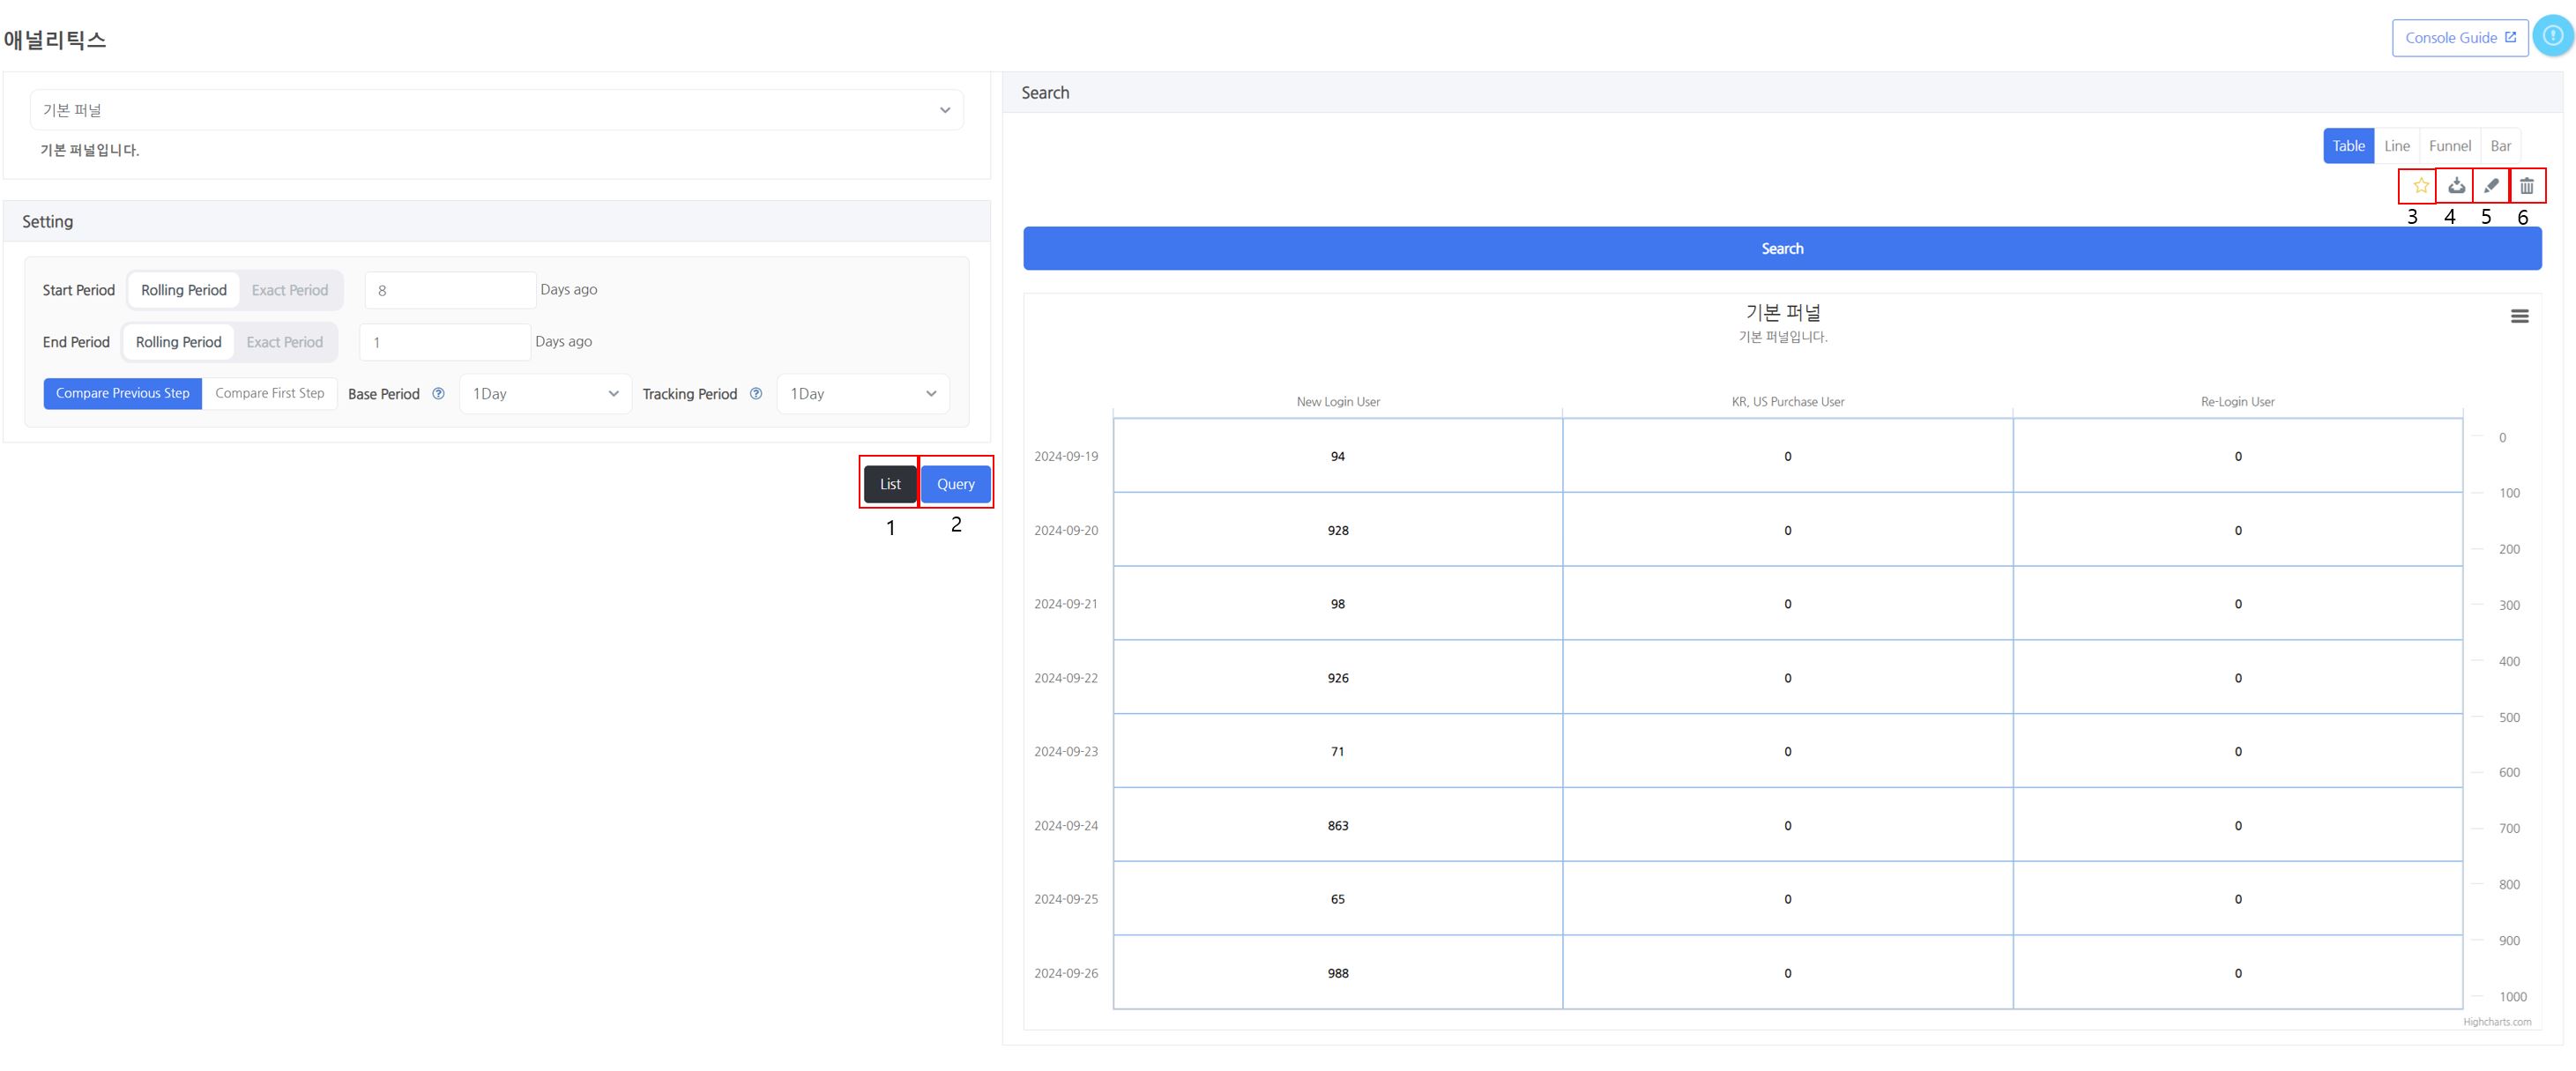
- Moves to the funnel list page with the currently selected game displayed.
- You can check the SQL query generated from the set funnel values.
- Favorites: Marks the funnel to prioritize its display on the funnel list page.
- Download: Exports the chart or downloads the CSV file.
- Modify: You will be directed to a page where you may alter the target funnel. This function is only available to funnel registrants and users with owner/admin permissions.
(Only users with owner/admin access are permitted to modify the game entry section funnel. To change the game entry section funnel, use the copy function.) - Delete: This function deletes the target funnel. It is only available to funnel registrants and users with owner/admin permissions.
(The game entry section funnel cannot be deleted.) - Save Image: Choose to save the image as PNG, JPEG, PDF, or SVG vector.