This is how you can use the Hive Console product management menu. Please connect to Hive Console (http://console.withhive.com) and log in first.
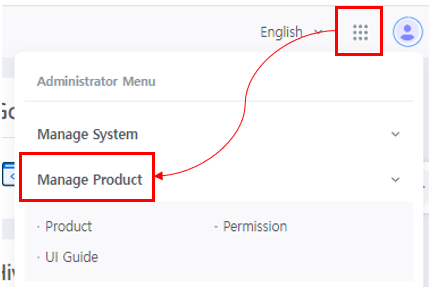
You can find the manager menu button for the product management in the location below.
Company management
The menu is accessible only by the system manager and you can set up company settings and access authority of the data per company for console users.
Access authority
This is the authority settings page for accessing the data of the registered company. Depending on the company you belong to, data that can be accessed by default will be checked. If you need access to another company’s data, the system manager can grant access to it with a request.
You can search for users by entering their name or department name. Searching with ID is not supported.
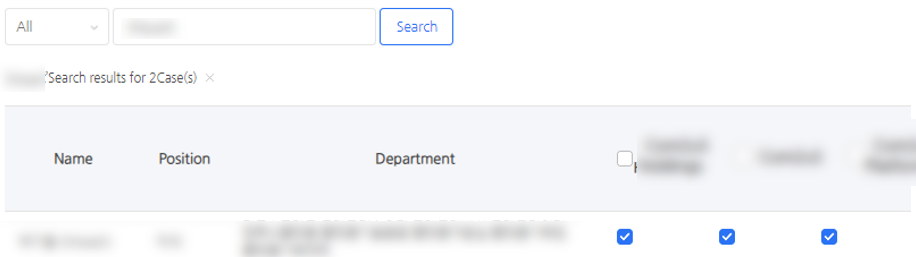
After searching, you can select or deselect the check box for each company to grant or remove data access. The user will have access to the information of the checked company and will be able to select the company from the upper right company value selection combo box.
Manager settings
This menu is accessible only to system manager. You can specify managers for each role of system / product / authority. There are three ways to add managers: Add with a file, Add with name search, Add with department search.
Adding with a file
If the number of managers to add is too large to add manually, you can upload them in batches through the specified file format. Click on the file form button on the right side of the input form to download the form, and follow the guide to enter the user to add and upload.
Adding with name
You can add a managers by searching the name of the member of the company. If you search for a name, you can automatically find the presence of a member and the information when a user is registered in groupware. If the group member you want to add is correct, you can click the search result area to add the member to the group member list.
Adding with department search
Managers can be added to a group in bulk by searching with department names. If you enter text (ex. Business), the text you entered automatically searches all department names included in the organizational chart. If you enter larger department names, there will be many sub-departments, which can increase the number of search results. When you select a search result, all the subordinates in that department and any future departmental staff (such as new employees) will be automatically added to the group.
When adding managers by department, only certain positions of that department can be added as a manager. For example, if you select manager as the position after selecting Platform> Platform Planning Team, only the managers of the team will be added to the group.
Please note that only the people of the selected position will be added when you use the position filter. Make sure to select the positions manually if you want to add people of other positions.
Deleting registered manager
If the manager was registered through name search, you can cancel the manager privileges by using the delete button on the right side. If the manager was registered through department search, you cannot delete the manager. Please remove the department settings and search the users that need to authority to register.
Menu management
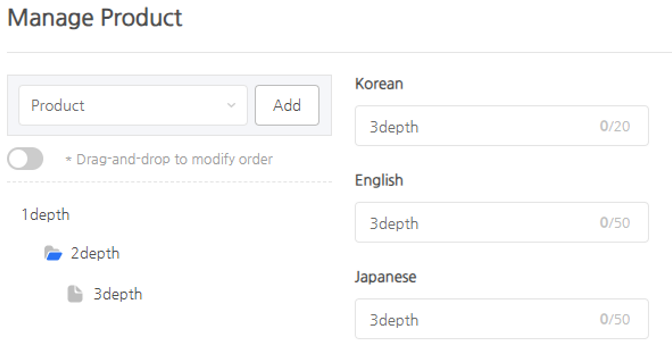
The menu is divided into 3 types: Product (1depth), Category (2depth), and Page (3depth). You can create only up to 3depth including the product for the menu.
Product is the highest depth that distinguishes products and it can be registered by the system administrator.
Categories can be created by product managers under the product which is created by the system administrator.
Pages can be created by product managers. Users can perform the duty themselves or place pages under the Category or under the product without any Categories depending on the characteristics of the Page.
Creating Product
If you click the Add Button after selecting the product, “product” will be added to the product list at the bottom. Please select the newly added menu, change the name to the product name, and register the icon.
Only JPG/PNG files (80*40, 5KB or below) can be registered. Please contact the Platform Department, Platform Planning Team, Platform Design Part (PP_DN@gamevilcom2us.com) for questions regarding the icon.
Creating Categories
If you add a Category while a product is selected, the Category will be created under the selected product. Please select the Category you created to rename it. Make sure to enter both Korean and English Category names.
Creating Pages
If you add a Page while a Category/product is selected, the Page will be created under the selected Category/product. Please enter the Page name and the link address, and check the company to expose the Page to and whether you want to give permission to handle the privacy policy. Make sure to enter both Korean and English Page names.
Make sure not to check the Management Permission for test/sandbox servers when you add menus.
Basics of the Menu Management
To move the menu, please turn on the toggle button with Drag-n-drop to change order On/Off located right below the add menu UI. You can change the order of the menu only when this button is turned on. After you’ve changed the menu order, click the Save Order Button on the top to save changes. The default value of the toggle button is OFF to prevent mistakes during use.
Permission management
Permissions are a feature for granting detailed permissions to pages within each product. For menus with separate permissions, when you give access to a group in the console for a menu, you are given only the ‘read’ permission for that menu. You’ll be able to use all functions when the access is given for menus that do not specify any permissions. However, in the case of the menus in which the ‘read’ and ‘write’ permissions are separated, only the ‘read’ permission is given when access is granted and the ‘write’ permission is granted only through a separate permission registration menu.
Each product developer develops the function after confirming with the planning team about what permissions the product requires. In the console permission management, only the permission code is generated, and the function is executed by connecting the developed function with the generated code.
Click on the Register Permission button to select the product and enter the permission name and description. Code values are generated automatically. For development advice, please contact the PlatformServer Team PlatformServer3 Part (WD_BACKOFFICE@gamevilcom2us.com).