Publisher Group Settings
A menu where you can create a group of publisher games that are frequently used in the compensation settings when registering a cross campaign. You can register the cross campaign even if you don’t set up a media group.
- Go to the Publisher Group Settings menu and click the Add Group Button.

- Enter the publisher group name, click on the select box to add games and click Save.

Campaign Banner Registration
Full banners are the banners that are displayed first when the game starts. Normal banners are the banners that are displayed in the recommended games area of the Notice. The two types of banners differ in size and the campaign registration method is the same for both. The current guide is written based on the full banner.
Basic Settings
- Click on the Promotion-> Campaign Settings.
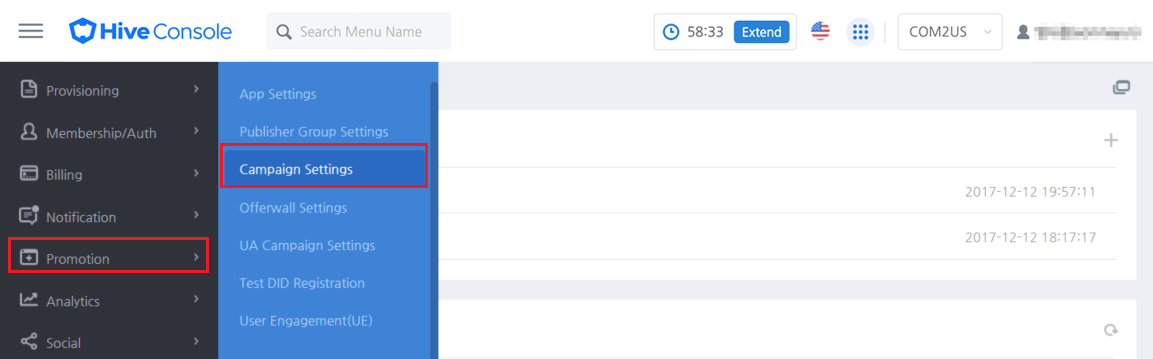
- Click on the Registration Button in the Cross Full Banner Tab.

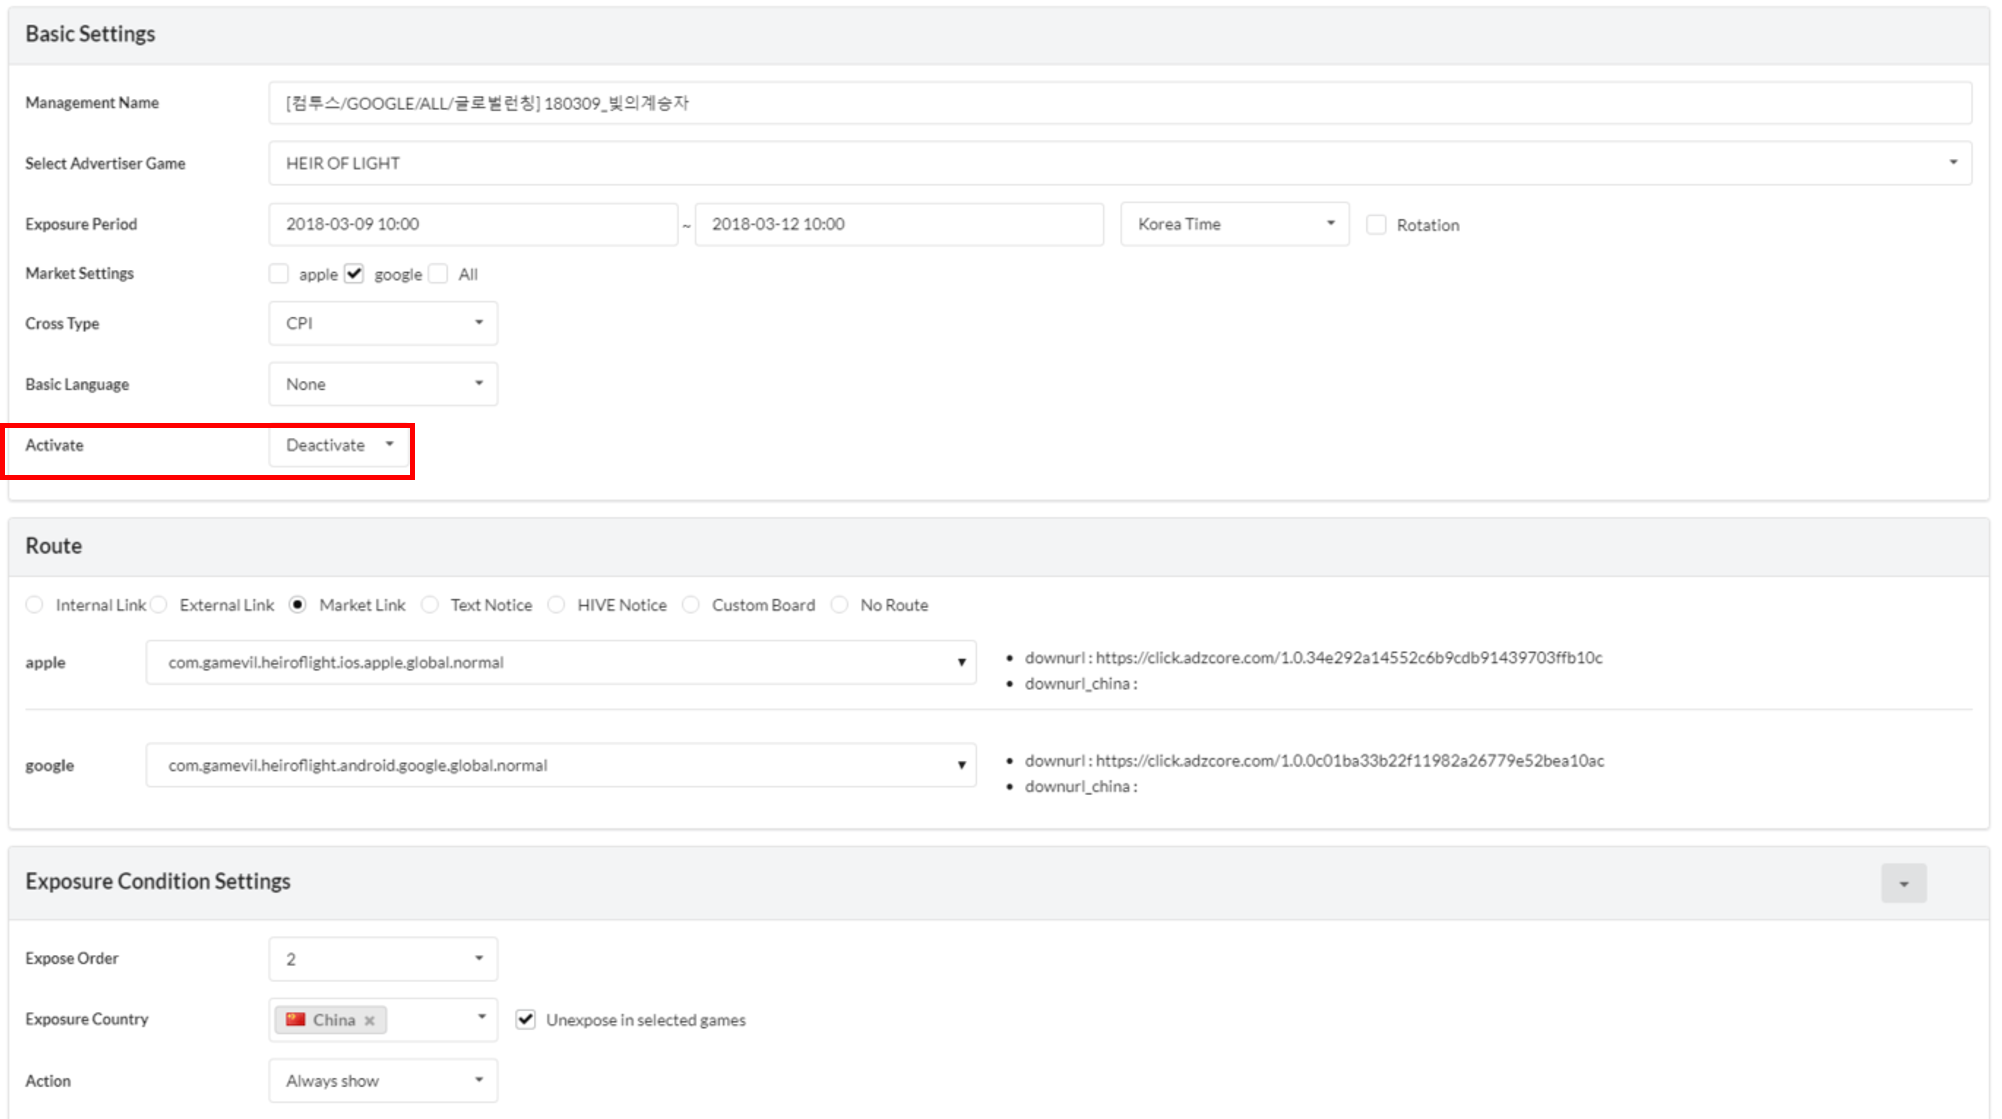
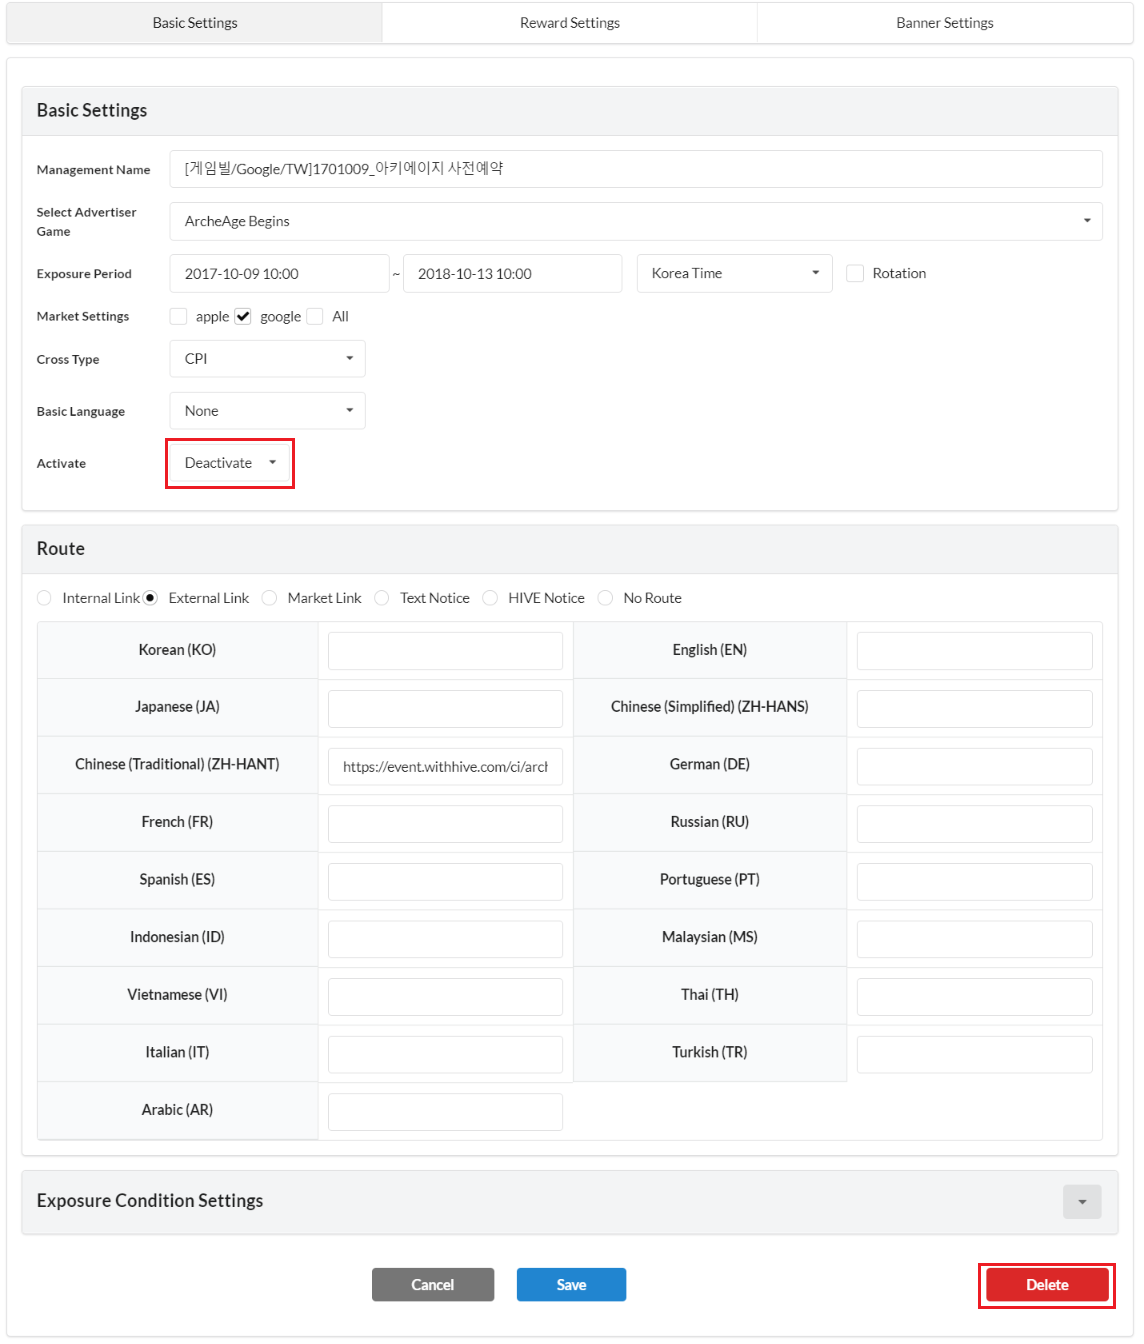
- Enter the campaign info on Basic Settings

- Management Name : Enter a title that describes the campaign.
- Select Game: The market where the relevant game is exposed will be shown automatically when you select an advertiser game.
- Exposure Period : Choose how long you want the banner to be exposed. You can set the period for each server if you’ve registered the server info at App Settings.
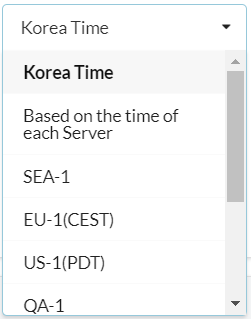 ←Example of a Server Option
- Korea Time: The campaign period will be exposed based on KST.
- Time per Server: The campaign period will be exposed based on the standard time of each server.
- A particular server: The selected server becomes the reference time. If you select a US-1 Server, the campaign period will be set based on this server time. For example, if US-1 Server is set as GMT -8, and the campaign is set to start at 3pm, then the campaign will begin when the timezone of GMT -8 is at 3pm.
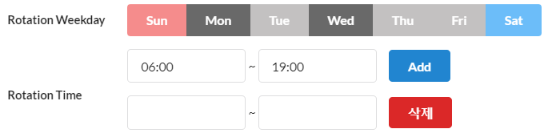
- Rotation: You can set a recurring time for a specific day of the campaign. Multiple days of the week can be selected, and recurring times can also be set in multiple intervals. For example, if you set up like the image below, it will only be displayed on every Monday and Wednesday from 6am to 7pm during the campaign period.
- Market Settings: Select a market to expose the campaign on.
- Cross Type
- CPI: Provides reward when you install and start the game.
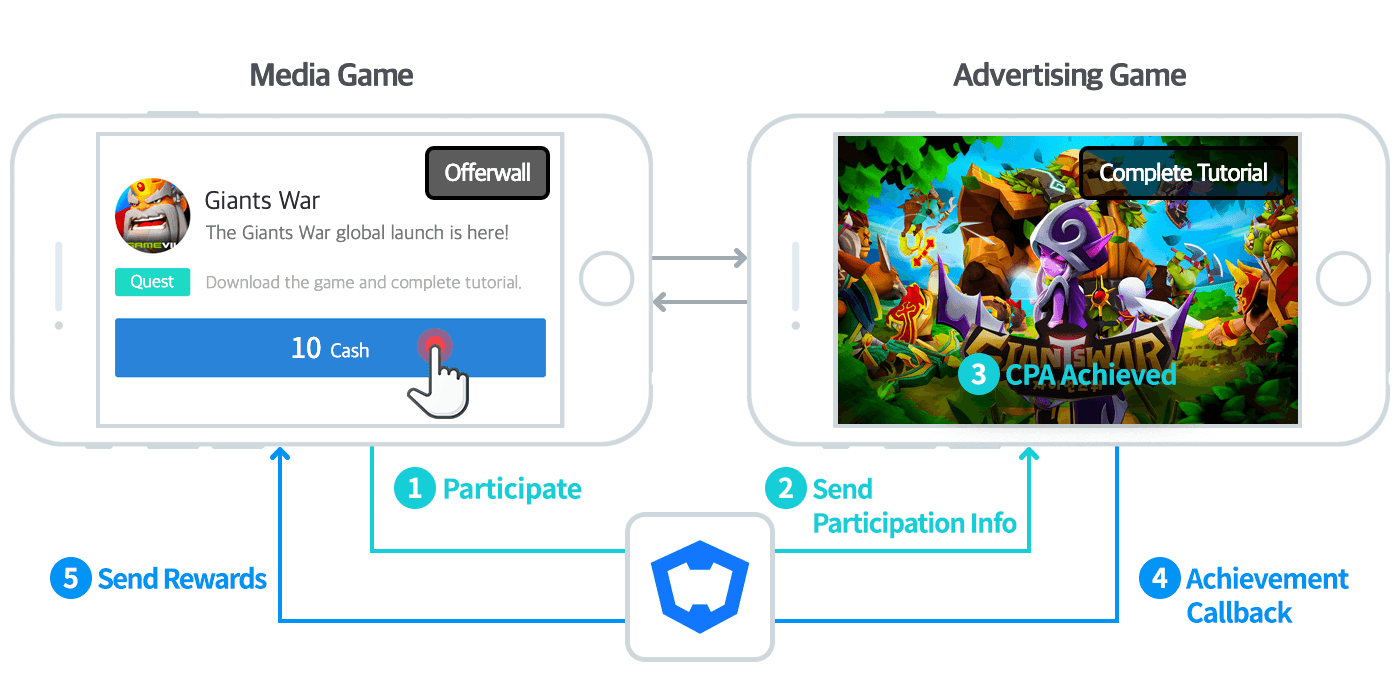
- CPA: Provides reward when you complete the achievement target. Selects a CPA code that’s registered. For more info, please refer to How to Use CPA.
- Basic Language: Select a method to use for languages which you didn’t register the banner for. Banners won’t be displayed if you select “None”. If you select one of 16 languages, the banner for the selected language will be displayed. Please refer to Basic language Settings Example for more info on the basic language.
- Activate: Decide whether to display the campaign or not.
- Activate: Save the campaign as to be displayed. If the starting time of the campaign is earlier than when it was created, it will be displayed in the game right away. If the starting time of the campaign is later than its creation time, the campaign won’t be displayed instantly but will be displayed after the starting time.
- Deactivate: Save the campaign as not to be displayed. It won’t be displayed regardless of the campaign’s starting time, and you need to change it to Activate from the campaign list or campaign modificaiton screen in order to display.
Route
Enter the route to be moved to when you click on the image banner. It won’t work even if you enter the route if you use the web banner.
- Internal/External Link
- You can enter the URL for each language and you’ll be moved to the URL of basic language if you don’t enter the language. With the internal link, you’ll be moved to the page via the browser within the game without exiting the game. With the external link, you’ll be exiting the game by using an external browser app. Please include “http” or “https” when you enter a URL. (See the following example)
- ex. https://www.withhive.com
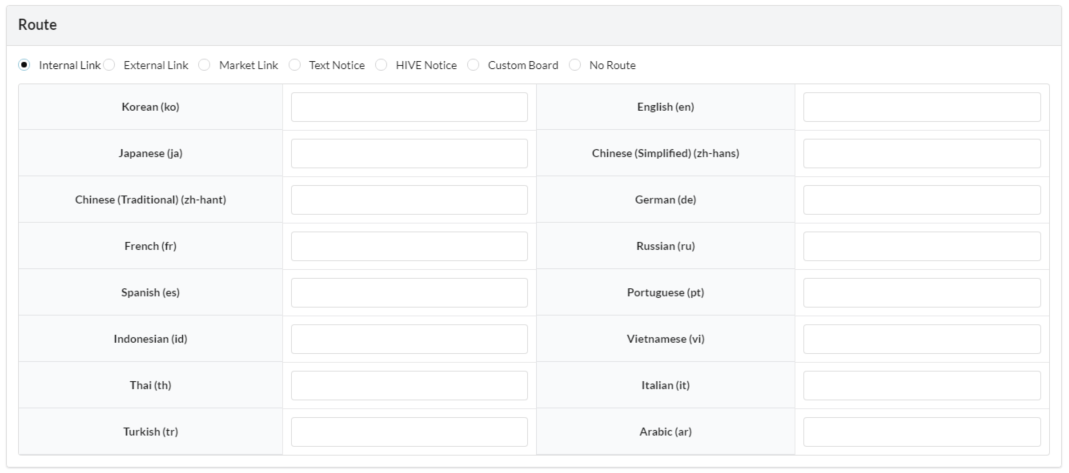
- Market LinkYou’ll be moved to the download URL registered to App Settings.

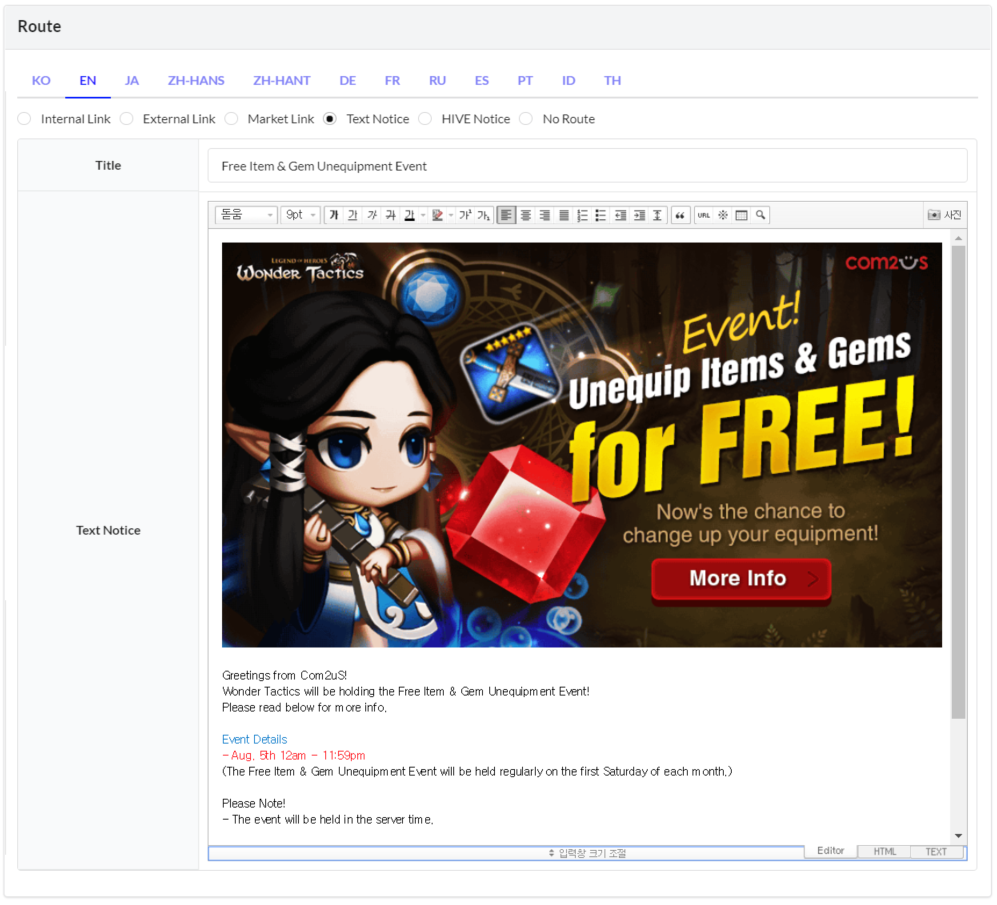
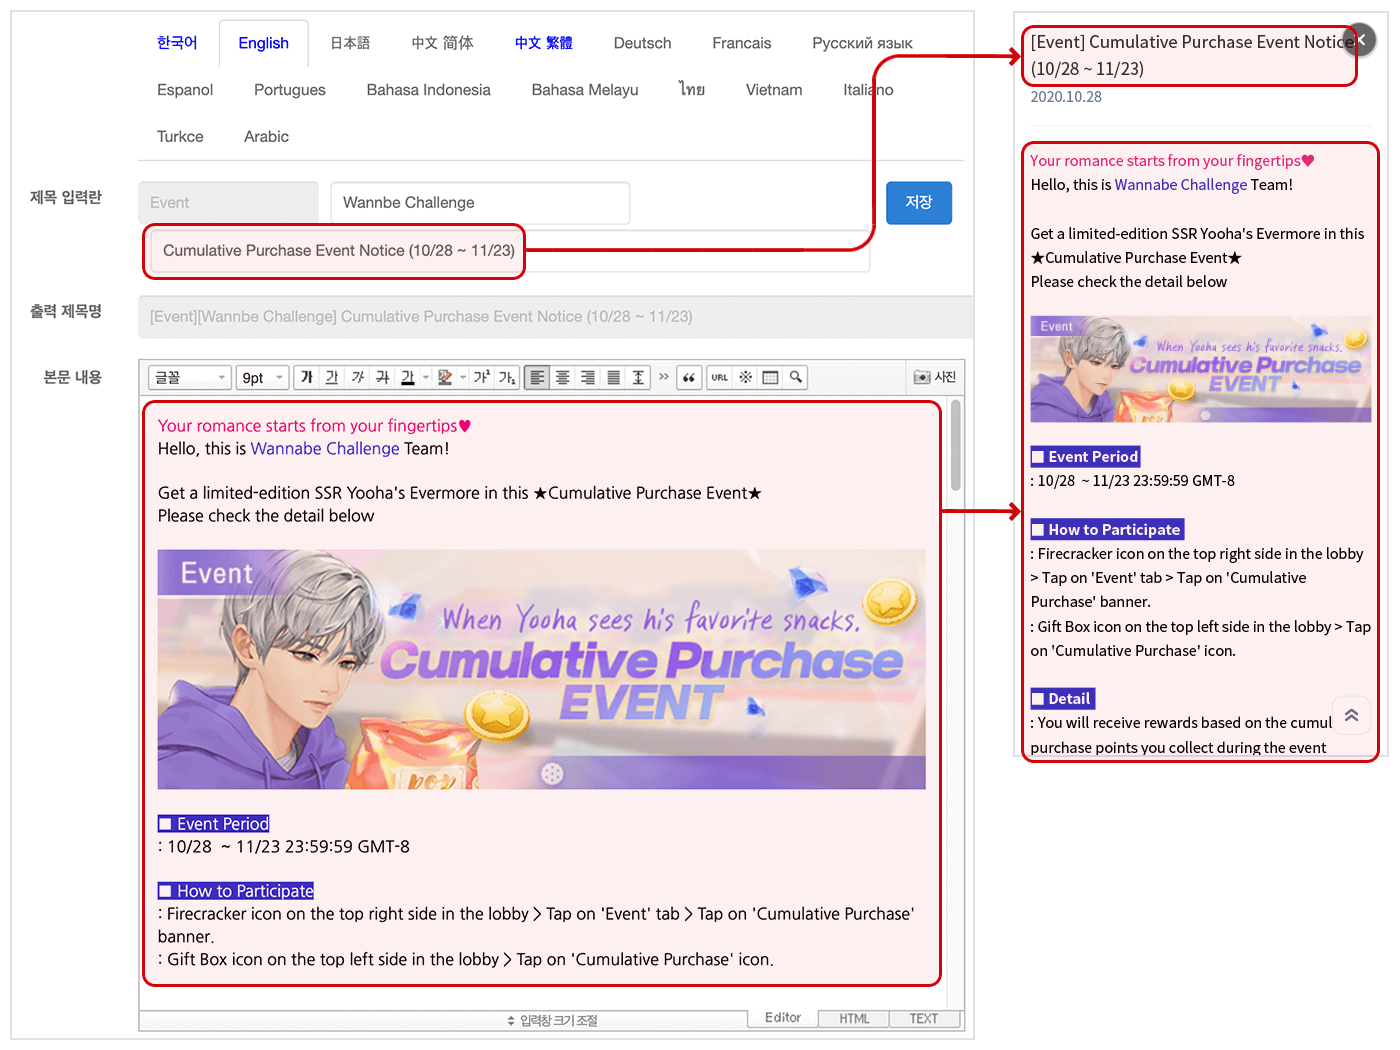
- Text NoticeYou can enter the details for each language via Editor.
- Load 50 posts that have been registered most recently from the list of Hive notices/notices of the relevant game registered to social network services. The [ON]/[OFF] sign shows whether the notice will be exposed or not.
If there’s an image included in the notice, please check and make sure the image path starts with “http”. When dragging and pasting an image registered externally, the image area may be displayed as an empty box on iOS if the website where the image is registered doesn’t support http. “Http” is supported if you’re uploading an image via Editor on Notice.
- No RoutePlease select if there’s no route to move to. When you select the “No Route”, only banner images will be displayed, and users won’t be able to tap or click.

Exposure Condition Settings
You can set up the country, server, exposure method, etc. for banner exposure. Set up the exposure condition and click Save.

- Exposure Order : Set the exposure priority when the exposure periods of the cross large banners overlap. After the first rank banner period is passed, the second rank banner is exposed.
- Concurrent Exposure Order : The cross large banner will be exposed together if the exposrue period overlaps and the exposure priority is the same. You can set the order when they are exposed together. The concurrent exposure order can be entered between 0 to 9999.
- Exposure Country : You can select multiple countries to expose the banner to and you can expose the banner to all countries except for the selected country if you check on “Don’t show on selected country” Box.
- Select an exposure method on Action.
- Always Show: The banner will be shown at all times during the campaign regardless of whether users click or not. If you choose to use the web banner, only “Always Show” method will be available.
- Show only once: The banner will be shown only once during the campaign.
- Don’t show when clicked: The banner won’t be shown during the rest of the campaign period once a user clicks and move to campaign.
- Targeting Setting : The targeting setting is used to expose the campaign to specific users only. You can set up segments in the Segment Menu of Analytics 2 and proceed with targeting campaigns. Please refer to the Hive Analytics 2 Guide for more info on how to use targeting.
- Test Show : Click “Test Show” if you want to expose the banner only on the test device. The banner will only be shown on the Test DID that’s registered for the game. Refer to Test DID Registration to more info.
Reward Settings
This is a menu where you can set up a reward that will be given to users when they install a game via cross promotion. Click on the Reward Condition Tab, enter details and save.
Advertiser Game Reward Settings
If you need to provide rewards for Advertiser Games, you need to check the checkbox, click on the Add Button and enter the game money info. Only the game money registered at the App Settings will be shown.
An Advertiser Game Reward function cannot be used in versions below SDK v1.19.8 or C2S 19.8.

- The reward amount you selected will be displayed on the right when you select the game money type and enter the Bid value. In case of an item, you can only enter natural numbers for the Bid value. If you enter “1”, one item will be given and if you enter “2”, two items will be given as a reward.
Select Publisher Game
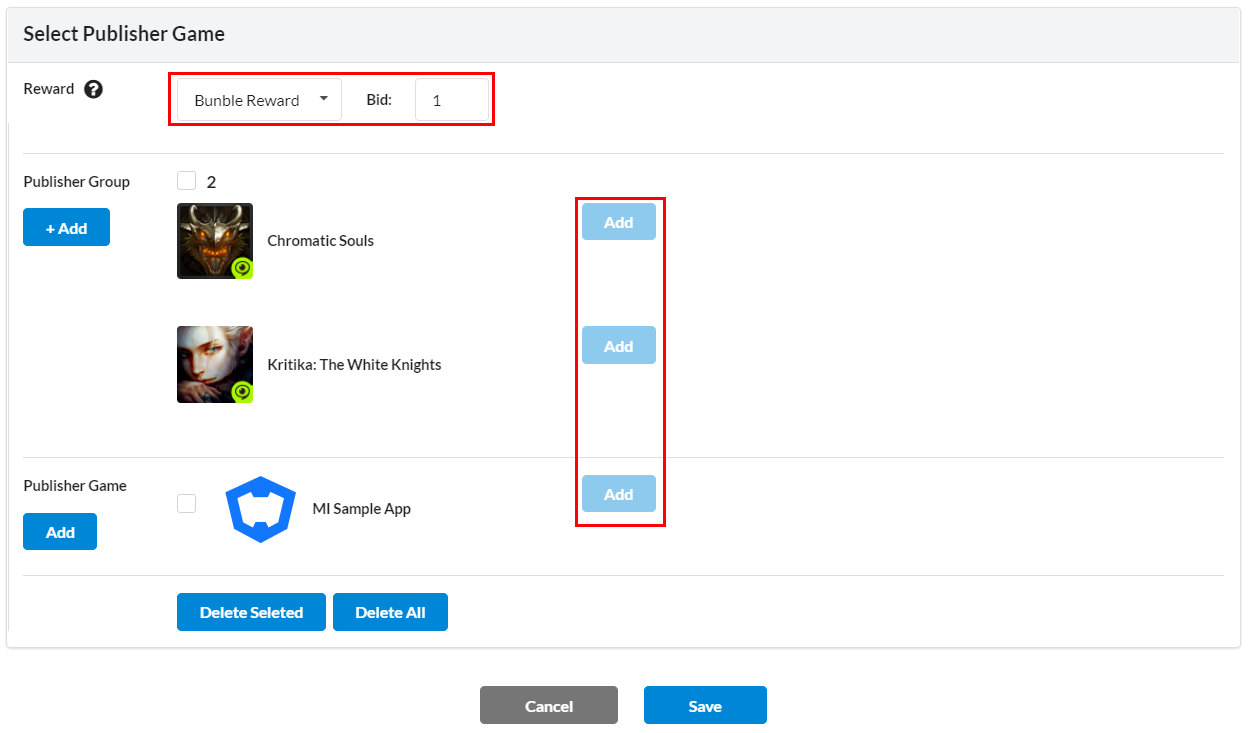
Register publisher group or publisher games individually and set up the reward.
- Bundle Reward: Gives out the default reward of the media game by the amount of Bid value. If you select “Bundle Reward”, “Add” Buttons which allow you to add rewards for the media group will be deactivated
- Individual Reward: You can set different rewards for each game selected. Select the reward individually, click Add Button to set up rewards.

- Publisher Group: Select a group that you registered before in the Publisher Settings to add at once. You can select multiple publisher groups.
- publisher Game: Add games one by one. Bundle/individual rewards are also applied on games added individually
Banner Settings
You can register 2 types of banners (Image/Web). For image banners, you can either register multiple images at once or register them one by one. You must register a banner for the default language that’s registered at the Basic Settings. However, web banners aren’t affected by the default language.
Register Web Banner
You can use Web Banners to expose external web pages, such as web animations created with HTML5 rather than images, directly to the banner area. Please make sure to check Web Banner Usage Process, test in advance, and register when using web banners. Since only one URL can be registered, the web page should support multiple languages.
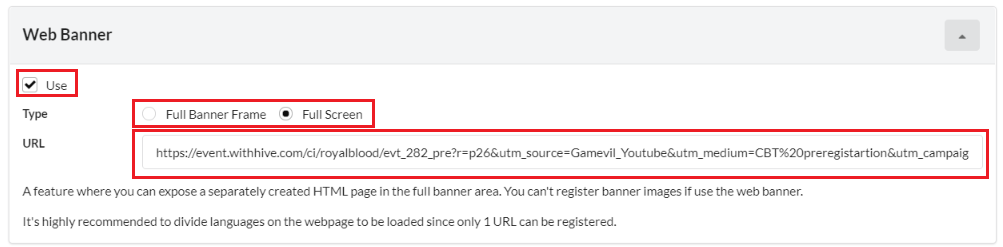
After checking the “Use” box, select the type of banner you want to expose and enter the URL. URLs must be entered in the form “https”. Http addresses may not be exposed properly on iOS.
- Full Banner Frame Example
Displayed on the basic full banner frame. The web page must be created to fit in the full banner frame since scrolls do not work in the browser.
- Full Screen Example
Displays as the same as the custom view without using the banner frame.

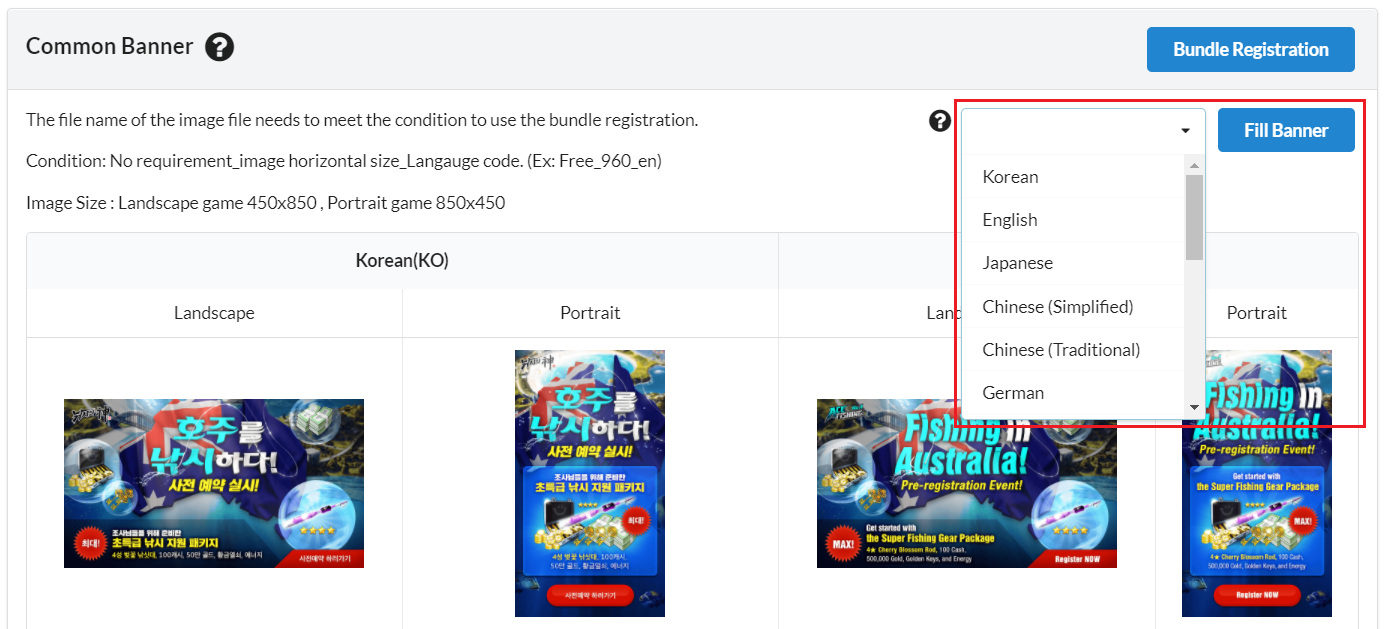
Bundle Registration
Click on Bundle Registration to register multiple banners at once, and you must follow the file naming rules in this case. Also, please note that banners won’t be displayed properly if you use an apostrophe, which is one of the special characters. Image file formats can only contain alphabets, numbers, and special characters (-, _). but considering the slow network environment of overseas users, the size is recommended to be within 300k.
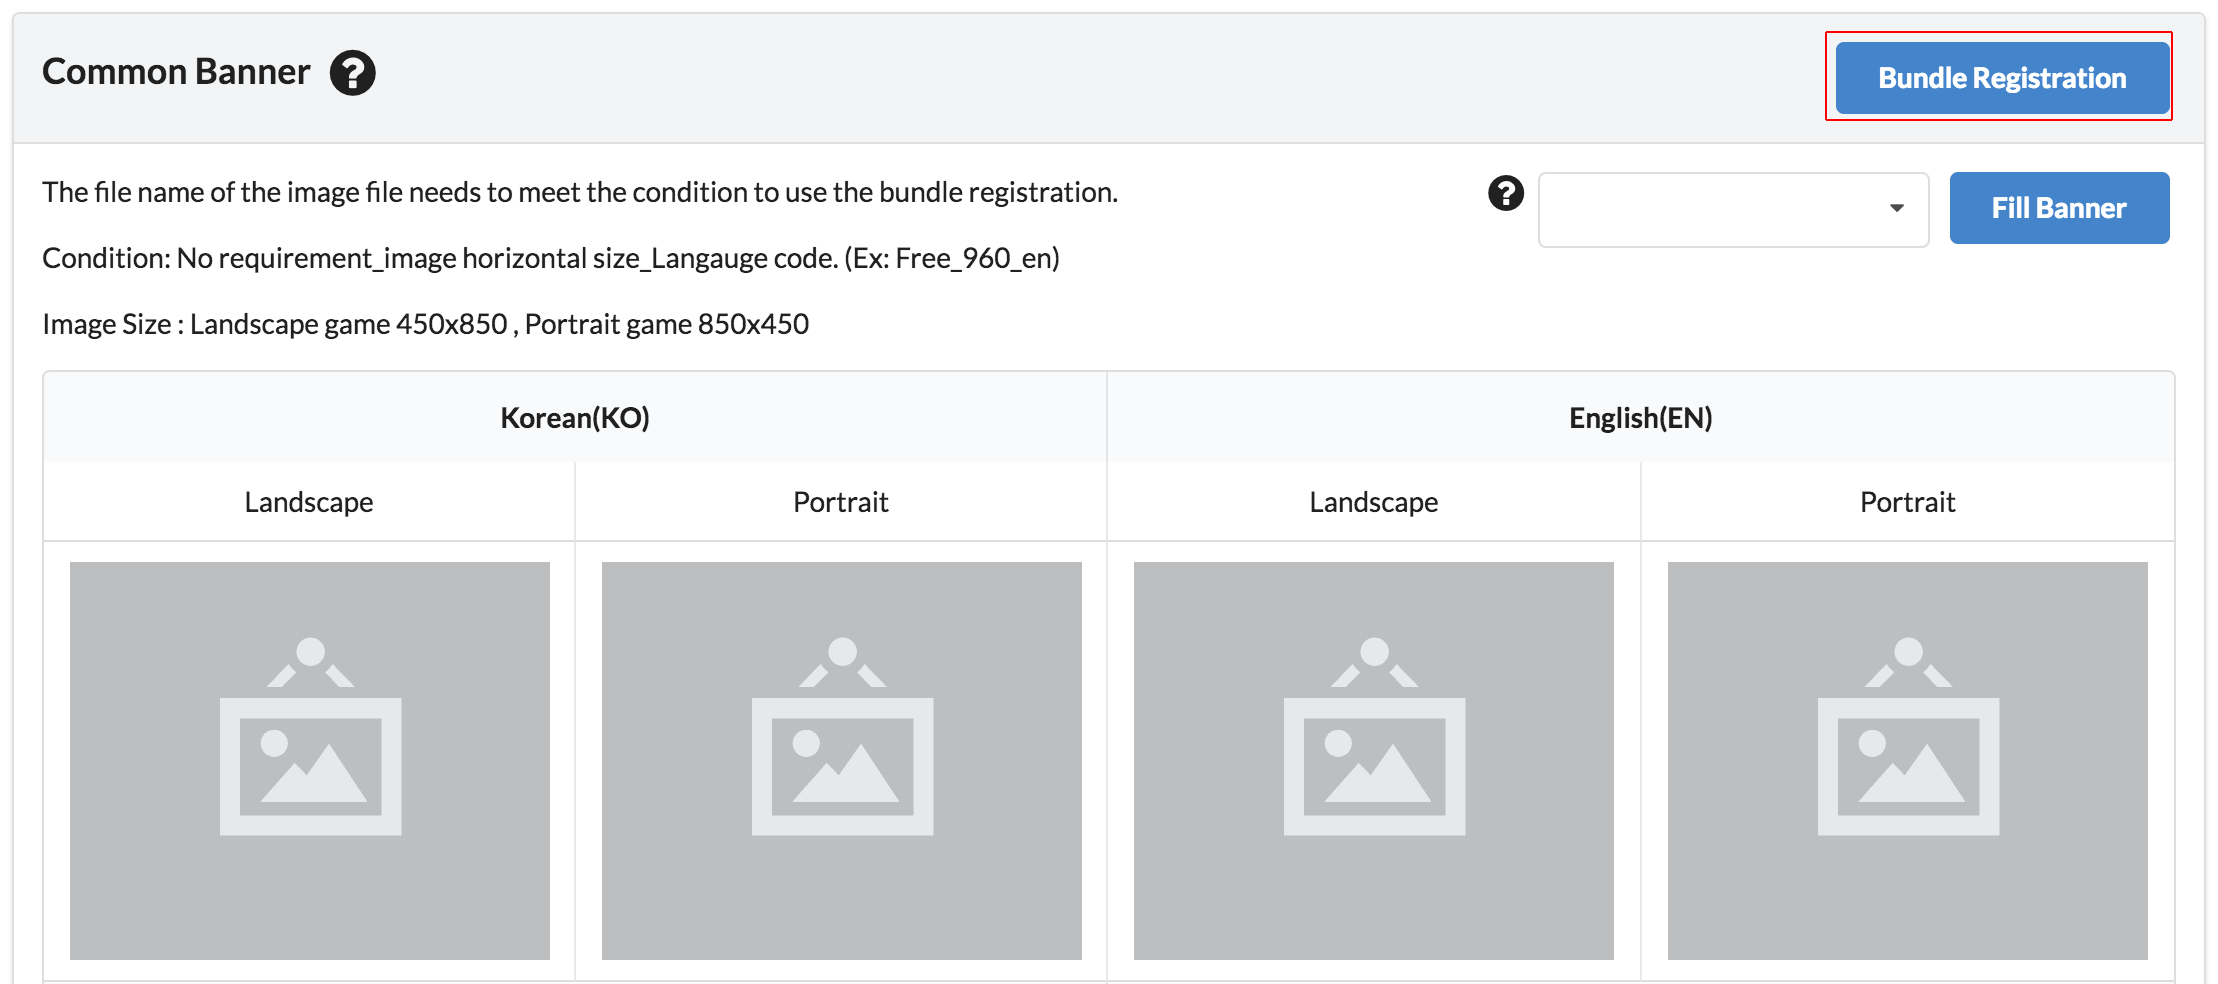
- File naming rule: ~_banner width_language code(ex. AceFishing_640_ko)
- Language Code: You can also check the language codes in English with English displayed in parenthesis.[Language Code List]
language code language code Korean ko English en Janpanese ja Chinese Simplified zh-hans Chinese Traditional zh-hant German de French fr Russian ru Spanish es Poruguese pt Indonesian id Malaysian ms Vietnamese vi Thai th Italian it Turkish tr Arabic ar
Individual Registration
Click on each empty banner area to register. When registering individual banners. there will be no restrictions on naming the files, but the banners won’t be displayed properly if you use an apostrophe. Image file formats can only contain alphabets, numbers, and special characters (-, _). but considering the slow network environment of overseas users, the size is recommended to be within 300k.

Multiple Registration
To check which banners are most effective, you can register three banners in the same campaign. Banners that are registered multiple times in a single campaign are exposed randomly in one slot. For example, if you register A, B, and C banners in one campaign, you will see a random banner among A, B, and C in one banner slot. This feature is available only for full banners and cross banners.
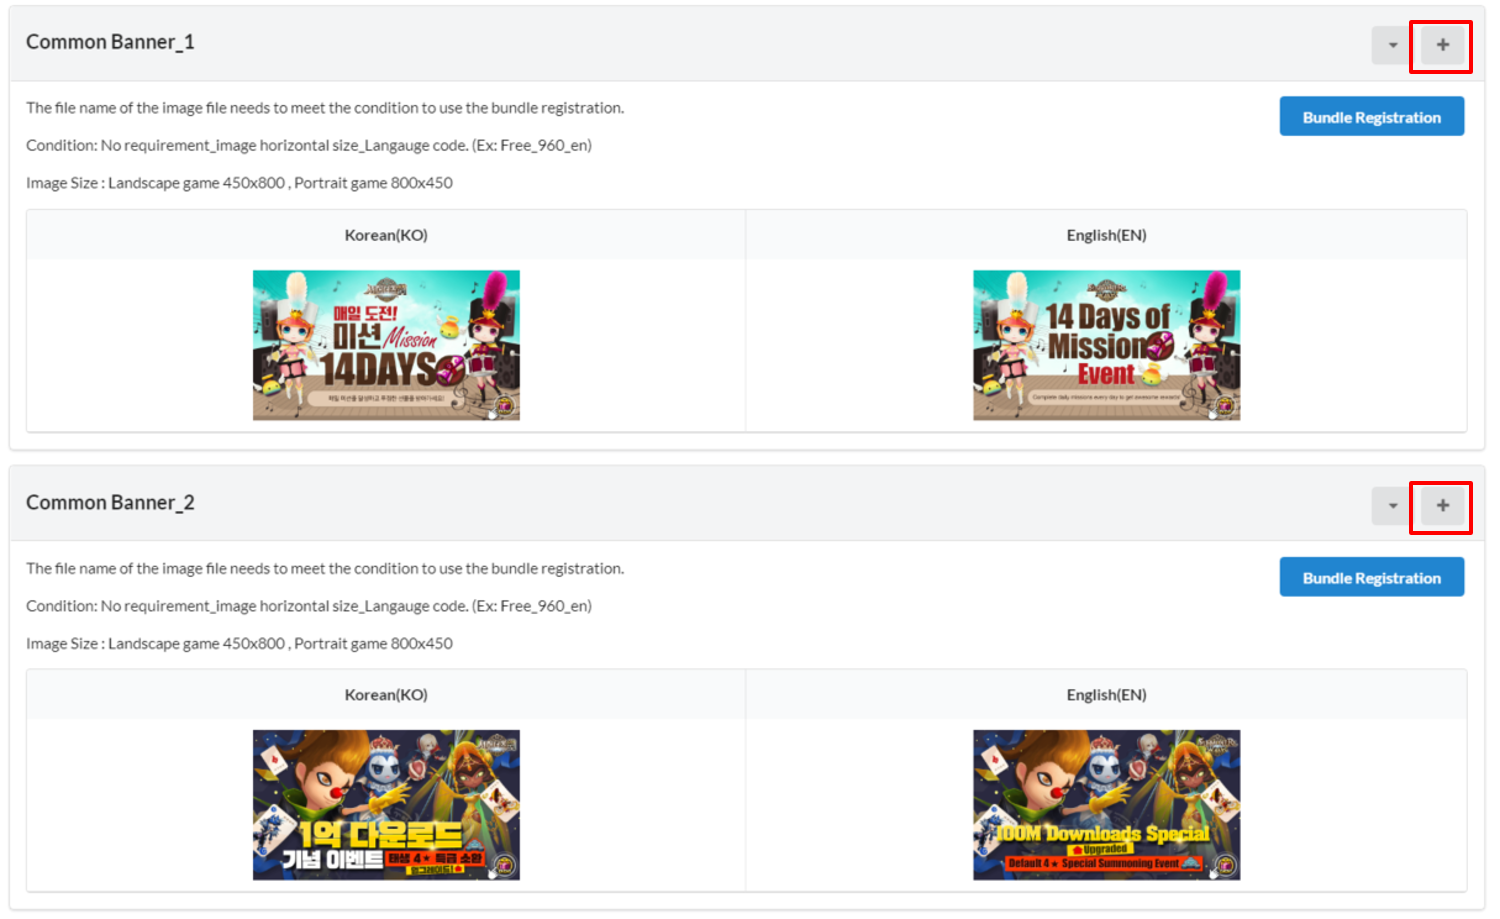
When registering banners, you can tap the + Button on the right to add a banner group and register the banner image of your choice. Common banner 1 and 2 are randomly exposed in the same slot when you register like the above.
Banner Deletion and Replacement
If you click on the uploaded banner image, you can see the original image via a pop-up window. You can either click the Upload Button at the bottom to replace the banner, or click Delete to remove it.

Individual Banner Registration
It’s used when you want to expose a banner, such as “24 Crystals available for Summoners War”, that’s only relevant to a certain game.
-
Click the + button to select a game from on a pop-up. Only games of the registered publisher will appear on the list.
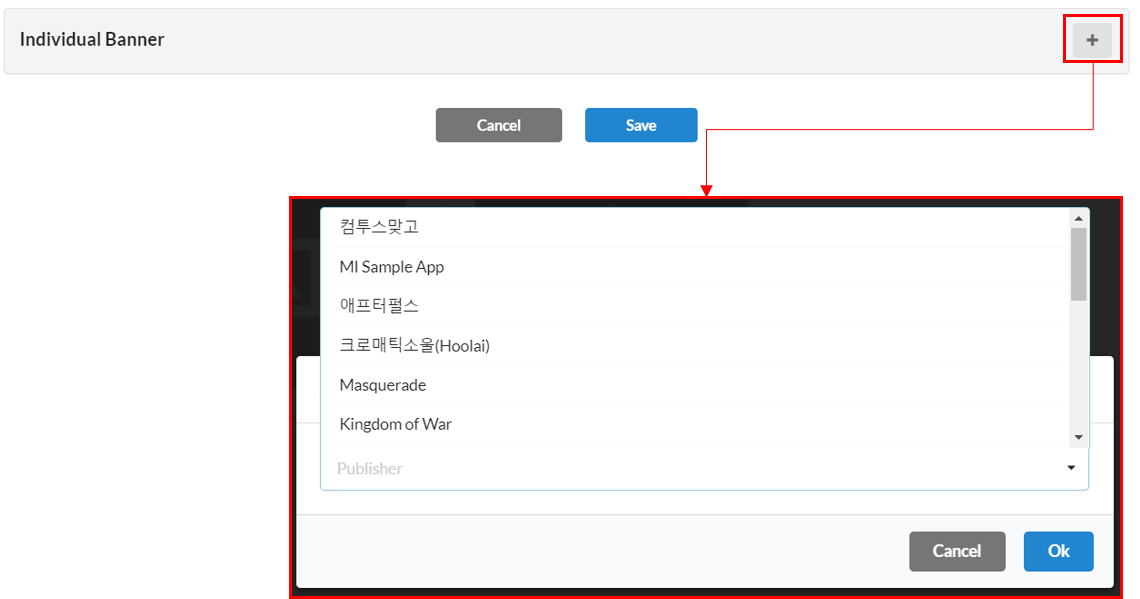
- You can register a banner to added media games. You can register the banner in the same way as the common banner. Click + button to add multiple media games or x button to delete them.
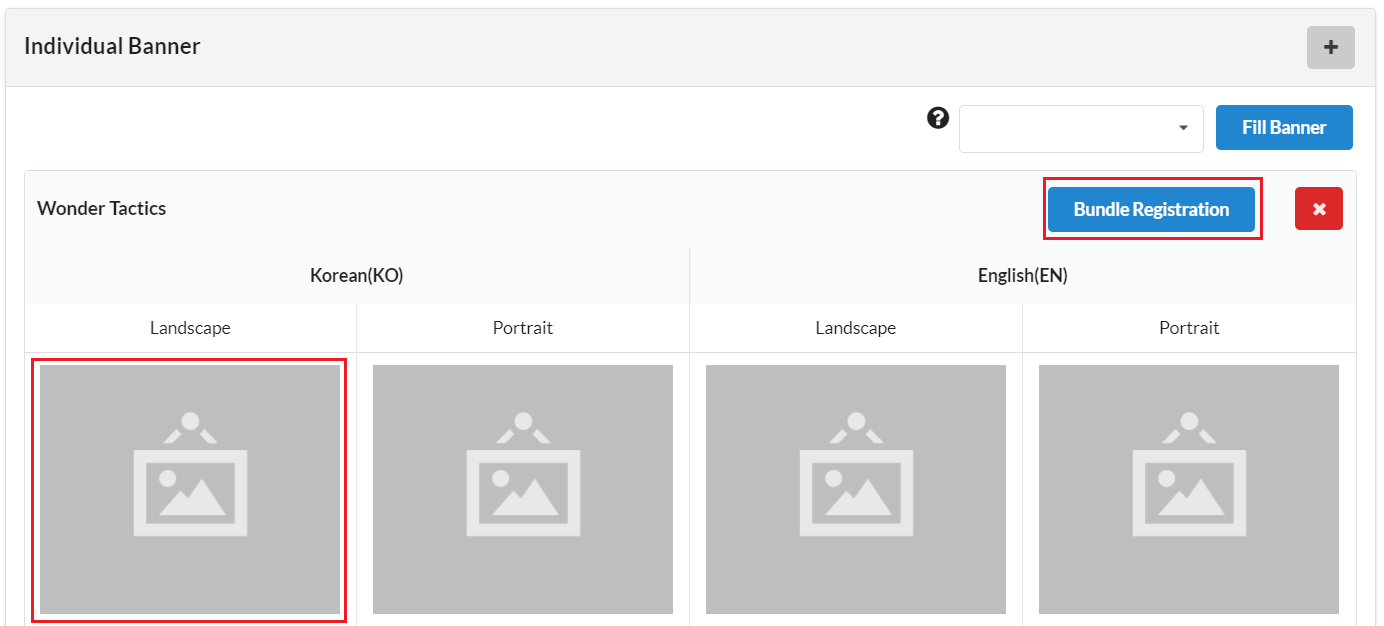
Fill Banner Registration
It’s a function where you can fill an empty area where a banner isn’t registered with a banner of a designated language. The language you selected at the option will automatically fill the empty banner window. Only languages of the registered banner will be exposed at the option.
Registered Campaign Management
You can change the exposure status, order of the banner, and preview the campaign for each language at the campaign list.
Search Registered Campaign via Filter
You can search registered campaigns using the Filter based on department, author, and language. This filtering feature will only be applied to campaigns registered after Oct. 11th, 2016.
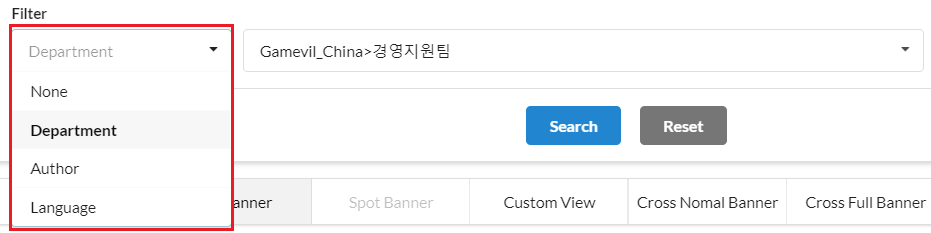
- Department: You can use filter based on the author’s department; English name for the department is currently not supported.
- Author: You can use filter based on the author’s name. You can search by English name if the backoffice language supports English.
- Language: It shows the list of banners registered for selected languages by filtering. For example, if you choose to filter based on Chinese, banners registered for Korean, English, and Japanese won’t be found.
Campaign Modification/Deletion
You can either modify or delete the campaign. You can only delete campaigns that are deactivated.
- Click “Management Name” from the list or preview.

Modify the detailed info and click “Save”. If you want to delete, the campaign must be under “Deactivate” status at Basic Settings > Activation.
How to Use CPA
Please refer to the following steps and cautions to use CPA on cross normal banner, full banner, normal offerwall, special offerwall in Hive promotion.
Checklist when using CPA (Requirement)
-
- Available Hive SDK version
You can use publisher games regardless of the version and you can use advertising games if the SDK version is higher than the following.
Advertising game Hive SDK version: v4.6.0 or above, v1.13.1 or above
- Available Hive SDK version
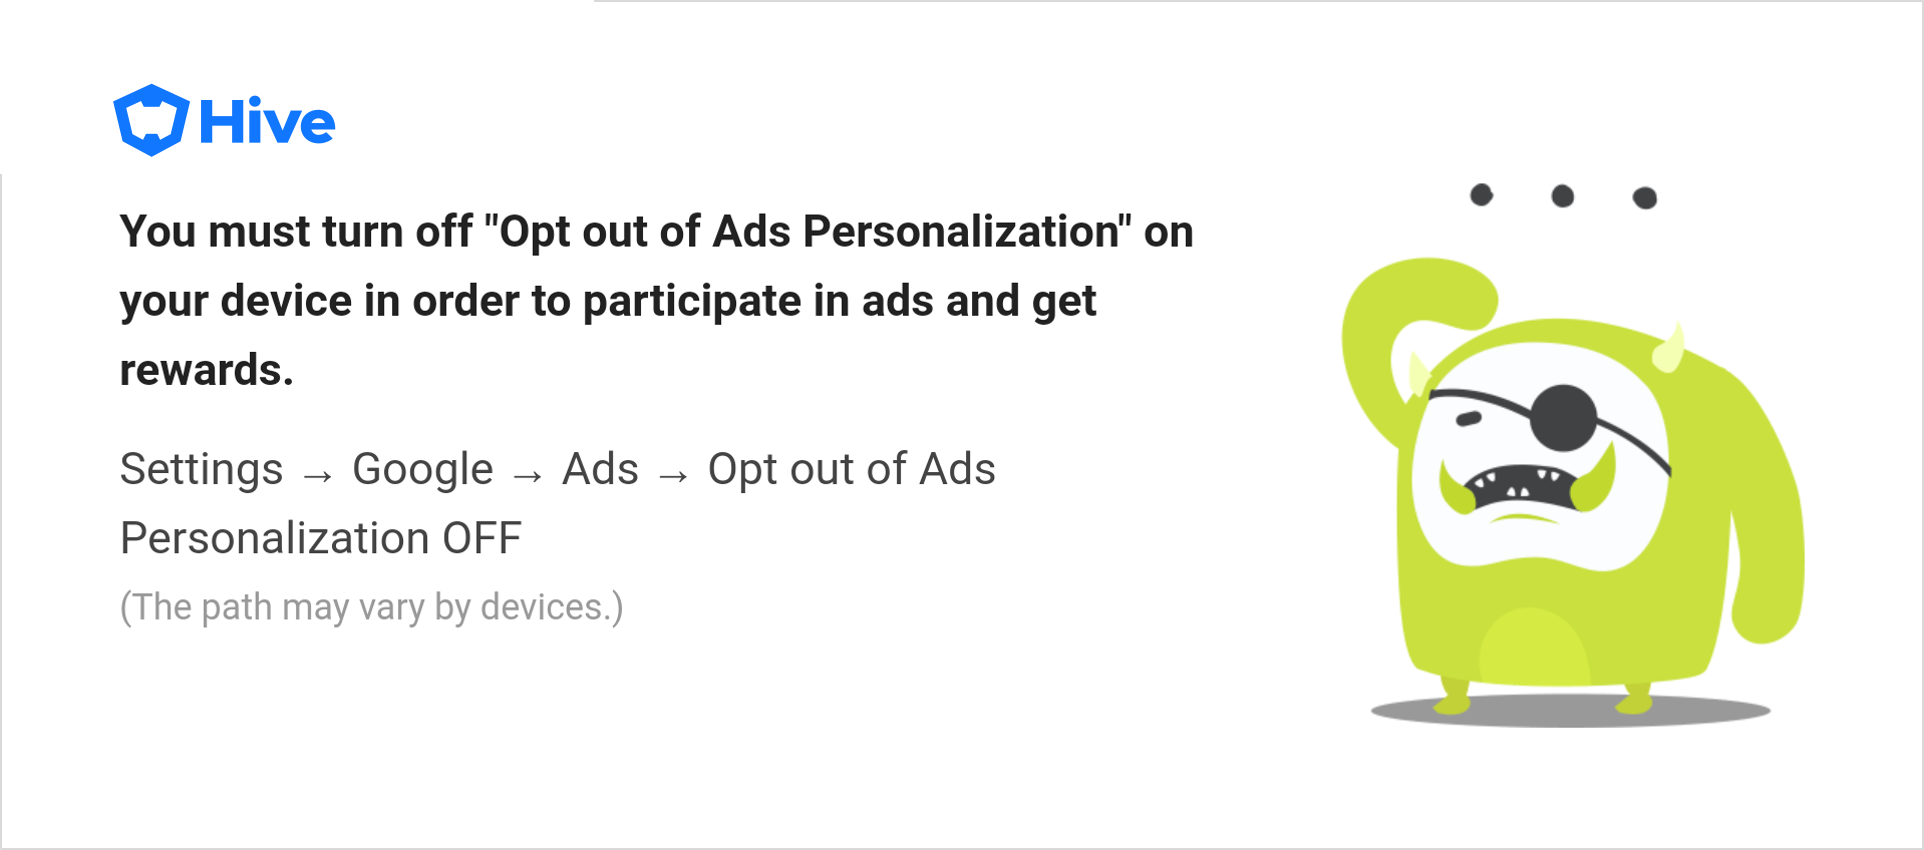
- Both guest players and Hive members can participate in the CPA; however, you need an advertising ID and DID to send out campaign participation rewards to users. If the user declined his or her advertising ID to be collected, click the banner to expose the notice page on collecting the advertising ID.
- Since you track users with deeplinks, rewards won’t be sent properly in the following circumstances. Thus, you need to notify the user regarding such issue.
- Deeplinks should be processed at once up to the user matching process without being stopped in the middle once clicked. For instance, if you click on the campaign in the media game and are proceeded up to terms of service agreement (up to the point where the full banner is exposed for users who’ve already installed the game) after installing and starting the game, you only need to achieve the CPA target within 30 days. Users must proceed until the advertising game’s vid is created. If they quit the game before the advertising game’s vid is created, rewards won’t be given.
- If the game was installed on the device before participating in the CPA

-
- Even if you started the advertising game by clicking on the campaign in the media game, the deeplink will disappear if you’re moved to the market because the game had to be updated. You can’t track the user if this happens, and in this case, you should notify the user that he or she needs to click on the campaign in the media game to start the advertising game again. Notice can be displayed in the banner in texts or as an offerwall campaign description.
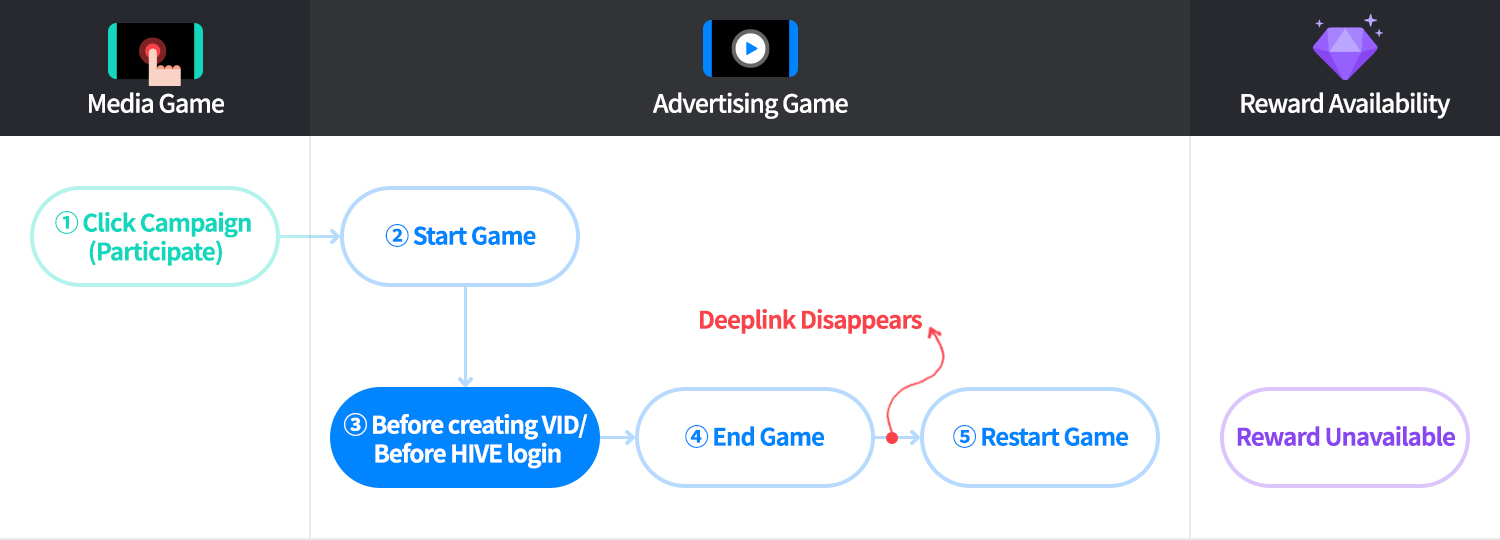
- Users can’t be tracked if the deeplink disappears because they quit the game before agreeing to the terms of service even if they started the advertising game via cross campaign.
-
- Others
- Apple prohibits giving out rewards according to the CPA or from installing other games, so you must proceed the campaign only on Android.
- Rewards will be given only when users clear the quest within 30 days from the point that they click on the campaign.
- You can’t proceed both CPI and CPA campaigns at the same time with only one campaign for the corresponding advertising game.
- If you embed a CPA code in the game, the game server will send logs regardless of whether the campaign started or not. Rewards will be given to users who clicked on the campaign regardless of the point that the CPA code was embedded in the game.
- Users who already achieved the CPA quest before the CPA campaign started can’t collect rewards. During the CPA campaign, rewards are given as long as you click on the campaign within the period even when the CPA quest goal is achieved before clicking on the campaign.
- Rewards are given if you reach the goal again even if the goal has been achieved before the CPA campaign has begun, so you need to take that into account when setting up your campaign goals in cases where the campaign target can be achieved repeatedly (Ex: Clear Stage 1-10)
Steps to Use CPA
- CPA Campaign Design
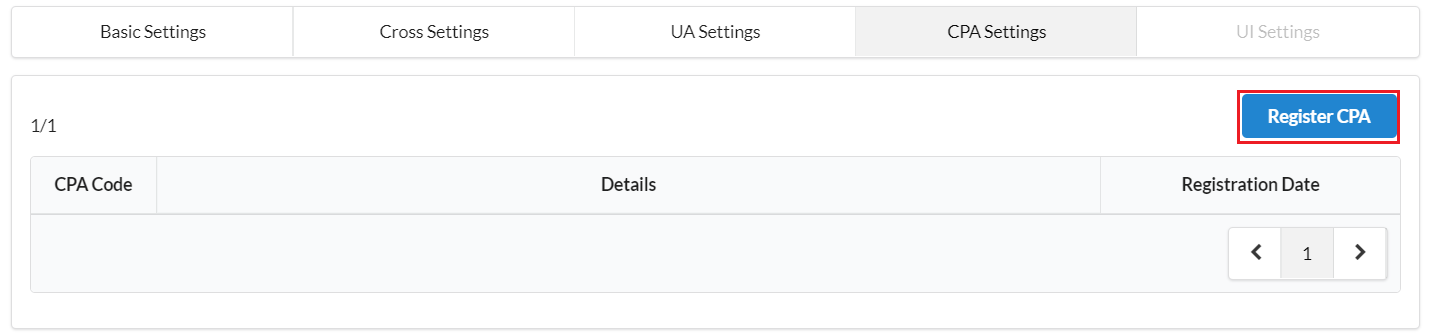
Discuss with the game development team about the quests users should complete and the rewards to be given. (Ex. When a users achieves Level 3) - Go to Hive Promotion Backoffice App Settings Menu -> Click App Registration Button to issue a CPA Code at the CPA Settings Tab.
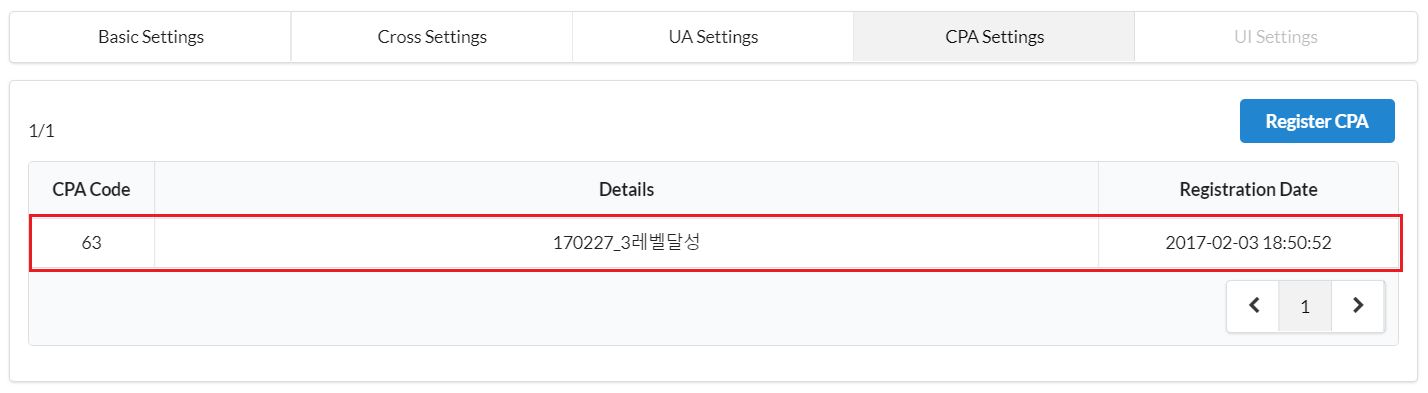
- Pass the CPA Code (Ex. 63) to the development team and the development team should add the code to the game. It can be applied to the game via server patch.
- Go to Hive Promotion Backoffice -> Campaign Settings to register the campaign. Select a CPA that’s registered at Basic Settings -> Cross Type.

- Once the campaign starts, rewards will be given when a user achieves the quest.
Setting Banner Groups
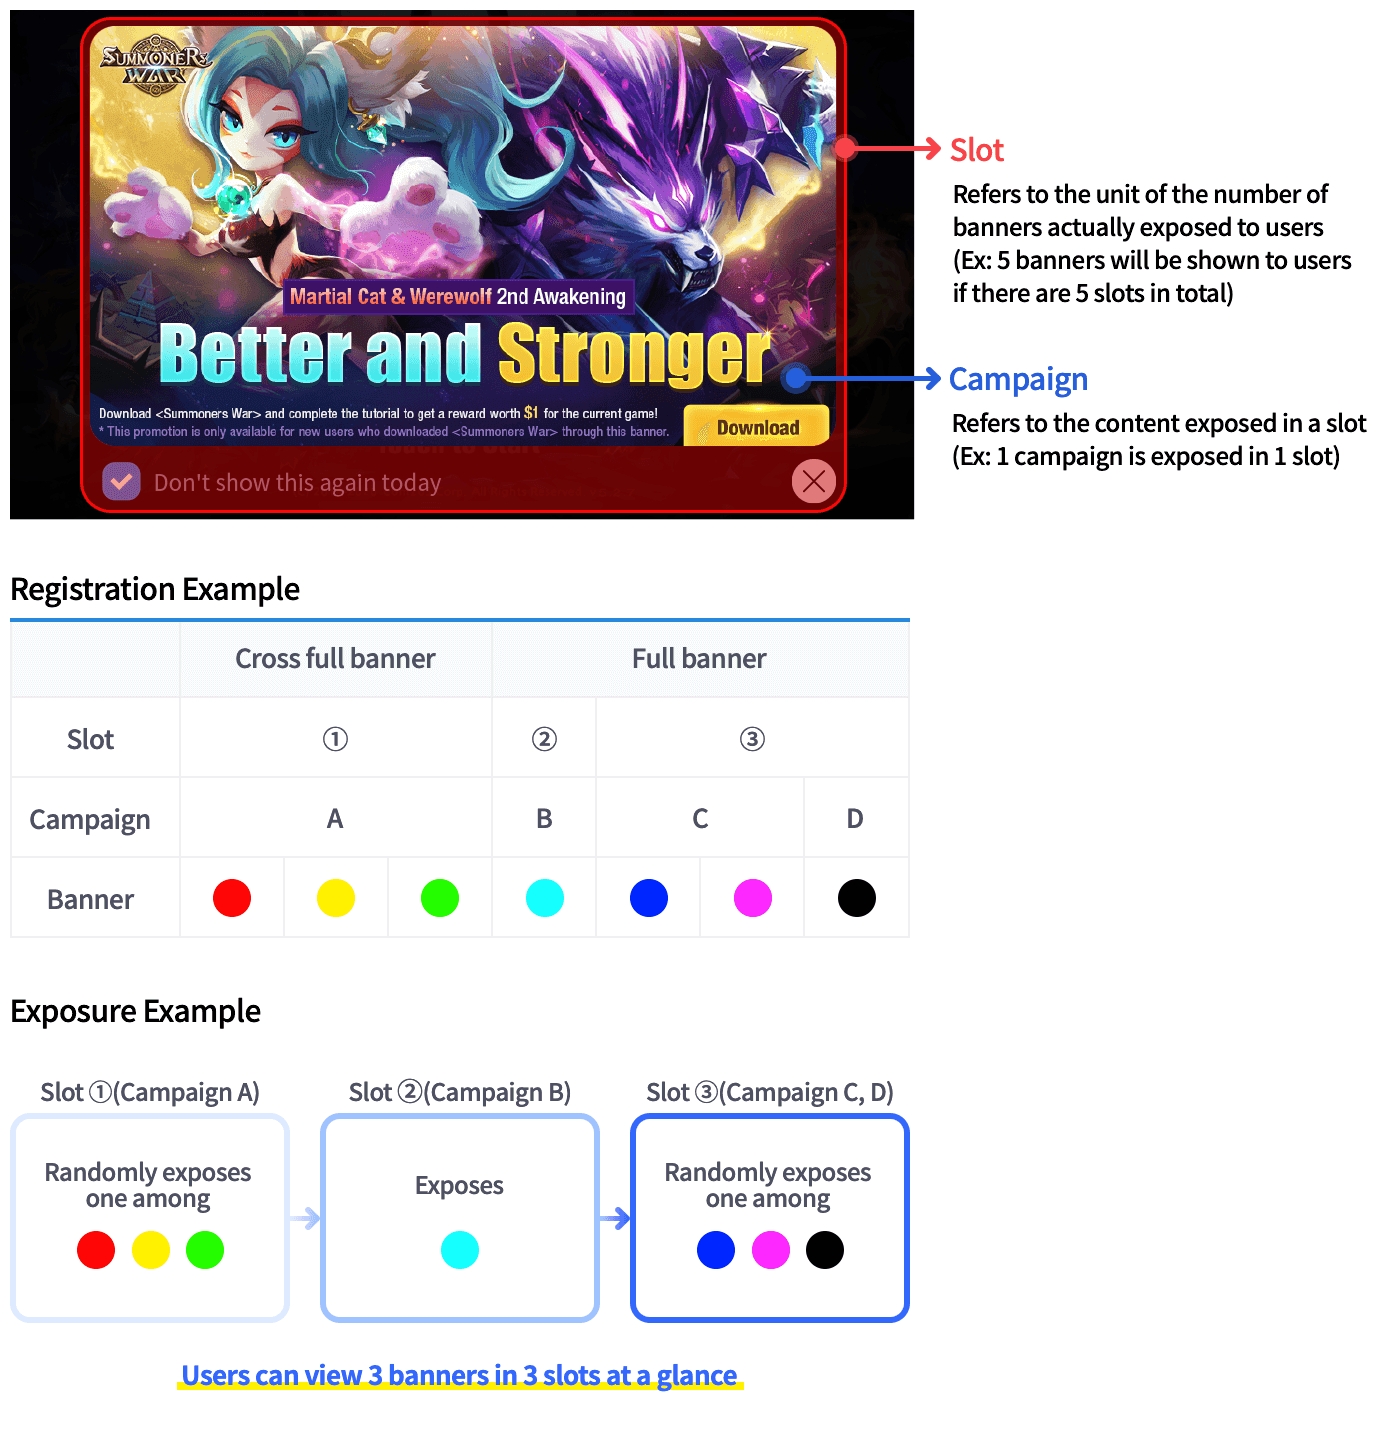
There could be many banners that you want to expose if you have a lot of events, yet the number of banner slots you can expose in the game is limited. In this case, you can group multiple campaigns into one group to expose different banners. Campaigns in the same group are exposed randomly in one slot. For example, if you group campaigns A, B, and C into one group, these three campaigns will be exposed randomly in one banner slot. This feature is available only for full banners and cross banners.
Ad Group Settings
Ad Group Function Introduction
1.Create Ad Group
You must create an ad group first to set up a campaign as an ad group.

The ad group ID can be set to 6 digits. (Minimum input value: 100,000, Maximum input value: 999,999)
If you enter an ad group ID that has not been created previously, a pop-up will be displayed to confirm if you want to create it. Click the Create button.
An ad group is created with the ID you entered.

2.Add Ad Group
After entering the created ad group ID, click the Add Ad Group ID button. You can add ad groups to your campaigns.

3.Ad Group Settings

- Set Exposure Level Within Group : Enter the percentage of exposure weight your campaign has in the group. The number of exposures is determined by the exposure weight entered.
- No. of Campaigns Within Group : Shows the number of campaigns currently set in the group. Up to 5 cross campaigns per group can be set up.
- Group Exposure Period : Sets the exposure period for the group.
- Ad group exposure period precedence over those set on a per-campaign basis
- Ad group exposure duration is based on KST.
- Simultaneous Exposure Order Settings : An ad group or a single cross-campaign may be exposed at the same time if the exposure period overlaps and has the same exposure priority. You can set the order when they are exposed together. Simultaneous exposure order can be entered from 0 to 9,999.
※The ad group’s exposure priority is fixed at 1.
- Disable : You can disable ad group settings. Ad groups will be maintained and only the campaigns will be excluded.